


David Everett shows how you could help your students with redox chemistry
One of the Royal Society of Chemistry’s Developing Expertise in Teaching Chemistry courses covers the subject of redox chemistry and how teachers can understand the difficulties their students have with the topic. This article gives you a flavour of that course and introduces some of the strategies you can use to deal with students’ difficulties and misconceptions.
Most teachers introduce the concept of redox reactions when teaching the reactions of various elements with oxygen. This naturally leads to establishing a reactivity series of metals, which is extended by introducing the metals’ reaction with water and acid and adding transformations that are not easily demonstrated. Hydrogen and carbon find their place in this reactivity series as components of displacement reactions and teachers can use this opportunity to explain the extraction of metals from their ores. Students easily understand these concepts but start having problems when electron transfer is introduced.
Defining difficulties
Historically, the two types of static electricity were assigned the symbols + and –. When scientists discovered current electricity, they agreed on the convention of current flowing from + to –. Students have difficulty equating this with a flow of electrons in a wire in the opposite direction, or the flow of positive ions in a melt or solution in the same direction as the conventional current while negative ions flow in the opposite direction.
By demonstrating the ion movement under the influence of an applied current, teachers can address pupils’ problems. In most curricula, electrolysis is introduced before electrochemical cells and students memorise the idea that the anode is the positive electrode and the cathode the negative one. Confusion then arises when teachers present electrochemical cells – here, the opposite applies. It would be better to label electrodes as ‘positive electrode’ and ‘negative electrode’ and, when we introduce the terms anode and cathode, to define the anode as the electrode at which oxidation takes place and cathode as the electrode at which reduction takes place.
Definitions of oxidation and reduction are confusing to students as there are four ways of defining these (see table).
| Oxidation | Reduction |
|---|---|
| Gain of oxygen | Loss of oxygen |
| Loss of electrons | Gain of electrons |
| Loss of hydrogen | Gain of hydrogen |
| Increase in oxidation number | Decrease in oxidation number |
Teachers regularly establish assignment of oxidation number merely as a series of rules without students fully understanding what they are or how they are to be used. Brian Hobson1 suggests a metacognition exercise: pupils are given cards with information about the oxidation number of elements in various situations and then asked to deduce the rules for assigning the oxidation numbers, thus developing a better understanding of their meaning.
Using oxidation numbers

I taught secondary school students how to balance equations by setting them a challenge, offering them a small cash prize if they could balance the following (unbalanced) equation in less than five minutes:
Cu + HNO3→ Cu(NO3)2 + NO + H2 O
Few succeeded: in 38 years of teaching, only two pupils solved the equation and in one instance I think a rather bright year 11 student knowingly or otherwise used the change in oxidation numbers to get to the bottom of the problem rather than juggling with atom numbers. However, once students recognise that the copper atoms each lose two electrons and the nitrogen gains three electrons from some of the nitric acid to become nitric oxide, they quickly balance the equation as a 3:2 oxidation/reduction ratio between copper and nitrogen.
3Cu + 8HNO3→ 3Cu(NO3)2 + 2NO + 4H2 O
Giving pupils similar challenges and showing them how oxidation numbers and electron transfer can be used to help balance ‘difficult’ equations gives meaning to an otherwise abstract concept.2
Electrode potentials
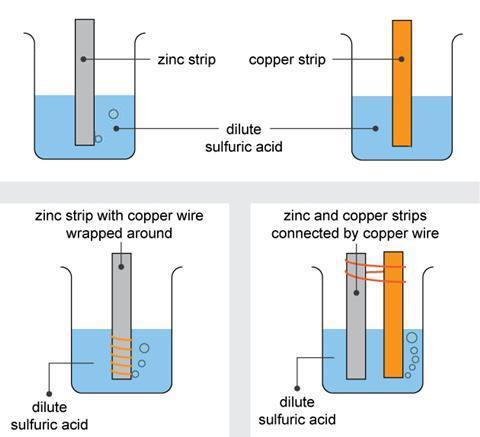
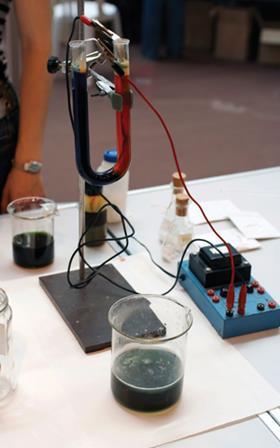
The topic of electrode potentials is also sometimes presented in an abstract way. Students need to see that electrode potentials are a measure of reactivity in redox reactions and so a good place to start is with a simple experiment involving copper, zinc and dilute sulfuric acid (fig 1).3 A copper strip dipped in acid does not react. In contrast, a strip of zinc in the same acid reacts slowly, producing bubbles of hydrogen. Wrapping copper wire around the zinc produces more bubbles, most originating on the copper. Dipping the lower ends of the copper and zinc strips into the acid and connecting the strips across the top by a wire results in visible hydrogen production on the copper, though without dissolving the metal in the process.
Students quickly deduce that a current must flow in the wire between the two metals in the last stage of this experiment. Using this idea, teachers can show that different metals have different abilities to donate electrons in redox reactions.
A classic way to measure electrode potentials is to use a standard hydrogen electrode. However, this cumbersome process is not feasible in most schools. Instead, a simple microscale approach is a good substitute demonstration.
Transition metals and redox reactions
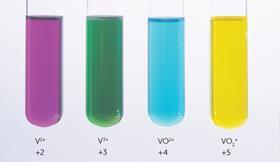
The colours produced by transition metals in different oxidation states are a thing of beauty.4 Vanadium for example – a malleable, dull grey metal – shows vibrant colours when oxidised: from violet (V2+), to green (V3+) and blue (VO2+, +4), and finally yellow in its +5 oxidation state (VO2+).
However, leaving it at pretty colours gives students little insight into how and why oxidation states change. One approach to help students understand how to use electrode potentials to predict reactions is to have a series of cards, each showing a half equation and its corresponding electrode potential. The teacher then gives each pupil two such cards randomly and asks them to predict any possible reactions, to work out the cell potential and to give the overall equation for the reaction. This method requires ‘minds on’ thinking by the student, which will lead to a deeper understanding of how to use electrode potentials than a rote learning approach.
David Everett is an independent science education consultant
More CPD
This topic is covered in one of the Royal Society of Chemistry’s Developing Expertise in Teaching courses. The RSC can support you throughout your teaching career. Find out more about the CPD for teachers courses on offer.
References
- B Hobson, Aust. Sci. Teach. J., 1997, 43, 56
- T Jolliff, Chemistry for the gifted and talented, p61. Royal Society of Chemistry: November 2007
- I am much indebted to my late colleague at Felsted School, David Waddell, for introducing me to this simple exercise.
- T Lister, Classic chemistry demonstrations, p258


3 readers' comments