There are a number of classic contexts for teaching about optical activity. There can't be many chemistry classrooms around that haven't heard tell of the rise and fall (and rise) of thalidomide, but of course there are chiral molecules all around us which can also provide simple, effective demonstrations. A classic example is the enantiomers of carvone which give rise to the smells of spearmint and caraway. In sugars however, we find an even more familiar example whose optical properties can be revealed by the use of polarisers.
Kit
- Polarising filters (at least one should be a minimum of 15 cm wide for best effect).
- Four 100 cm3 beakers
- Sucrose (table sugar)
- D-glucose
- Fructose (available from supermarket sugar sections as 'fruit sugar')
- Lemon juice
- Heating apparatus
- A backing light consisting of an overhead projector or light box.
Procedure
Preparation
Carefully turn the backing light on its side, ensuring that any cooling fans remain clear. Cover as much of the light with your polarising filter as is possible. Obscure the rest of the light's surface. This is more for the comfort of the audience and will also avoid you being dazzled. If the rest of the surface is not obscured and the base of the light includes a Fresnel lens, it will be easy for you to stray into the intense light at the focal point during the demonstration which should be avoided.
Prepare each beaker by dissolving 40 cm3 of sugar in 20 cm3 of warm water (this should be done well in advance of the demonstration as it can take some time). For the demonstration you will need two beakers of sucrose and one each of the other two sugars.
In front of the audience
Dim the lights to improve the contrast between the backing light and the surroundings. The audience should sit so they can see through two polarisers. They can either hold small ones in their hands or you can have a larger one in front of the beakers that you can rotate. Ensure that everyone can see that the combination of the two polarisers blocks out the backing light and explain how this works.
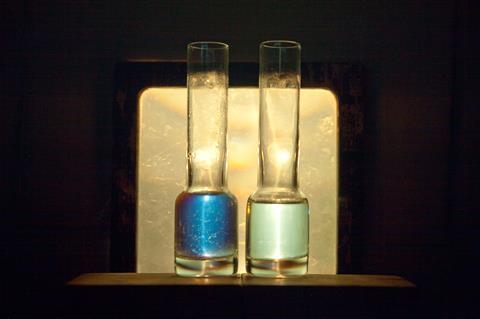
Show them the fructose solution and point out that (obviously) it isn't glowing. As you place it in front of the light box (and the first filter), the solution will appear to 'light up' as it rotates the polarised light passing through the first filter, into the correct orientation to pass through the second filter.
Now add the two sucrose solutions which will also appear to be 'glowing' and ask the audience to begin rotating the second filter. The effect will be that the sucrose solutions and the fructose solution appear to chase each other through the colour changes.
This occurs because the component colours of white light experience different rotations according to their individual wavelengths (and according to the differing specific rotations of the solutions), effectively creating a 'rainbow of rotations'. As the second filter is rotated, the viewer will see each of the components of the rainbow in turn.
At this point, remove one of the sucrose samples, add approx 1 cm3 of lemon juice and gently boil it for 5 minutes. This provides a good break in which to explain to the students what they were seeing.
When the sucrose has finished boiling, return it to the backing light between the other sucrose and the fructose. When the second polariser is rotated this time, the colour changes associated with the boiled sucrose will come between the colour changes of the other two. A wave of blues, purples and yellows will move across the backing light from one side to the other.
Demonstration points
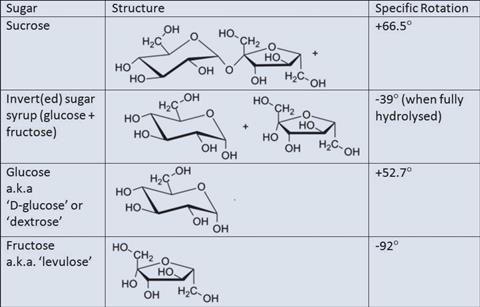
There are a number of points to demonstrate here. Firstly that sucrose and fructose both rotate plane polarised light because they are chiral. Sucrose and glucose are both dextrorotatory, hence the latter also being known as 'dextrose'. Fructose (lesser known as 'levulose') is levorotatory (and more strongly so than glucose is dextrorotatory although this will not be particularly obvious in this qualitative demonstration).
Following hydrolysis, the sucrose will begin to form invert sugar syrup - so named because the resulting mixture of fructose and glucose is now levorotatory instead of dextrorotatory. In the production of invert syrup, the progress of the reaction is actually followed by polarimetry. Students can be invited to compare the specific rotation of invert syrup with the figures for its components.
For those that have to teach it, the curriculum link here with the lack of optical activity of racemates is obvious. The difference in the other properties of the sugars are worthy of further investigation by keener students (eg how can we explain why invert syrup is worth making?)
After discussing this, you can replace the partially inverted syrup you made with glucose to show that it behaves in a similar fashion. It's not recommended to do this before the discussion in case students think that the hydrolysis of sucrose merely produces glucose.
Take care to point out the optical activity is not the result of any specific chiral centre but a property of the molecule as a whole. This is clearly seen by the fact that sucrose and invert syrup rotate so dramatically differently despite being so similar in terms of their internal framework.
Alternative methods
This experiment scales well assuming you have a large enough filter to cover three larger vessels. Removing the 'chemistry lab context' by performing the experiment in shot glasses or similar vessels improves the visual appeal as does ascertaining the correct orientation in which to hold the polarisers such that they are already at 90 degrees to the one on the light source when it's turned on.
Safety
The main hazard associated with this experiment comes from looking directly into a bright light source, especially at the focal point of any lens that is on it.




No comments yet