


-
Download this
Technician notes as MS Word or pdf to help set up and do this experiment.
View and download more Exhibition chemistry demonstrations
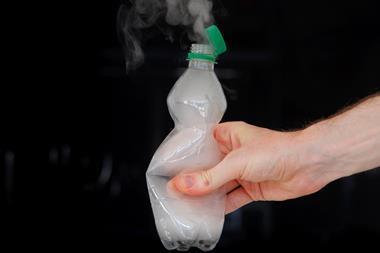
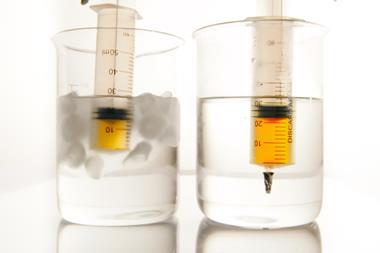
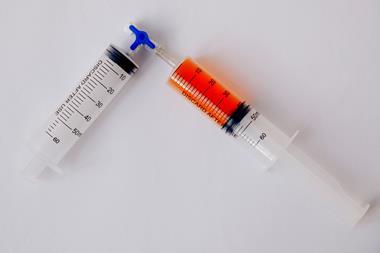
Look at any diagram representing the particle arrangement in solids, liquids and gases and you are likely to see an illustration which shows a five-fold reduction in density upon evaporation of a liquid. This makes sense because we need to show that the nature of the particles does not change when we change the state of matter. But such representations underestimate the true difference in volumes of liquids and gases, so I’m always looking for ways to reinforce this.
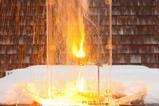
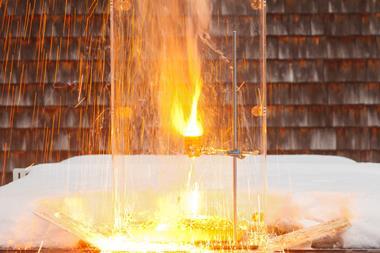
Fountain demonstrations are an excellent option, but lower year groups may be better catered for with a simpler demonstration focusing just on the volume change instead of also introducing chemical changes. This is where the balloon in the flask demonstration can help. Traditionally this is done by boiling a small amount of water in a flask before leaving it to cool with a balloon over the top. But George Gross had the idea of using the solubility of ammonia to help speed up the volume change, which can make for a more impressive result.
Get started
Watch a demonstration of this experiment and download the technician notes from the Education in Chemistry website: rsc.li/3q94n1S
Look at any diagram representing the particle arrangement in solids, liquids and gases and you are likely to see an illustration which shows a five-fold reduction in density upon evaporation of a liquid. This makes sense because we need to show that the nature of the particles does not change when we change the state of matter. But such representations underestimate the true difference in volumes of liquids and gases, so I’m always looking for ways to reinforce this.
Fountain demonstrations are an excellent option, but lower year groups may be better catered for with a simpler demonstration focusing just on the volume change instead of also introducing chemical changes. This is where the balloon in the flask demonstration can help. Traditionally this is done by boiling a small amount of water in a flask before leaving it to cool with a balloon over the top. But George Gross had the idea of using the solubility of ammonia to help speed up the volume change, which can make for a more impressive result.
Kit
- 100–500 cm3 borosilicate conical or round-bottomed flask, dried and with a fitted bung
- Party balloons (large enough to stretch over the neck of the flask)
- Clamp stand and clamp
- Boiling tube and long delivery tube
- Anti-bumping granules
- 10 cm3 concentrated 880 ammonia solution
- A few cm3 of water (to go into the balloon)
- 250 cm3 beaker for hot water
- Kettle
- Splash-proof goggles
Preparation
Select a borosilicate conical or round-bottomed flask with a neck thin enough to allow you to stretch the neck of your balloon over the opening. Pre-stretching the neck of the balloon can help you attach it later when the flask is full of ammonia. Dry the flask thoroughly by placing it in a warm oven overnight or by rinsing with propanone and allowing it to evaporate.
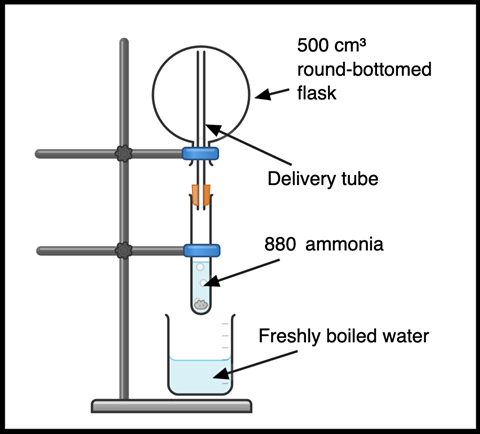
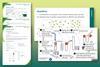
Fill the flask with ammonia gas by evaporating concentrated 880 ammonia. Work in a fume cupboard and wear splash-proof goggles. Take extra care when opening the ammonia as gas pressure can build. Avoiding skin contact, transfer 10 cm³ of the concentrated ammonia to a boiling tube with a few anti-bumping granules. Invert and clamp the collection flask. Ammonia is less dense than air, so will collect in the flask if inverted above. Clamp the boiling tube beneath the inverted flask inside the fume cupboard and use a long delivery tube to deliver the evolved gases to the top of the flask (Figure 1). A drying tube is not necessary.
Ammonia boils off at approximately 55°C, so a 250 cm³ beaker of freshly boiled water can be raised and lowered by hand around the boiling tube to gently heat and fill the flask above with gas. Updated CLEAPSS guidance (RB005) suggests that moist indicator paper held at the opening of the neck does not produce an effective test for the flask being filled. Instead, gently boil the ammonia for a few minutes to ensure the flask is completely full – CLEAPSS recommends five minutes for a 500 cm3 flask.
Stopper the flask and store inverted until ready for use.
Attach the balloon shortly before the demonstration, as this can be fiddly. Place a few cm3 of water into the balloon. 10 cm3 is enough to dissolve litres of ammonia at room temperature so a few cm3 will be sufficient. Use a syringe with a small section of tubing to deliver the water to the bottom of the balloon while keeping the neck dry. Then gently close the neck with a Hoffman clip to avoid accidentally squeezing out any water while stretching over the flask. Keeping the flask inverted in the fume cupboard, remove the bung and stretch the balloon neck over the opening. It is useful to have a person to help you with this task.
Preparation
Select a borosilicate conical or round-bottomed flask with a neck thin enough to allow you to stretch the neck of your balloon over the opening. Pre-stretching the neck of the balloon can help you attach it later when the flask is full of ammonia. Dry the flask thoroughly by placing it in a warm oven overnight or by rinsing with propanone and allowing it to evaporate.
Fill the flask with ammonia gas. This can be evaporated from concentrated ’880’ ammonia. Work in a fume cupboard and wear splash-proof goggles. Take extra care when opening the ammonia as gas pressure can build. Avoiding skin contact, transfer 10 cm³ of the concentrated ammonia to a boiling tube with a few anti-bumping granules. Invert and clamp the collection flask. Ammonia is less dense than air, so will collect in the flask if inverted above. Clamp the boiling tube beneath the inverted flask inside the fume cupboard and use a long delivery tube to deliver the evolved gases to the top of the flask (Figure 1). A drying tube is not necessary.
Ammonia boils off at approximately 55°C, so a 250 cm³ beaker of freshly boiled water can be raised and lowered by hand around the boiling tube to gently heat and fill the flask above with gas. Updated CLEAPSS guidance (RB005, bit.ly/3Kks0LB) suggests that moist indicator paper held at the opening of the neck does not produce an effective test for the flask being filled. Instead, gently boil the ammonia for a few minutes to ensure the flask is completely full – CLEAPSS recommends five minutes for a 500 cm3 flask.
Stopper the flask and store inverted until ready for use.
Attach the balloon shortly before the demonstration, as this can be fiddly. Place a few cm3 of water into the balloon. 10 cm3 is enough to dissolve litres of ammonia at room temperature so the volume is not important. Use a syringe with a small section of tubing to deliver the water to the bottom of the balloon while keeping the neck dry. Then gently close the neck with a Hoffman clip to avoid accidentally squeezing out any water while stretching over the flask. Keeping the flask inverted in the fume cupboard, remove the bung and stretch the balloon neck over the opening. It is useful to have a person to help you with this task.
Safety
- Wear eye protection.
- Work in a fume hood or behind safety screens when performing the demonstration.
- Avoid contact with skin when working with ammonia.
- CLEAPSS members should consult RB005: preparation of ammonia. Ammonia is corrosive and toxic if inhaled. Wear splash-proof goggles and gloves and work in an efficiently working fume cupboard – do not inhale the vapours. Protect the face when opening bottles of concentrated ammonia or transferring from them as pressure may have built up.
- Take care, the flask or vessel will be hot after mixing the ammonia and water.
- Pour the used ammonia solution down the sink in a fume cupboard diluted with plenty of water.
In front of the class
Wear eye protection. Either work in a fume cupboard with the sash lowered or protect the audience and the demonstrator with two safety screens.
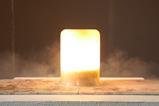
Hold the flask the correct way up and remove the clip. Nothing will happen until you raise the end of the balloon to empty the water into the flask, at which point the balloon will be pushed into the flask with a satisfying pop.
Tip
- In George Gross’ version, he attaches the balloon in front of the audience. When I tried to do this, it took me too long, the vapours escaped and the demonstration failed. This is why I recommend getting the balloon over the flask while inverted.
Teaching goal
The goal here is to display the phenomenal difference in the volume occupied by substances in gaseous and liquid (or aqueous) states. As the ammonia dissolves into the water, the internal vapour pressure drops rapidly. Were the balloon not flexible, the external air pressure could be as much as 100 times greater than inside the flask (and is the reason for using borosilicate glass) so it is little wonder the balloon is thrust into the flask with such enthusiasm.
Not so evident is the astonishing solubility of ammonia which is 1900 times greater than that of carbon dioxide and 45,000 times greater than that of oxygen. The reaction is exothermic, due to the formation of more hydrogen bonds between ammonia and water than were disrupted by ammonia’s solvation. However, the decrease in entropy from the reduction in volume is not compensated for by the mixing and exotherm. Consequently, there is a rapid decrease in solubility as the temperature rises. Use this as an example to highlight the relevance of gas solubility to students’ lives. As global temperatures rise, this rapid decrease in the solubility of gases in water has alarming ramifications, not only for the amount of carbon dioxide the oceans can hold but the levels of oxygen too.
More resources
If you’re looking for more demonstrations related to the topics in this article, see these resources:
- Shed light on the solubility of gases and the properties and reactions of ammonia using the luminol fountain demonstration.
- Introduce the concept of alkalis and the pH scale to 11–14 learners using the ammonia fountain demonstration.
- Prove the Avogadro principle to 14–16 learners with the hydrogenation of an alkene using this practical and download the technician notes.
Declan Fleming
Downloads
Balloon in a bottle technician notes
Editable handout | Word, Size 0.52 mbBalloon in a bottle technician notes
Handout | PDF, Size 0.22 mb
- Prepare(2)
 Resource
States of matter | Beyond appearances
Deconstruct misconceptions learners may have around states of matter and understand what this means for your teaching
 Course
Particle and atomic models | Self-led course
Strengthen your subject knowledge and discover teaching strategies to develop your learners’ understanding of the particle model and atomic structure
- Deliver(6)
 Poster
Everything you need to teach states of matter
Particle diagrams, changes of state and their properties – perfect for your 11–14 year-old learners
 Resource
States of matter | Developing understanding | 11–14 years
Encourage learners to deepen their understanding of states of matter and how they are represented at different conceptual levels of thinking
 Resource
States of matter | Johnstone’s triangle worksheets | 11–14 years
Use this worksheet to develop learners’ understanding of states of matter, including a teacher demonstration
 Resource
States of matter | Structure strip | 11–14 years
Support learners to recall and write about the properties of solids, liquids and gases
currently reading
 Exhibition chemistry
Demonstrate changes of state using volume differences
Use this demonstration to reinforce the differences between states of matter with your 11–14 learners
 Demonstration
The sublimation of air freshener | 11–14 years
Use this experiment to demonstrate sublimation, showing how solid air freshener changes directly from a solid to a gas. Includes kit list and safety instructions.
- Literacy(3)
 Resource
Particle model | Key terms support | 11–14
Language support pack for particle model, with key terms list, accessible glossary, Frayer models and unscrambling definitions
 Resource
Particle model | Reading comprehension | 11–14 years
Use this reading comprehension based on a real science research news story to develop literacy skills and confidence
 Resource
Particle model | Structured talk | 11–14 years
In this speaking and listening task learners work together to build word bridges, building and sharing understanding by applying the particle model
- Enrich(8)
 Class experiment
Viscosity | Classic chemistry experiments | 11–14 years
Compare the viscosity of thick and thin liquids by measuring the time is takes for a bubble to move through them
 Games and puzzles
States of matter 1 | Gridlocks puzzle | 11–14 years
Reinforce your students’ understanding of states of matter using these sudoku-style puzzles, with printable worksheets and answers
 Games and puzzles
States of matter 2 | Gridlocks puzzle | 11–14 years
Reinforce your students’ understanding of states of matter using these sudoku-style puzzles, with printable worksheets and answers
 Class experiment
Particles in motion? | Classic chemistry experiments | 11–14 years
Explore the movement of gas particles by reacting calcium carbonate with hydrochloric acid and testing with limewater
 Job profile
Scientist, food and pharmaceuticals
Taryn uses scientific instruments to test our food and medicines and make sure they are safe

 Exhibition chemistry
Superheated steam
Ready to start a fire with water? Use this demo to teach students about enthalpy and properties of water
 Job profile
Laboratory analyst and higher degree apprentice, water
Joseph helps ensure there is clean, safe, water for 15 million people in the UK whilst studying towards his chemistry degree


1 Reader's comment