The 'methanol whoosh bottle' has gone from a little known demonstration to one of the most loved by chemistry teachers in the last 10 years, due in part to its simplicity and the crowd-pleasing flame and whoosh that gives it its name.
Exhibition Chemistry described this demonstration back in September 2009. This time we look at a variation that shows how the energy from this reaction can be put to good use.
Kit
- 1 or 1.5 l PET carbonated drinks bottle, thoroughly dried. Look for PET on the bottle or the recycling symbol with a '1' inside.
- A section of guttering (approximately 1 m)
- Ethanol (flammable)
- Splint attached to the end of a metre rule
- 50 cm3 beaker Glass rod or bradawl
Preparation
Make a ramp angled at approximately 20o by propping the end on a number of textbooks. The area in front of the ramp should be clear for at least 20 m (you may need to perform this experiment outside).
Ensure the bottle is completely dry. Bottles should not be used after a demonstration without having been left inverted to cool and dry for at least 24 hours. Make a hole (approximately 5 mm diameter) in the base of the bottle. This can be done with a bradawl or with a glass rod, the end of which has been heated in a Bunsen.
In front of the audience
Position the audience at least 3 m behind the bottom of the ramp. Wearing gloves, cover the hole with your finger and pour approximately 6 cm3 of ethanol into the bottle. Replace the lid and shake the bottle thoroughly for 10 seconds, to facilitate vaporisation. Pour out all remaining liquid into a beaker and replace the lid. Dispose of the excess alcohol (see below).
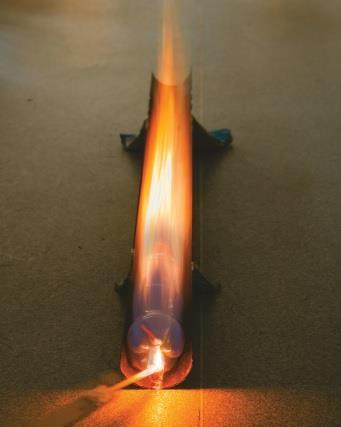
Remove your finger from the hole in the base. Place the bottle on the ramp with the base facing the bottom of the ramp. Light the rocket by holding a lit splint attached to a metre rule next to the hole in the bottle. The rocket will fly around 15 m through the air with a high pitched hiss.
Disposal
Any spare ethanol can disposed of down the sink, followed by plenty of water, before firing the rocket.
Teaching goal
Teaching goals will vary with the audience. At its simplest level, this demonstration can show younger students how chemical reactions can release energy that we can use to do useful work, like driving an engine.
All students should observe that there is no liquid in the bottle before ignition: when a fuel burns, it is the vapour that is reacting. Similarly, while students will have seen all the liquid poured from the bottle before the reaction, they will be able to observe condensation afterwards that can be shown to be water with anhydrous cobalt(II) chloride paper.
Older students may be shown this demonstration (which also works with propan-1-ol and propan-2-ol) within the context of alternative fuels. Ethanol combusts completely with a blue flame here and no soot is left in the bottle. Despite the apparent advantages alcohols provide over petroleum products, their hygroscopic properties reduce engine life through corrosion.
7/3/2017: Take a look at this brilliant slow-motion video of this demo from the science department at Lammas School, London, UK.
Safety
This experiment is not covered by the model (general) risk assessments in common use in UK schools. Readers will need to obtain a special risk assessment by contacting eg CLEAPSS or, in Scotland, SSERC.
Although this experiment works well with methanol, ethanol is preferable for safety reasons. A number of accidents have happened recently involving methanol in similar demonstrations: either too much liquid was left behind in the bottle or the excess was not disposed of appropriately and the vapours from the more volatile methanol found their way to a naked flame during the demonstration. The values quoted above have been chosen to minimise the excess alcohol that needs to be poured out.
- The audience and demonstrator should be protected by safety screens. Both should also be wearing safety glasses.
- This demonstration should never be attempted with a glass bottle.
- Never enrich the mixture with oxygen.
- Check the bottle for cracks or melting from previous demonstrations and use another bottle if there is any sign of damage.






No comments yet