


Mixing chemicals in a large measuring cylinder with rapid stirring is an excellent way to engage students' attention and interest. As substances concentrate in the vortex, they are pulled toward the bottom of the tube producing a spectacular 'tornado' effect
Chemical tornadoes – an alternative and inspirational way to mix chemicals and watch the reaction
The tornado effect can be used to demonstrate several chemical concepts to 14–16-year olds. Here we describe a few experiments that you might use to liven up what might otherwise be uninspiring lessons on: acid-base indicators; fluorescence; chemiluminescence; and precipitation reactions. The chemical tornado can also be used if you are teaching younger pupils about the mixing of primary colours by using supermarket food colourings. The Box lists the apparatus and materials you will need.
The demos
To create the tornado for each demonstration, add the stirring bar to one litre of tap water in the measuring cylinder, and place this on an electric stirrer unit.
Acid-base reactions
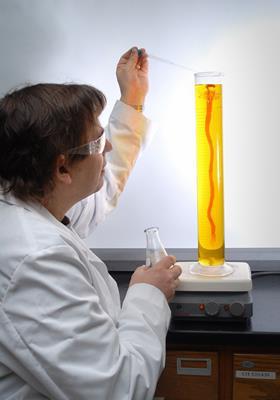
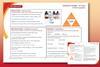
Add phenol red and stir until the colour disperses and a vortex forms along the entire length of the cylinder. Add several drops of HCl so that the solution is bright yellow, then add NaOH dropwise into the vortex. When the solution eventually turns red, add more HCl and repeat the demonstration by adding more NaOH (see photo). The cycle can be repeated many times.
Fluorescence
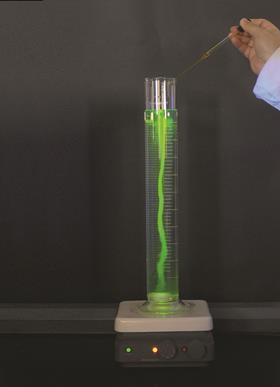
Stir until the vortex forms. Place an ultraviolet lamp to the side of the cylinder and dim the room lights. Add fluorescein solution dropwise to the vortex (figure 1).
Chemiluminescence
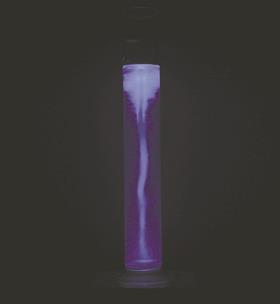
Replace the tap water in the measuring cylinder with one litre of the copper/luminol solution1 and stir until the vortex forms. Dim the room lights (a completely darkened room is best) and add hydrogen peroxide dropwise to the vortex (figure 2).
Food colourings
Add a drop of blue food colouring to the vortex, followed immediately by a drop of yellow food colouring. Repeat with fresh water using other food colouring combinations.
Special tips
Wear safety goggles and rubber gloves when handling hydrochloric acid, sodium hydroxide, and hydrogen peroxide solutions. The ultraviolet lamp should be directed at the apparatus and away from the students.
To obtain the best vortex while stirring, the measuring cylinder should be centred on the stirrer and the stirring rate slowly increased. Positioning a sheet of white cardboard behind the cylinder improves visibility in a large classroom. For the acid-base demonstration, other indicators (eg methyl red, phenolphthalein, bromothymol blue, universal indicator etc) can also be used. The best effect occurs when the vortex is darker than the surrounding solution.
Teaching goals
These chemical tornadoes offer an alternative to simply mixing two solutions together in a flask or beaker. They are easy to set up, generally require small quantities of materials, and conveniently simulate the swirling motion of a miniature tornado. The addition of reagents to the vortex produces a relatively high local concentration, which slowly dissipates by diffusion. This makes the reaction visible in the vortex, while the rest of the solution is initially unaffected.
For the acid-base demonstration, as long as the reagent added to the vortex is limiting, the initial colour in the vortex will fade. The demonstration can therefore be used to illustrate the principle of limiting reagents. This can be repeated until the reagent added to the vortex becomes the excess reagent and the colour will not fade.
This demonstration can also be used to introduce kinetics (a rapid acid-base reaction with a high rate constant) and equilibrium (Le Chatelier's principle and the interconversion of the protonated and deprotonated indicator molecules). When an indicator has an intermediate colour near its end point, this can be seen and the reversible nature of the system is demonstrated.
In addition to illustrating fluorescence and chemiluminescence, precipitation reactions also produce interesting effects. For example, when a few drops of 1% dimethylglyoxime (DMG) solution in ethanol is added to a dilute, aqueous nickel solution, the red precipitate, Ni(DMG)2, is observed in the vortex. When the stirrer is stopped, the insoluble product is clearly visible floating in the cylinder. In principle, many reactions or processes that produce visible effects and are relatively rapid, have the potential to be demonstrated by this method.
Dr Steven E. Arnold is assistant professor and head of the department of chemistry at Auburn University Montgomery, Montgomery, AL, US; Nicholas C. Thomas is professor of chemistry, and Stephen Faulk is a recent chemistry graduate in the same department.
Apparatus and materials
- One-litre measuring cylinder
- Electric stirrer
- 3cm magnetic stirring bar
- UV (blacklight) lamp
- Large piece of rigid, white cardboard (~ 60cm × 90cm)
- 10–15 drops methyl red indicator
- 10cm3 aqueous fluorescein solution
- 50cm3 1.0M HCl
- 50cm3 1.0M NaOH
- 1cm3 30 per cent H2O2
- Food colourings
- Copper/luminol solution (prepared from luminol, copper sulfate, sodium carbonate, sodium bicarbonate and ammonium carbonate)1
References
- N. C. Thomas, J. Chem. Educ., 1990, 67, 339 (DOI: 10.1021/ed067p339)


No comments yet