Try this teacher-tested approach to find out what your students are thinking and understanding as you’re teaching

Finding out what my students are thinking is a key part of my teaching. Their interpretation of what I’m saying and doing is filtered through the lens of what they already know and think. Adapting my teaching to account for this increases the likelihood of them correctly understanding chemical concepts.
I’ve used mini whiteboards throughout my career for this reason. Mini whiteboards give students the opportunity to draft responses, and they’re a low-stakes way of contributing during a lesson. By carefully choosing the questions I ask during mini whiteboards work, I can see emerging themes of understanding and misconceptions, and adapt my teaching accordingly.
At the beginning of the school year, my school moved to individual digital devices for all year 7–12 students. This has given me the opportunity to develop my use of digital whiteboarding that started during remote teaching. I have tried three main methods, including Microsoft OneNote Collaboration Spaces, Microsoft Whiteboards and the whiteboard.io website.
A quick, low-stakes approach
Drawing 3D representations of simple molecules can prove challenging for some students. As experienced chemists, teachers can translate such diagrams into a mental picture of the molecule. We’ve probably made the physical molecular models and possibly used online digital modelling like molview.org. These techniques have helped build a rich schema that we draw on automatically.
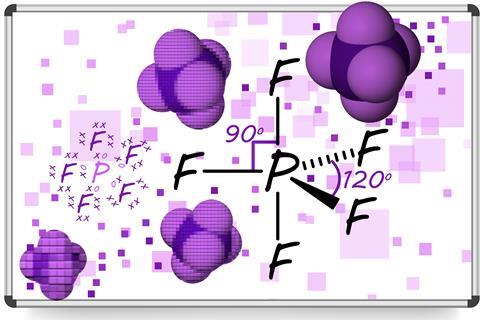
Novice students need time and space to develop this knowledge. Rapid feedback helps to minimise the development of misconceptions and spot outright mistakes early. In the past, with mini whiteboards, I would generally get to see the end point of quite a lot of students’ thinking. For example, drawing the 3D structure of PF5 requires various steps, including identifying the central atom, type of bonding between the atoms, arrangement of the atoms around the central atom, bond angles, types of bonds drawn etc. If a student has made more than one error, it isn’t always easy to unpick those mistakes.
Digital whiteboarding means I can see multiple students developing their structure. Here’s how I set this up.
- I open a new Whiteboard page and draw a grid with enough cells for all the students.
- Each student picks a cell, names it, and zooms in so their cell fills their screen.
- I view the whole grid on my device.
- I pose the first question, for example ‘Draw me the 3D structure of PF5, showing correct bond angles’.
- I then observe the students creating their answers.
I can give rapid feedback in different ways. If a student is struggling to start, I give them verbal prompts. If a student has made a simple error, I use the highlighting pen, letting them know to look again at something. If I need to direct their attention somewhere specific, I draw arrows or write quick notes. By explicitly discussing their work and asking them about their thinking, digital whiteboarding is helping develop their metacognitive skills.
How the group does with three or four examples decides my next steps. Do I need to go back to remodelling and explaining the techniques required? Do I need to give them time for independent practice? Have they reached a sufficient level of mastery to move on to other concepts? Does the group need dividing up, with additional support or extension work as appropriate? With digital whiteboarding I have more and better information to make my decision.
Pros and cons
There are some other practical benefits to using digital over traditional whiteboards. Getting the boards in and out, pens running out, and boards not cleaning well can slow down the tasks. Of course, digital whiteboarding brings its own challenges, including the potential for ‘digital graffiti’ and easy copying of another student’s work. As students develop their respect for others’ work and their learning, such problems tend to diminish.
My favoured digital whiteboard set-up currently is Microsoft Whiteboard. This seems to sync more quickly than pages in Microsoft Class Notebooks, and it is well integrated into our school’s use of Microsoft 365. I’ve successfully used this strategy with my year 9 to 12 students (ages 13–17) covering a range of topics including quantitative chemistry, organic chemistry nomenclature, graph plotting and drawing reaction mechanisms.
More resources
Looking for further ideas and reading on digital devices in the science classroom? Try these for starters:
- Bridging the digital divide from our Tech Talk articles describes how some teachers have been using devices in STEM subjects.
- Let’s get digital, digital shares a teacher’s experience of using edtech to enhance learners’ understanding and develop skills.
David Paterson


No comments yet