


How to use Petri dishes and galvanic cells with your 14–16 students to teach electricity in the chemistry classroom
Galvanic cells and electrolytic cells, the two main types of electrochemical cells, are both fascinating and tricky to teach and learn about. Electrolytic cells are commonly found in 14–16 specifications, but galvanic cells are not always referenced. Given the complementary nature of the two cell types, and the links to important concepts, I teach about both types regardless of the specification.
From a historical point of view, galvanic (or voltaic) cells were developed first through the work of Galvani, including his experiments with frogs’ legs, and then Volta, who developed the first useable batteries. Other scientists then used these ‘voltaic piles’ as a source of electrical currents. Early work by Davy led to the separation of potassium and sodium from their compounds. It took several more decades before Bunsen and Matthiessen extracted lithium from molten lithium chloride. With most of us carrying around lightweight lithium-ion batteries in our mobile devices, cells and batteries provide a great context through which to teach and learn some fundamental chemical concepts.
Investigate batteries further with a global experiment
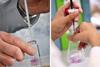
Perfect for your younger students, Take charge: a global battery experiment gives them the opportunity to build and test their own coin batteries, as well as exploring how they can help build a more sustainable future. It’s so easy, get started today.
So how do I link metal reactivity and galvanic cells at 14–16? It comes down to a quick and simple practical that I bring down from post-16 studies – making galvanic cells in a Petri dish.
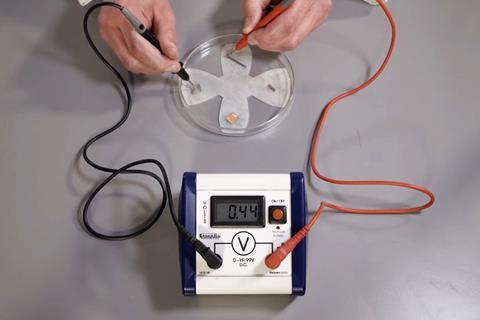
The set-up is simple – a Petri dish, a strip of filter paper, small pieces of metal (usually magnesium, zinc, iron and copper), a few drops of metal solutions (usually metal sulfate solutions), a few drops of saturated potassium nitrate solution and a multimeter.
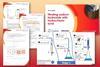
Make a cell by:
- cutting and laying the filter paper in the Petri dish;
- adding a couple of drops of different metal solutions to either end of the paper;
- placing a piece of the corresponding metal on top of the filter paper; and
- adding a couple of drops of potassium nitrate solution to the middle of the paper.
Make a cell by cutting and laying the filter paper in the Petri dish; adding a couple of drops of different metal solutions to either end of the paper; placing a piece of the corresponding metal on top of the filter paper; and adding a couple of drops of potassium nitrate solution to the middle of the paper
Once the cell is set up, students can measure the potential difference generated in the cell (the electromotive force) using the multimeter. They need to press down on the pieces of metal using the multimeter probes to ensure good contact, but the readings are usually stable.
Setting the cells up in this way makes it easy for students to swap around the probes to investigate what happens. They can work in groups to set up all the different combinations possible with the four metals (six cells can be produced). This allows them to investigate the effect of different metals on the potential difference.
What do students learn?
I find my students learn about both the underlying chemistry of galvanic cells, electricity and potential difference, and it helps demystifies cells and batteries.
For example, they quickly discover for themselves that the largest potential difference comes from the magnesium/copper cell, with magnesium acting as the negative electrode. Looking at all the combinations, they see magnesium is always acting as the negative electrode and copper always as the positive. Linking this to the reactivity series and the underlying redox reactions is then an easy step.
Quick and easy, and it helps my students get a better handle on these fundamental concepts
They also get to practise and improve their skills in setting up and troubleshooting equipment. I know from my physics classes, one of the big practical frustrations is making circuits. Finding and fixing their own practical problems is an important skill for students, one that becomes increasingly important as they progress through their science education.
Finally, seeing that electrical current is generated from just a few simple materials and apparatus makes learning about electricity, electrochemical and fuel cells, electrolysis and redox less mystifying.
Chemistry, like all the sciences, relies heavily on simplifications and models, especially when we are teaching and learning the subject. As learners progress through their education, we support them by returning again and again to concepts and contexts, building on what has come before. This helps them develop the necessarily complex and interconnected conceptions of the subject.
In building the conceptual link between chemical reactivity and electricity, I find some specifications have simplified the topic too far. To fill this knowledge gap, I bring down this simple practical used at post-16 to my 14–16 groups. It’s quick and easy to do, and helps my students get a better handle on these fundamental concepts.
Looking for more information about how to best use the microscale approach in your teaching? Or maybe you want more microscale experiments? If so, check out this collection.
David Paterson
Let your students build and test their own coin batteries, as well as exploring how they can help build a more sustainable future with Take charge: a global battery experiement: rsc.li/takecharge


2 readers' comments