


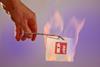
Early secondary chemistry courses often include the fire triangle as a context for oxidation reactions. Students learn that to keep a fire burning, a ready supply of heat, fuel and oxidant is required. One of the most popular demonstrations for this topic is the chip pan fire, where an attempt to cool the fire using water results in an unexpected, but potentially very dangerous, fireball.
Kit
- Tall nickel crucible (diameter 25 mm)
- Cooking oil (3 cm3)
- Pipe-clay triangle
- Tripod
- Heat-resistant mats
- Heat-resistant gloves
- Bunsen burner
- Small square of aluminium large enough to completely cover the crucible and smother the flame
- Test tube rack
- Test tube
- Metre rule
- Test tube holder that grips the tube firmly, eg peg-type
- Sticky tape
Preparation
Set up the equipment in an open lab. Ensure plenty of room overhead, clear of light fittings or objects hung from the ceiling. Cover the demonstration desk with heat-resistant mats and set up the Bunsen, tripod and pipe-clay triangle. The nickel crucible should fit snugly in the pipe-clay triangle. Bend the ends of the triangle’s wires around the frame of the tripod to secure it in position so the crucible does not tip when the flame is smothered.
Fix the test tube holder to a metre rule and place a test tube containing about 5 cm3 of water in its grip. This can be propped up in a test tube rack ready for use.
In front of the class
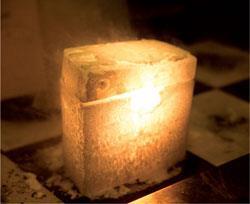
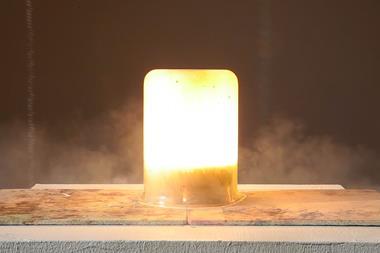
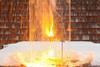
Place 3 cm3 of cooking oil into the crucible, light the Bunsen and open the air hole. After a few minutes the oil will ignite. Turn off the Bunsen at the gas tap. Put on heat-resistant gloves and show the fire can be extinguished by placing a piece of aluminium over the crucible to smother the flames.
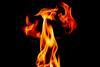
Remove the aluminium, reignite the oil by relighting the Bunsen, then turn the Bunsen off at the gas tap again. At arm’s length, plus the length of the metre rule, add the water from the test tube to the crucible. A fireball will rise about one metre above the crucible.
Teaching goal
At its simplest level, this demonstration shows the risks associated with trying to extinguish fat fires with water, and the efficacy of the removal of oxygen. It could also form part of a series of lessons on types of fire extinguisher. (The magnesium and dry ice demonstration shows the inefficacy of CO2 extinguishers against metal fires.)
When burning the oil, there are three temperatures to consider: the flash point, c.330°C, at which the oil ignites given a flame or spark; the fire point, c.370°C, when oil will continue to burn on removal of the ignition source; and the auto-ignition temperature, c.430°C, where oil vapours will ignite without an ignition source.
Initially, the oil is heated above the auto-ignition temperature – briefly smothering it may mean the fuel remains above this temperature and reignites. If the fire is given a short time without external heating it may cool to below the auto-ignition temperature but remain above the fire point, keeping the flame going. As the Bunsen is turned off as soon as the oil ignites, this is the most likely initial condition of the oil fire.
The fire point for cooking oil is above both the boiling temperature and the Leidenfrost limit of water (c.200°C). Above this, an insulating layer of vapour protects the liquid from further rapid evaporation, causing small droplets of water to form when added to the oil. When the droplets of water are disturbed on impact with other droplets, breaks in the Leidenfrost layer and the density difference lead these to sink through the oil. They boil vigorously and disperse the oil with water vapour into the atmosphere above. This results in a rapid increase in surface area for combustion, and a fireball.
Additional note
In the past, UK fire and rescue services advised tackling fat fires by soaking a tea towel under the tap, wringing it out and then placing it over the rim of the pan. However, there is a significant risk of injury (fat fires are the biggest cause of accidental non-fatal casualties in dwelling fires). The current advice is to ‘get out, stay out, and call 999’. Do not tackle the fire. So while it is of educational value to show the effectiveness of smothering the fire in the demonstration, teachers should not tell students to do so in the event of a real fire.
Safety and disposal
Do not use more than 3 cm3 of oil. Do not perform the demonstration in a fume cupboard as the flame is too tall. The demonstrator and audience should wear eye protection. Place safety screens around the equipment so both audience and demonstrator are protected. The audience should be at least 3 metres away.
Short crucibles are unsuitable as they spit fat out to the side. Ceramic crucibles must not be used as they can break.
Following the demonstration all equipment (including tripod and pipe clay triangle) should be washed with detergent and dried.
Downloads
Technician notes
PDF, Size 45.91 kbTechnician notes
Word, Size 52.45 kb


No comments yet