


Screencasting – preparing audio-visual materials that students can watch in their own time – is becoming increasingly ubiquitous in education. The three main tasks in making a screencast are working out what you want to say, how you mean to say it, and saying it
![Blog2[1]](https://d1ymz67w5raq8g.cloudfront.net/Pictures/480xAny/7/1/4/113714_blog21.jpg)
These sound simple, but they require the teacher to wear several hats. Obviously they need the chemistry knowledge to know what will be most useful to their students, so that they can prepare the materials. Then they also need to prepare the materials with some sense of how students learn; considering the balance of the amount of information and what students will do with it. And finally they need the technical capacity to actually produce it as a screencast.
The first two tasks are usually done in tandem and are the bread and butter of a teacher’s daily job. The only caveat is to be aware of the different delivery medium to the usual in-class scenario. Some good principles for designing e-learning materials such as screencasts have emerged over the years. These are explored in detail at this link, but briefly they can be listed as:
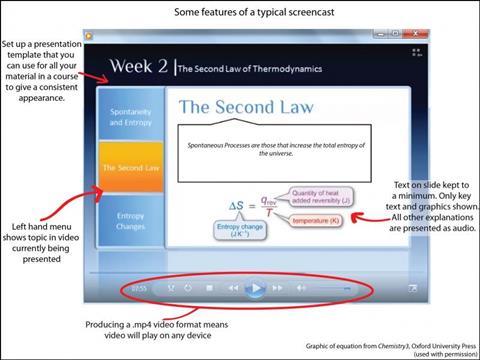
- Present important material visually (e.g. diagrams, equations, or key text) and most text based material verbally (as audio).
- Audio commentary should be coincident with the slides currently on display.
- Additional information not directly relevant to the core message of the screencast should be minimised.
Using these principles, the slides and script that will be the basis of the screencast can be prepared. I have found that preparing a formal script saves time in the long run; you can usually record in one take; you can identify areas that aren’t quite clear in advance of recording; and if required you can use the text of the script as subtitles in the recording software.
Having prepared the materials and script, the next stage is to record and produce the screencast. This is where those bottlenecks emerge. Finding a quiet place to record audio is difficult. If it isn’t the telephone in work, it’s noise at home. But if you know you have a certain number of words to record and how long that will take, it might be easier to block off that time in a quiet space. A guide to length can be estimated using a conversion of 100 words per minute.
In my own work, I use Camtasia, commercial software from Techsmith, which has an educational licensing price. There are free alternatives, but Camtasia has some useful post-recording production options. There is a 30 day trial and it is amazing how much can be done in this time! Free options include PowerPoint itself, CamStudio, and VLC Player.
I usually try to record audio as I am recording the screencast. This is obviously a lot easier with a script. If the doorbell rings or a child wails, I can just pause, wait for silence, resume at the last section and edit out the offending piece later. Audio quality makes or breaks screencasts, so it is worth making sure it is as good as it can be. After final video production (.mp4 format is best) with the software, you can upload to YouTube, Google Sites, or your own virtual learning environment.
I’d be interested to hear what your views on making screencasts are. What works well for you?
In a subsequent post, I’ll be writing a bit more about how to make screencasts interactive, and how to reuse videos already in the public domain for your own purpose. In the meantime, check out the recent EiC article on using video in learning and this EiC article on audio recording and podcasting.


No comments yet