


Get started
Watch a demonstration of this experiment and download the technician notes from the Education in Chemistry website: rsc.li/3Ms4bWR
The thermite reaction is one of the most impressive demonstrations of redox chemistry a learner is likely to see. The current UK explosives regulations prohibit many older methods without an explosives certificate. CLEAPSS has developed a range of alternative methods which use explosive mixtures in controlled quantities and allow the next generation of students to witness the drama of the thermite reaction firsthand.
This article describes a tens-of-grams scale demonstration which can be performed outside (if there is no wind), or indoors in a large laboratory with good ventilation and no smoke detectors.
Don’t have access to a suitable outside space or lab to perform this experiment? Wow your learners with a microscale thermite reaction instead.
Kit
- 2 x terracotta flowerpots (about 5 cm in diameter and height, with a drainage hole at the base)
- Passive welding glass (shade 9)
- Sand in a tray
- Clamp
- Filter paper
- 11 g aluminium powder (fine or medium)
- 32 g iron(III) oxide powder
- Sparkler marked as suitable for indoor use and marked ‘F1’, ‘Category 1’, or ‘BS EN 15947’)
- Magnet
- Bunsen burner
- Tongs
- Heat resistant mats or a piece of hardboard, if indoors
- Safety screens
Preparation

Set up the equipment as shown in figure 1. Remove everything flammable from the close vicinity and use safety screens to protect the audience and demonstrator. If indoors, position the demonstration away from any heat sensors and protect the bench with a large piece of hardboard or heat-resistant mats. Do not use a fume cupboard.
You need a sparkler with a burning length of at least 9 cm, to convert into a fuse. Typically, this means the sparkler needs to be at least 16.5 cm long, including the handle. Use pliers or a tin snip to trim off the handle and enough of the flammable mixture that you are left with a fuse around 9 cm in length.
Place one terracotta flowerpot inside another and clamp them approximately 14 cm above a metal tray that contains at least 4 cm depth of sand. Terracotta pots with a drainage hole are not always available in garden centres, but can be easily obtained online. Place a circle of filter paper in the upper flowerpot to cover the hole in its base. This will hold the powder mix in place.
Mix 32 g iron(III) oxide with 11 g aluminium by passing them carefully from one filter paper to another and back again. Do not stir, as you want to avoid creating any unnecessary friction. Avoid raising dust and work away from flames when weighing and mixing the powders. Make a fresh powder mixture for each demonstration. Pour the powder mixture into the upper pot (which should be at least two thirds full).
In front of the class
Position your learners, standing up and wearing eye protection, at least 4 m away. Instruct them not to look directly at the reaction once it has started except through a passive welding glass (shade 9). Show learners that no component in the starting mixture will stick to a magnet.
Stick the sparkler fuse into the powder mix so the bottom third is in the mix with 5–6 cm protruding from the top. Ensure that the fuse is stable and will not tip over after ignition.
Use a Bunsen burner to light the fuse and retreat to a safe distance. If the mixture fails to light, wait a few minutes in case of a delayed reaction before replacing the sparkler with a new one. If this second attempt fails, then the mixture must be disposed of (see below) and a completely fresh demonstration set up.
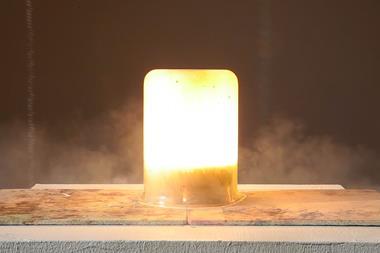
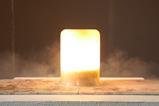
In a successful reaction, the mixture ignites and burns white hot, generating a significant amount of heat, sparks and smoke. Molten iron drops through the drainage hole in the flowerpot and glows for some time in the sand tray below.
After the reaction, the powder mixture and any iron will remain hot for some time. Check how hot it is with a few drops of water before cautiously handling it with tongs. You can then demonstrate that the powder will now stick to a magnet.
Teaching goal
14–16 year-old students need to understand the reactivity series and its application to metal extraction. In this reaction, the more reactive metal (aluminium) displaces the less reactive metal (iron) from its oxide. The thermite reaction has been used since 1899 to weld together railway tracks and an analogous reaction with copper is commonly used to weld conductors.
Equation 1: Fe2O3(s) + 2 Al(s) → Al2O3(s) + 2 Fe(s)
This demonstration only really gets going once the aluminium melts, as molecule collisions are far more frequent in the liquid phase than the solid phase. As the reaction accelerates, liquid iron forms and the side product, aluminium oxide, floats to the surface of the melt to form a slag. Relatively pure iron then drops through the hole in the flowerpot base.
Health, safety and disposal
- The experiment must only be performed by experienced demonstrators.
- Read our standard health and safety guidance before running a live demonstration (rsc.li/47AiZJY). This reaction is unlikely to be covered by model risk assessments – a special risk assessment may be needed. CLEAPSS members should consult SRA026 which this method follows (rsc.li/4rVTfQw). Do not deviate from the instructions or attempt to scale up the reaction. SSERC members should consult the Chemsitry health and safety page (bit.ly/4tk8ljD)
- Always wear eye protection and a lab coat.
- The aluminium powder is flammable.
- The sparkler must be marked as suitable for indoor use. If in doubt, SRA026 and L195 include an alternative method which uses an ignition mixture rather than a sparkler (rsc.li/4rm5HrK).
- This reaction creates lots of dust and smoke. If performed indoors it could activate smoke detectors or nearby heat detectors. When performing this demonstration outside, pay attention to the wind: do not perform it in windy conditions and be mindful of unexpected gusts or eddy currents near buildings.
- Dispose of the reaction remnants in the normal bin. Unreacted powder requires treating first. Pour it into a beaker of 600 cm3 of 2 M sulfuric acid and leave overnight in a fume cupboard. Check the next day that the remaining solution is still acidic. Collect any remaining solid by filtration, double bag it and put in the bin. Pour the solution down a foul water drain with further dilution from a bucket of water.
Health, safety and disposal
- The experiment must only be performed by experienced demonstrators.
- Read our standard health and safety guidance before running a live demonstration. This reaction is unlikely to be covered by model risk assessments – a special risk assessment may be needed. Consult your local safety advisory body for specific guidance. CLEAPSS members should consult SRA026 which this method follows. Do not deviate from the instructions or attempt to scale up the reaction. SSERC members should consult the Chemsitry health and safety page.
- Always wear eye protection and a lab coat.
- The aluminium powder is flammable.
- The sparkler must be marked as suitable for indoor use. If in doubt, then SRA026 and L195 include an alternative method which uses an ignition mixture rather than a sparkler.
- This reaction creates lots of dust and smoke. If performed indoors it could activate smoke detectors or nearby heat detectors. When performing this demonstration outside, pay attention to the wind: do not perform it in windy conditions and be mindful of unexpected gusts or eddy currents near buildings.
- Dispose of the reaction remnants in the normal bin. Unreacted powder requires treating first. Pour it into a beaker of 600 cm3 of 2 M sulfuric acid and leave overnight in a fume cupboard. Check the next day that the remaining solution is still acidic. Collect any remaining solid by filtration, double bag it and put in the bin. Pour the solution down a foul water drain with further dilution from a bucket of water.
Don’t have access to a suitable outside space or lab to perform this experiment? You can still impress your learners: keep reading for a microscale thermite reaction.
Downloads
Thermite in a flowerpot technician notes
Handout | PDF, Size 0.26 mbThermite in a flowerpot technician notes
Editable handout | Word, Size 0.5 mb




No comments yet