


The synthesis of biodiesel is exploited to teach general chemistry principles and as a way of fostering a 'green conscience' within undergraduate chemistry students
-
Vegetable oil from the canteen can be used to teach general chemistry principles
-
On the menu - titrations, kinetics and thermodynamics

As a result of the hurricanes Katrina and Rita, which caused damage to petroleum producers in the Gulf of Mexico, coupled with unrest in the Middle East, many Americans find themselves paying dramatically higher prices for any product with connections to petroleum. Not surprisingly, their interest in home-grown fuels, such as biodiesel, is growing. This prompted me to think about using biodiesel (fatty acid methyl esters or FAMEs) to teach general chemistry principles, especially since the synthesis of biodiesel is a green process. (At this time, however, the large-scale synthesis of biodiesel from virgin oils is not cost effective compared with petroleum-based diesel without government subsidies.)
Synthesis of biodiesel
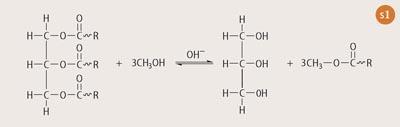
Beginning with a renewable feedstock, such as soybean oil, a catalysed transesterification reaction results in the formation of three FAME molecules and one molecule of glycerine (see Scheme 1). The reaction can be catalysed with acid or base and is usually done at 50 °C. Higher temperatures can be used, but these would require specialised vessels to prevent the evaporative loss of methanol and are not suited to undergraduate teaching laboratories. Since the two layers have large differences in polarity and resist mixing, the system must be stirred vigorously to encourage intimate contact between the reagents. The reaction is complete in ca one hour when stirring is stopped and the products separate into two easily discernable layers.
While methanol and sodium hydroxide both need to be handled with care, these reagents do not pose any greater hazard than many commonly used substances in the undergraduate laboratory. In fact, both are available to buy as gas-line antifreeze (methanol) and drain cleaner (sodium hydroxide).
An excess of methanol is used to drive the reaction to completion and this ends up with the catalyst in the glycerine layer when the reaction is complete. In an ideal world, the FAME layer would be ready for use in a diesel engine. However, some soap molecules (salts of the fatty acids present) need to be removed from the fuel before use. This can be done via a bubble wash procedure in which air bubbles introduced into a water layer carry water droplets to the surface of the FAME. When the air bubbles reach the surface and burst, the water coalesces into drops which fall back through the FAME layer preferentially extracting the soap molecules into the water layer. This process is usually repeated several times and the water from successive wash stages can be reused on a new batch of fuel in the first washing stage. The finished product is listed as an alternate fuel by the US Environmental Protection Agency (EPA) and is subject to standards published by the American Society of Testing and Materials (ASTM). It is classified as a non-toxic material by the EPA and degrades readily in the environment.3 The excess methanol is recovered via a reduced pressure distillation of the glycerine layer and recycled for further use.
The Achilles heel of this process has always been what to do with the left over glycerine. While it can be burned as a fuel, and has many uses including in the manufacture of cosmetics, food products, and pharmaceuticals, the large volume being produced, as biodiesel becomes more popular, has caused a glut in the world glycerine market.4 In response chemists are seeking innovative and green uses for this byproduct. One of the more promising ideas recently published involves the use of a copper chromite catalyst to transform glycerine into propene glycol, a more environmentally friendly antifreeze.5,6
So how does all of this fit into the teaching of general chemistry? Many of the topics we currently cover in 'proof of concept' experiments can be presented through the synthesis of biodiesel.
Titrations
Titrations are a common experiment done, for example, to determine the ethanoic acid content of vinegar (which can be verified by reading the label). Students could, for example, titrate a sample of used cooking oil to determine the free fatty acid (FFA) content which is a function of many things, including how the oil has been used. This is a bit messier than a simple aqueous titration, but the results have a bearing in determining the amount of catalyst (NaOH) required for the transesterification reaction. This also gives students a chance to practise the mathematics involved in solution stoichiometry calculations. They could also design their own experiments to identify what factors influence the FFA content of used oil. My students have investigated a variety of factors including: oil type, food type and moisture content, temperature used, as well as length of use.

First, however, the students need to consider what would be an appropriate medium for such a titration. A class discussion of the differences in polarity between oil and water often leads them to conclude that the solvent used should have characteristics of both. At this point, I give them a list of possible choices for them to investigate - methanol, water, propanone, ethanol, ethyl ethanoate, and isopropyl alcohol (propan-2-ol). Of these, isopropyl alcohol (IPA) gives the best results and our titrations are run using 1 ml of oil in 10 ml of IPA. We sometimes find it necessary to warm the mixture slightly to ensure complete mixing. After adding a few drops of phenolphthalein the mixture is titrated with a solution of NaOH prepared by dissolving 1 g of sodium hydroxide in 1 l of water. These values are convenient because the volume of titrant added (ml) equals the number of grams of NaOH needed to neutralise the fatty acids present in 1 l of oil. When the transesterification reaction is complete, an extra catalytic amount of NaOH (3.5 g per litre of oil) is added along with the amount determined by the titration.
Once the scale of the reaction is determined (I find that 1 l batches are easy to make and store), the students need to measure out the required volume of methanol (20 per cent of volume of oil used) and dissolve the predetermined amount of NaOH in it. Caution: heat is generated and the resulting methanol/sodium methoxide solution is caustic. If time is an issue, simply mix the oil and the methanol/sodium methoxide in a container which can be sealed tightly and shaken vigorously for several minutes. You should open the container periodically to release any pressure. The resulting cloudy mixture can be left to sit on the bench overnight where it will separate into two distinct layers.
If you want to introduce kinetics and temperature effects, you can warm up the oil (do not exceed the boiling point of methanol) in an Erlenmeyer flask and then add the methanol/sodium methoxide solution while mixing with a magnetic stirrer. The mixture will appear cloudy at first and then clear within a few minutes as the reaction nears completion. An inverted beaker placed over the mouth of the flask will condense any methanol vapours, returning them to the reaction mixture. The reaction is substantially faster with heating and an hour of stirring is more than sufficient. If the students do both techniques, they will be able to see a clear difference in the rate of formation of products as revealed by the time required for the mixture to become clear and begin to separate.
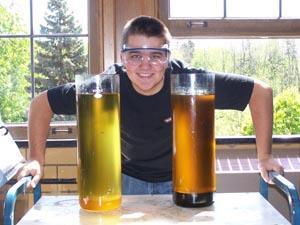
After the reaction is finished, the top layer (FAMEs) can be carefully decanted from the bottom layer, which contains glycerine and the bulk of the excess methanol and catalyst. Often, the bottom layer will have solidified, especially if waste cooking oil is used. For the production of fuel-quality biodiesel, the FAME layer would now need to be washed and dried.
Characterising FAMEs
Once the FAMEs have been isolated, a variety of experiments can be done to determine their characteristics. Physical properties such as density, viscosity, and heat capacity are easily measured using common laboratory techniques. As an added bonus, the changes which occur in these properties as the oil is converted to its methyl esters and glycerine lend themselves to a discussion of the relationships between physical properties and chemical structure.
For instance, the viscosity of biodiesel is considerably lower than the oil from which it is made. While the structure of the fatty acid moiety does not change tremendously, the cleavage of the long chain from the glycerine backbone plays an important role in explaining this change.
Another particularly interesting discussion revolves around the excess methanol and where it ends up when the reaction is complete. Using their knowledge of bond and molecular polarity, as well as intermolecular forces, students could be encouraged to suggest where the methanol might be found, and then verify their hypotheses by doing an appropriate experiment. Common laboratory equipment is sufficient to make measurements such as viscosity, which can be approximated by measuring the time it takes for a known amount of the liquid to flow out of a pipette. (A word of caution to those who use styrofoam cups as calorimeters - biodiesel is an excellent solvent and will degrade the polymer in the same way as propanone.)
Colligative properties such as boiling point elevation and freezing point depression can also be discussed. When biodiesel is cooled, rather than freezing, it gels (similar to petroleum diesel). The introduction of solutes to biodiesel has an effect similar to freezing point depression. Again, students could experiment with various solutes and concentrations and note their effect on the gel point. In my classes, I ask the students to suggest possible solutes. We often end up with a list that is similar to the one given for the free fatty acid titration.
The experiment is done using a total of 10 ml of biodiesel and solute. Pure biodiesel gels around 0 ?C so an ice-salt bath is needed to observe gel formation in mixtures. Cloudiness in the liquid is a good indication of the onset of gel formation and a graph of temperature versus time should show a corresponding change in slope.
While there are many chemical properties that may be investigated, I have limited our investigations to the transesterification reaction itself and the enthalpy of combustion of the FAME produced. Understanding the catalysed exchange of one ester for another is not beyond first-year undergraduate students and they could be encouraged to postulate what might be responsible for the exchange.
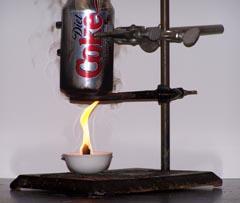
Combustion reactions are commonly discussed in first-year chemistry and the measurement of the enthalpy changes associated with them is a straightforward experiment. While bomb calorimetry is the ideal way to measure enthalpy of combustion, the equipment required is expensive.7 Instead we use a simple wick burner and a suspended container of water. We make our burners by using a piece of cotton cloth (2 × 10 cm) rolled into a wick (2 cm high), which is wrapped and supported with a piece of wire. The wick is placed in an evaporating dish with several ml of biodiesel and the mass of the entire 'burner' is measured. An aluminium soda can of known mass containing a thermometer and a measured amount of water is placed above the burner on a ring stand. The initial temperature of the water is measured; the burner is lit and allowed to burn until the temperature of the water changes by at least 10 °C, whereupon the burner is extinguished by placing a beaker over it. The energy absorbed by the can/water divided by the mass change of the burner gives a value for the enthalpy of combustion that is crude but typically turns out to be in the correct order of magnitude of published values (~ 40 kJ g-1).7
Research opportunities
I have also got undergraduates to do a variety of research projects related to biodiesel. Some projects they have worked on recently include:
-
an investigation of the ability of wheat germ lipase (enzymes which catalyse the breakdown of triglycerides) to improve the synthesis of biodiesel;
-
a comparison of the effectiveness of washing biodiesel verses undisturbed settling of soaps; and
-
an investigation of naturally occurring soil microbes for the digestion of unusable vegetable oil.
Student feedback for this series of experiments has been positive. Many commented that they enjoyed the 'real world' nature of the experiments while others enjoyed the freedom to design parts of the experiments on their own. As with any such experiences, you should be aware that students will come up with ways of doing things that you have never thought of. I find that it is best to allow them as much safe latitude as possible to encourage them to think for themselves. Hopefully, you will take some time to consider making your laboratory experiments a bit greener, and the next time you are enjoying a plate of fish and chips, think about all the cooking oil you could be transforming into a great learning experience as well as a tank full of fuel!
Richard Hartmann is assistant professor of chemistry and director of general chemistry programmes at Nazareth College, Rochester, New York 14618, US (e-mail: rhartma0@naz.edu).
Further Reading
Green education materials for chemists (GEMs) website
References
1. J. A. Haack et al, J. Chem. Educ., 2005, 82 (7), 974.
2. EPA publication, EPA 742-F-02-003, March 2003; also see website
3. EPA publication, EPA 420-F-00-032, March 2002; also see website
4. M. McCoy, Chem. & Eng. News, 2006, 84, 6.
5. G. J. Suppes, Appl. Catal. A, 2005, 281, 225.
6. S. K. Ritter, Chem. & Eng. News, 2006, 84, 28.
7.S. M. Akers et al, J. Chem. Educ., 2006, 83 (2), 260.


No comments yet