


Resources and teaching tips to develop learners’ observation skills and make them better scientists
David Paterson updated this article on 18 August 2025.
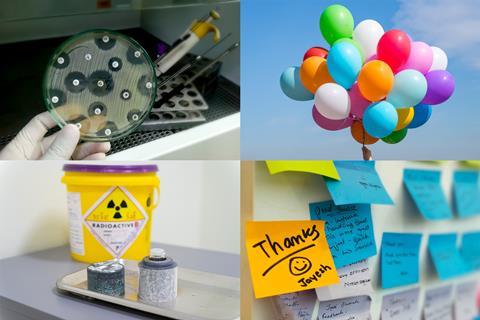
Look at the images in figure 1. What is the connection between them?
The link is that these are all examples of where careful scientific observations led to far-reaching effects on our everyday lives.
Alexander Fleming’s observation of a culture plate led to the development of antibiotics. The observation of an unexplained line in a solar spectrum during an eclipse led to the identification of helium as a new element. Images on Henri Becquerel’s photographic plates led Marie Curie to coin a new word – radioactivity. And Spencer Silver and Arthur Fry’s investigation of a glue introduced us all to sticky notes. Each of these observations has had profound consequences.
Give your students examples like these, and interesting contexts for practical work, as an effective way of engaging their interest and reminding them of the importance of making careful and thoughtful observations in their work.
Progression of ideas and skills
As students progress through school, we expect their conceptual and procedural knowledge and skills relating to observation to develop (see table 1 below).
| Secondary range | Types of learning areas |
|---|---|
|
Pre (approx 5–11) |
Observing closely using simple equipment Using observations and ideas to suggest answers to questions Making systematic and careful observations Observing changes over time and drawing conclusions from observations Asking questions based on observations, leading to making some decisions about enquiry |
|
Early (approx 11–14)
|
Asking questions and developing lines of enquiry based on real-world observations, drawing in prior knowledge and experience Making and recording observations and measurements using a range of different methods and suggesting possible improvements Presenting and interpreting observations, identifying patterns and drawing conclusions |
|
Mid (approx 14–16)
|
Using observation as part of the scientific process Making and recording appropriate observations during chemical reactions Developing and applying observational skills in the lab and in the field Making inferences from observations and drawing valid conclusions |
|
Late (approx 16–19)
|
Making and recording observations Producing scientific drawing from observations with annotation Applying investigative approaches to practical work |
There is a danger that we assume students are good at observation. However, good observation requires careful attention and attention can be both hard to control and also obscure what is right in front of us. Therefore, be clear with your learners about what we mean by good observation, and challenge simplistic or incomplete observations. This will make them better scientists and help them to better understand chemical change.
Encourage your students to think of each observation as a piece in a jigsaw puzzle, helping them to build a more complete understanding. They will quickly observe the ‘obvious’ changes – e.g. colour changes, effervescence. Coach them in patience – thinking and discussing what their senses are telling them about a reaction in front of them.
Use the reaction between calcium and water as a training exercise. After suitable risk assessment, add a small piece of calcium to a beaker containing cold water and a few drops of universal indicator solution. How do the following observations help students explain the reaction involved?
- Bubbles rise from the calcium at the bottom of the beaker.
- The solution becomes blue.
- A white precipitate gradually forms.
- The beaker becomes warm.
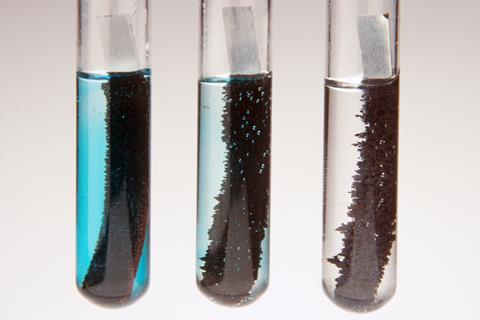
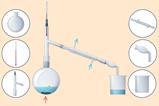
Once they have made observations, we need to help them interpret these in terms of particles such as atoms and molecules and often to write equations to describe the changes. Many students will find moving back and forward between the macro, symbolic and submicroscopic levels very challenging. Use questions as a powerful way to help students make the shift in their thinking between the levels. As the concepts they study become more complex, you will need to help your learners refine their observation skills and understanding of the theory. For example, consider the reaction between zinc and copper(II) sulfate solution (figure 2) and the range of questions you could ask (table 2).
| Early secondary: Questions to encourage observation | What changes do you notice about the solid in the beaker? |
|---|---|
| What changes do you notice about the solution? | |
| Is there a change in temperature of the reaction mixture? | |
| Early secondary: Questions to encourage inference | What is the brown solid produced in the reaction? |
| What type of reaction is this? | |
| Which metal is more reactive, copper or zinc? | |
| Mid secondary: Questions to encourage observation | How would you infer this is an exothermic reaction, without using a measuring device? |
| How can you tell the zinc is in excess? | |
| How can you tell when the reaction is finished? | |
| Mid secondary: Questions to encourage inference | What particles are responsible for the blue solution? |
| What is meant by a spectator ion? | |
| What has happened to the zinc atoms? | |
| Late secondary: Questions to encourage inference | What changes in oxidation states occur? |
| How can you use the reduction potentials to help explain the chemistry involved? | |
| How can you adapt this experimental setup to do electrical work? |
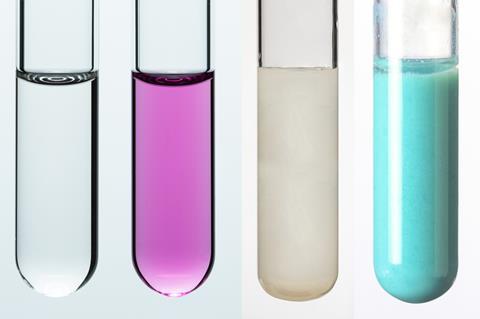
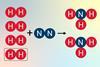
For some students, language may be a barrier (see recommendation six in the EEF’s Improving secondary science report). Over time, your students need to become familiar with scientific ways of communicating what they observe and to be able to use specialist chemical vocabulary accurately. For example, knowing that clear and colourless have different meanings (figure 3) and using words like precipitate, residue, solution, suspension, effervescence and distillate in appropriate ways. When a student makes an observation like ‘it went yellow’, discuss why this is ambiguous, unclear and unscientific. Use card activities, in which students match words with their meanings, as a way of exploring learners’ misconceptions and misunderstandings. Include plausible alternative definitions as distractors to help draw out these misconceptions. The monomer–polymer card game provides an example of how card activities can work, and the Tarsia programme is useful for making cards that require symbols.
For some students, language may be a barrier (see recommendation six in the EEF’s Improving secondary science report: bit.ly/3HrwQsv). Over time, your students need to become familiar with scientific ways of communicating what they observe and to be able to use specialist chemical vocabulary accurately. For example, knowing that clear and colourless have different meanings (figure 3) and using words like precipitate, residue, solution, suspension, effervescence and distillate in appropriate ways. When a student makes an observation like ‘it went yellow’, discuss why this is ambiguous, unclear and unscientific. Use card activities, in which students match words with their meanings, as a way of exploring learners’ misconceptions and misunderstandings. Include plausible alternative definitions as distractors to help draw out these misconceptions. The monomer–polymer card game provides an example of how card activities can work, and the Tarsia program is useful for making cards that require symbols (rsc.li/4moHeQW).
Practical problems and suggested solutions
Microscale activities are a great way of developing students’ observational skills. The very nature of reduced scale apparatus and small quantities of materials means students must look very carefully at what is happening. You can find details of microscale experiments from a variety of sources, including the RSC Microscale chemistry collection, CLEAPSS, SSERC and the ASE/Millgate House publication Understanding chemistry through microscale practical work. Some awarding organisations suggest microscale experiments as alternatives to traditional experiments.
One of the simplest microscale techniques is to replace test tube-based precipitation reactions with mixing drops of solution on a laminated sheet (figure 4). Students will make quick and effective observations, and the practicals are more economical in terms of chemicals and technician time. Learners can make more sophisticated observations in these reactions by using solids instead of solutions.
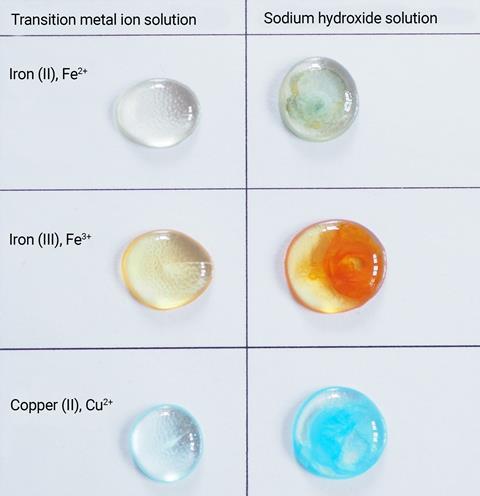
Use this drop-scale approach to quantitatively determine the concentration of copper in brass or demonstrate the displacement reactions between small pieces of metal and other metal ions. The formation of metallic iron in such reactions is shown quite dramatically by passing a small magnet over the pool of reaction mixture.
There is a lot of interesting chemistry that you can study through substances like chlorine and ammonia. However, working with these toxic substances requires careful and thoughtful risk assessment. A significant control measure is to produce only small quantities of the gases and contain the gases within Petri dishes. Provide your students with the chance to study the chemistry of chlorine via microscale electrolysis, and ammonia via this CLEAPSS activity.
Use variety in your approach to develop student practical skills. Alongside traditional and microscale activities, use a visualiser or low-cost digital microscope so the whole class can see the same experiment at the same time on a screen or whiteboard. You could focus the visualiser on the formation of a precipitate in a Petri dish or on the thermometer bulb during fractional distillation. How about projecting a microscope image of a disappearing cross rate experiment or showing this CLEAPSS YouTube video so that everyone can do the timing?
Microscale activities are a great way of developing students’ observational skills. The very nature of reduced scale apparatus and small quantities of materials means students must look very carefully at what is happening. You can find details of microscale experiments from a variety of sources, including the RSC Microscale chemistry collection, CLEAPSS, SSERC and the ASE/Millgate House publication Understanding chemistry through microscale practical work (bit.ly/4oG7RSN). Some awarding organisations suggest microscale experiments as alternatives to traditional experiments.
One of the simplest microscale techniques is to replace test tube-based precipitation reactions with mixing drops of solution on a laminated sheet (figure 4). Students will make quick and effective observations, and the practicals are more economical in terms of chemicals and technician time. Learners can make more sophisticated observations in these reactions by using solids instead of solutions.
Use this drop-scale approach to quantitatively determine the concentration of copper in brass (rsc.li/45ueqz2) or demonstrate the displacement reactions between small pieces of metal and other metal ions using CLEAPSS’s resources (bit.ly/3HEDITg). The formation of metallic iron in such reactions is shown quite dramatically by passing a small magnet over the pool of reaction mixture.
There is a lot of interesting chemistry that you can study through substances like chlorine and ammonia. However, working with these toxic substances requires careful and thoughtful risk assessment. A significant control measure is to produce only small quantities of the gases, and contain the gases within Petri dishes. Provide your students with the chance to study the chemistry of chlorine via microscale electrolysis using our practical video and supporting resources, and ammonia via this CLEAPSS activity (bit.ly/4mOdrB4).
Use variety in your approach to develop student practical skills. Alongside traditional and microscale activities, use a visualiser or low-cost digital microscope so the whole class can see the same experiment at the same time on a screen or whiteboard. You could focus the visualiser on the formation of a precipitate in a Petri dish or on the thermometer bulb during fractional distillation. How about projecting a microscope image of a disappearing cross rate experiment or showing this CLEAPSS YouTube video so that everyone can do the timing (bit.ly/4mm9jsf)?
Allow students to take their own photographs or videos of experiments as an effective way of training them to select key observations.
Considering colour vision deficiency
Colour vision deficiency (CVD), or colour blindness, affects about 4.5% of the population – mainly, but not entirely, male. Approximately 80% of 11–13 year-old children have never been screened for CVD so they may be unaware of their condition.
Students with CVD may have specific problems in chemistry with:
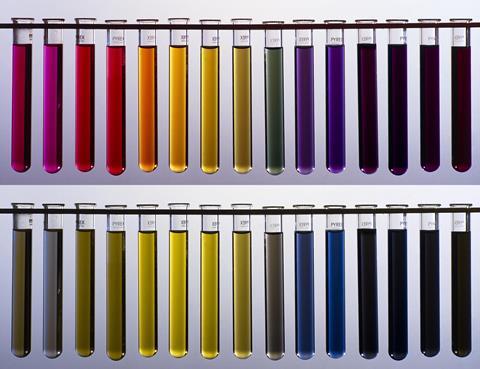
- Using universal indicator accurately (figure 5).
- Identifying the end point in an acid–base titration.
- Identifying metal ions using a flame test.
- Describing the colours of solutions and precipitates.
This raises some important questions for teachers. Do you know if any of your students have CVD? Do you try to help them by asking them to work in pairs for some experiments so that a partner can help describe colours, or by providing alternative acid–base indicators they can see more easily? If you have CVD, have you considered how this might impact on your teaching? Check your exam board’s literature for suggestions on supporting students with practical assessments – for example page 16 of the OCR chemistry practical skills handbook.
More resources
- Read Developing and using models: linking concepts and evidence to discover ways of helping students move between macro and submicroscopic levels.
- Michael Faraday gave six lectures at the Royal Institution in 1848 titles The chemical history of a candle. He began his lectures by asking his audience to record as many observations as possible about a burning candle. Watch this video from 2024 for a reimagining of the original lecture and task your classes to write everything they see.
- Try The nature of science: black box of activities to help 11–14 learners appreciate the difference between observation and inference.
This raises some important questions for teachers. Do you know if any of your students have CVD? Do you try to help them by asking them to work in pairs for some experiments so that a partner can help describe colours, or by providing alternative acid–base indicators they can see more easily? If you have CVD, have you considered how this might impact on your teaching? Check your exam board’s literature for suggestions on supporting students with practical assessments – for example page 16 of the OCR chemistry practical skills handbook (pdf: bit.ly/3Uuy8G3).
Derek Denby, an independent science education consultant, wrote this article in 2017. David Paterson, an assistant head and teacher , updated it in 2025.

Teaching practical science

Boost your confidence and your learners’ outcomes with these articles focused on practical lessons


3 readers' comments