


Watch this
Watch the video and download the technician notes from the Education in Chemistry website: rsc.li/XXXXXXX
Diffusion is one of the most common concepts taught to students – from early introductions to particles through transport in biology and kinetic theory in physics and chemistry. One of its most ubiquitous demonstrations is the reaction of ammonia with hydrogen chloride – but that doesn’t mean it’s not worth revisiting. This way, we can ensure we achieve the best and safest results, as well as the most authentic discussion of their meaning. Following a recent disappointment when rehearsing this demo, not only did I revisit the most recent CLEAPSS method – which rewarded me with some great tips for doing it even better – but I also gave some thought to the limitations of the conclusions that can be drawn from it.
Diffusion is one of the most common concepts taught to students – from early introductions to particles through transport in biology and kinetic theory in physics and chemistry. One of its most ubiquitous demonstrations is the reaction of ammonia with hydrogen chloride – but that doesn’t mean it’s not worth revisiting. This way, we can ensure the best and safest results are achieved, as well as the most authentic discussion of their meaning. Following a recent disappointment when rehearsing this demo, not only did I revisit the most recent CLEAPSS method (LINK) – which rewarded me with some great tips for doing it even better – but I also gave some thought to the limitations of the conclusions that can be drawn from it.
Kit
- 4 cm3 concentrated hydrochloric acid (corrosive)
- 4 cm3 concentrated 880 ammonia solution (corrosive (skin/eyes), irritating (respiratory), very toxic to aquatic life)
- 2 sample vials
- 2 100 cm3 beakers
- 2 cotton buds
- Cotton wool
- 2 elastic bands
- Glass tube for gases to diffuse in, with bungs to fit each end (ideally approx 1 m long)
- Clamp and stand
- Large beaker of water for disposal
- Black paper
- Gloves (CLEAPSS members should consult GL349)
- Splash-proof goggles
Preparation
Secure a glass tube horizontally in a clamp where the demonstration will take place. Check the bungs fit in the ends of the tube. Placing a piece of black paper behind the tube will improve the visibility of the white product.
Bore a small hole in each bung to snugly fit the stem of a cotton bud. Trim the bud to a length such that when inserted into the narrow end of the bung and placed in the sample vial, the tip of the bud touches the base of the vial. Once the stem of the bud has been secured in the bung, wrap extra wool around the end of the bud and hold this in place with an elastic band.
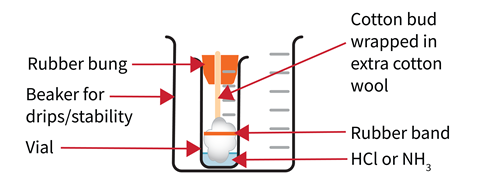
Wear splash-proof goggles and work in a running fume cupboard. Place the vials into 100 cm3 beakers to catch drips and reduce the risk of tipping. Add 4 cm3 of concentrated hydrochloric acid to one sample vial and 4 cm3 of concentrated ammonia to the other. When ready for the demonstration, take them to the bench and leave them at least one metre away from each other either end of the clamped tube.
In front of the class
Wearing gloves, dip the buds into their corresponding vials to absorb the liquids. Work with a colleague if possible to insert the two buds into the ends of the tube at the same time and place the beakers under the ends of the glass tube to catch any drips. After a couple of minutes, a white ring of ammonium chloride will form where the two gases meet. This will be closer to the source of the hydrogen chloride than to the source of the ammonia.
Safety and disposal
- Avoid skin contact with the chemicals – wear gloves and splash-proof goggles.
- Always use chemicals from a new or recently opened bottle. Open bottles of concentrated ammonia with caution in a working fume cupboard as pressure can build up, especially on warm days.
- Once the demonstration is complete, both buds and bungs can be placed in a waiting large beaker of water to dilute the remaining acid and base before washing down the sink with plenty of water.
Teaching goal
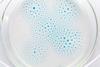
This demonstration is an excellent display of diffusion in action – especially when coupled with some of Bob Worley’s famous ‘puddle experiments’. The fact that the hydrogen chloride clearly travels a shorter distance than the ammonia is worth pointing out to students to illustrate the relationship between mass and kinetic energy of the relevant molecules. You can stretch the model still further to illustrate how Graham’s law is fraught with issues because the gases are not diffusing into each other directly, but rather through air.
Given the temperatures of the gases are the same, a common approach might be to suggest that their average kinetic energy and time taken for them to travel to the point of reaction must be the same. As such, the kinetic energy expression (KE = ½mv2) for the two gases reduces to the following, where d is the distance travelled by each gas:
dNH3/dHCl = √36.5/17 ≈ 1.47
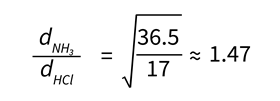
However, this method neglects the fact that the assumptions behind Graham’s law cannot apply. The different sizes of the molecules and their collision cross sections with other molecules come into play. In other words, the rate of diffusion depends not only on the molecules of HCl and NH3, but also on the properties of the (mainly) nitrogen and oxygen molecules into which they are diffusing. As such, the observed ratio may be slightly less than that predicted in the simplistic model above – the demo is perhaps best kept as a qualitative one at this level.
Downloads
Technician notes - Ammonium and hydrogen chloride diffusion
Experiment | PDF, Size 0.22 mbTechnician notes - Ammonium and hydrogen chloride diffusion
Experiment | Word, Size 0.1 mb


3 readers' comments