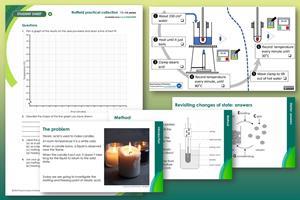
In this experiment, a solid turns into a liquid and then the liquid turns into a solid. The energy changes are examined
Learners will take the temperature of stearic acid at regular intervals as they heat and cool it. They will observe the melting and freezing point of the acid and plot a graph. This experiment can also be done using data-logging equipment.
-

Download this
A ready-to-go practical lesson with lesson slides, integrated instructions, two levels of student worksheet with method and follow-up questions, teacher guidance, technician notes and answers.
View more from the Nuffield practical collection
This practical takes quite a long time to carry out. Learners can begin by simply recording their data but, once they get the hang of what they are doing, most should be able to plot the graph at the same time as taking readings. If data-loggers are used, learners will need another activity to do alongside the experiment.
Learning objectives
- Determine the melting and freezing point of a sample of stearic acid by setting up and carrying out an experiment.
- Carefully make temperature readings and record them in a table.
- Plot and interpret a heating and/or cooling curve.
- Use particle theory to explain what happens during melting and freezing.
Learners will successfully set up and carry out the experiment (LO1); produce a results table (LO2) and draw a graph (LO3). LO3 and LO4 will be met by answering questions on the student sheet.
Scaffolding
There are two versions of the student sheet. The support sheet (✪) offers more scaffolding, including a ready-drawn table and a graph with axes and scales, whereas on the standard sheet (✪✪) learners are expected to make their own decisions when drawing the table and graph. Teachers will need to provide graph paper for learners using the standard sheet.
For those learners unable to successfully complete their own experiment (LO1), a set of sample results for the heating and cooling curve are included at the end of these teacher notes, so that they can successfully complete LO3 and LO4.
Integrated instructions are available in the PowerPoint presentation as an alternative to the written method on the student sheet.
Technician notes
Read our standard health and safety guidance and carry out a risk assessment before running any live practical.
Equipment
Apparatus
- Safety glasses
- Beaker (250 cm3)
- Boiling tube (note 1)
- Thermometer (0–100˚C)
- Stop clock
- Clamp, stand and boss
- Bunsen burner
- Tripod
- Gauze
- Heat resistant mat
Chemicals
- Stearic acid (octadecanoic acid)
Safety and hazards
Make sure that learners can use a Bunsen burner with confidence and remind them how to handle hot liquids in beakers, as in CLEAPSS student safety sheets SSS092 and SSS095.
Allow enough time for the equipment to cool down before asking learners to put away their equipment. In case of burns, follow the instructions on the CLEAPSS emergency cards E2a and cool the burn by immediately irrigating with gently running water for at least 20 minutes and until pain is relieved and heat is no longer felt.
Recycle the stearic acid and dispose of any small amounts of solid stearic acid in the general waste bin, if not reusable. Keep the stearic acid in boiling tubes that are used for this practical only. Check that the boiling tubes are not damaged before giving them out to the next class.
Method
- Put about 150 cm3 water into the beaker.
- Heat it on a tripod and gauze until the water just starts to boil.
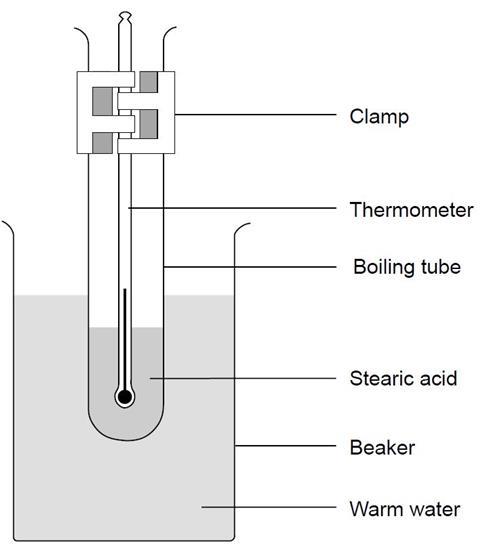
- Set up the apparatus as shown in the diagram and start the timer. Keep the water boiling, but not boiling vigorously.
- Using a suitable results table, record the temperature of the stearic acid every minute until it reaches about 70˚C. Note on your results table the point at which you see the solid start to melt.
- Use the clamp stand to lift the tube from the hot water. Record the temperature every minute as the stearic acid cools down until it reaches about 50˚C. Note on your results table the temperature at which you see the stearic acid begin to solidify.

Teaching notes
Remind learners not to attempt to move the thermometer in the solid stearic acid, as it will break.
Energy must be supplied to melt a solid; this same energy is released when the liquid re-solidifies.
This experiment presents a good opportunity to demonstrate how to maintain a steady temperature using a Bunsen burner. Slide the Bunsen burner aside as the boiling becomes too vigorous; slide it back as the water stops boiling. It is not essential that the water bath is boiling. Provide learners with another thermometer and ask them to maintain a lower temperature, say 80°C.
A variation to this experiment is to plot only the cooling curve. Place all the boiling tubes with stearic acid into a large beaker. Place some hot water in the beaker and continue to heat with a Bunsen burner. Remove from the heat when all the stearic acid has melted. Get learners to place a thermometer into the stearic acid and place the boiling tube into a test tube rack or beaker. Ask them to take the temperature every 30 seconds or every minute and plot a graph. Many learners will anticipate that the stearic acid will continue to cool to zero – it is useful to discuss why the stearic acid stops cooling when it reaches room temperature.
In either version of the experiment, it is good practice for learners to draw a graph of their results. There should be a clear horizontal line in the graph which corresponds to the changes of state; however many school samples of stearic acids are not very pure, so the line is often not perfectly horizontal. The exact melting and freezing points of the stearic acid may not be exactly the same and will depend on the purity of the product and where it was purchased from, but are usually about 55–70°C.
Answers
Find answers to both the student worksheets in the teacher notes.
Downloads
Melting and freezing stearic acid presentation slides
Presentation | PDF, Size 1.54 mbMelting and freezing stearic acid standard student sheet
Handout | PDF, Size 0.17 mbMelting and freezing stearic acid student support sheet
Handout | PDF, Size 0.5 mbMelting and freezing stearic acid teacher and technician notes
Handout | PDF, Size 0.58 mbMelting and freezing stearic acid presentation slides
Presentation | PowerPoint, Size 3.23 mbMelting and freezing stearic acid standard student sheet
Editable handout | Word, Size 0.57 mbMelting and freezing stearic acid student support sheet
Editable handout | Word, Size 0.91 mbMelting and freezing stearic acid student support sheet
Editable handout | Word, Size 0.97 mb
Additional information
This is a resource from the Practical Chemistry project, developed by the Nuffield Foundation and the Royal Society of Chemistry. The supporting resources were updated in 2025 by Dorothy Warren.
Practical Chemistry activities accompany Practical Physics and Practical Biology.
© Nuffield Foundation and the Royal Society of Chemistry


1 Reader's comment