


Armed with these teaching approaches, you’ll take to teaching Newton’s Third law like a duck to water

In my previous article on teaching physics for chemists, I identified themes that non-specialist teachers of physics should convey so that students learn the patterns and strategies that help physicists think about how the universe behaves. This article applies these themes to the concept of forces, focusing on the types of interaction and how forces are represented.
In my previous article on teaching physics for chemists, I identified themes that non-specialist teachers of physics should convey so that students learn the patterns and strategies that help physicists think about how the universe behaves (rsc.li/4xZTT2q). This article applies these themes to the concept of forces, focusing on the types of interaction and how forces are represented.
Phrase Newton’s Third Law carefully
Phrase the law carefully
There are advantages to teaching Newton’s Third Law at 11–14 level. This establishes forces as interactions that cannot act in isolation and avoids the misconception that only moving objects can exert forces. The First and Second Law both involve the concept of changing motion, which should be taught later as a consequence of forces.
The words push and pull are more intuitive and better describe a force as an interaction
The phrase ‘equal and opposite’ – when X pushes (pulls) Y, Y exerts an equal and opposite push (pull) on X – is a common feature of physics, appearing in electrostatics, the structure of an atom, electromagnetic induction, the change in momentum of two objects in collisions and explosions, and when practically measuring the frictional force on a sliding object.
Versions of the Third Law that use the words action and reaction or if … then … are confusing to students, since these imply there is motion or that the other force happens sequentially afterwards. Push and pull are intuitive words and better describe a force as an interaction rather than something an object has, and the word exerts supports the idea that both events occur simultaneously.
Explain that these force pairs act on different objects. Avoid confusing force pairs with balanced forces which are two independent forces that act on the same object. Show this to students – when they push down on their desk, they can feel the push that prevents their hand from moving through its surface.
Introduce force names with examples
It can be tempting to teach a list of names for forces, but this misses understanding why the forces occur and makes teaching more advanced concepts, such as gas pressure, more challenging.
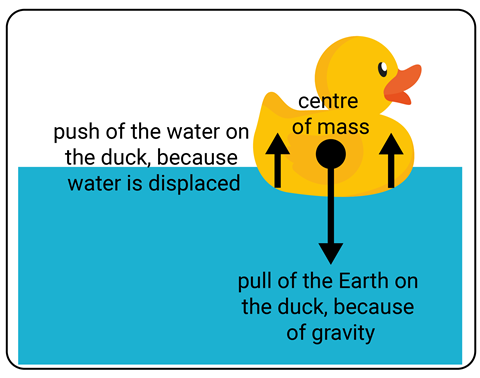
Introduce each force separately as a push or a pull on an object along with an explanation, suitable for the level you’re teaching, of what causes that force. You might describe weight as ‘the pull of the Earth on the apple, because of gravity’ at 11–14, but ‘the pull of the Earth on the apple, because the Earth has a gravitational field that attracts other masses’ at 14–16.
Here are more examples:
- magnetic attraction – the pull of the north pole on the south pole, because opposite magnetic poles attract each other
- air resistance – the push of the air on a plane, because particles that make up the air collide with the moving plane
- tension – the pull of a rope on a bucket, because the rope tries to maintain its shape.
Represent forces with diagrams
Force v free-body diagram
A force diagram, such as figure 1, is the best representation of the physical mechanisms and the useful for supporting explanations of why there are pushes or pulls. For contact forces, highlight points, surfaces or volumes that are responsible for the force, such as the underside of a falling parachute or the front of a moving train, where collisions with air particles cause air resistance. For non-contact forces, physicists model the overall effect on an object by simplifying all the forces as if they act from a single point. Start the force arrow at the centre of mass of the object, or for charges and magnets from where the field is strongest (at the centre of the charge or the magnetic pole).
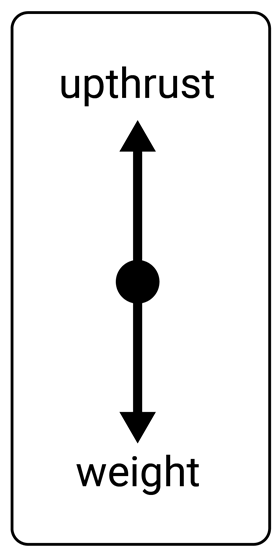
Once the underlying reason for the force is understood, then the names of forces are more meaningful. Now you can use a free-body diagram, where all the forces on a single object are projected from its centre. This is an example of where physicists strip away complexity to focus on what matters.
Figure 2 is a model that better supports comparison of the size and direction of forces and is also the most useful for working out the resulting force and subsequently how the forces affect the object. Stay tuned for my next article, which will focus on this.
Martin Coombes








No comments yet