


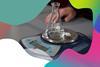
Measure and evaluate the combustion of alcohols using spirit burners
The value of experiencing live practical work cannot be overstated. Numerous studies provide evidence of its value in terms of learner engagement, understanding, results and the likelihood of continuing to study chemistry or work in a related field.
Use this video to complement live practical work, or to help learners understand the methods, equipment and skills when they cannot access the lab.
Chapter titles: 00:09 Introduction to enthalpy change of combustion; 00:39 Carrying out the experiment; 02:59 Repeats and testing other alcohols; 03:25 Complete and incomplete combustion; 04:09 Results and heat energy change calculation; 05:54 Evaluation.
Teacher notes
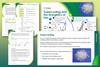
Full teacher notes are available in the supporting resources booklet (also available in MS Word), including ideas for how to use this video and the accompanying activities and answers to use as part of your teaching.
-
-
Learner slides
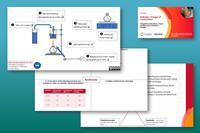
Integrated instructions, Frayer models and Johnstone's triangle
Download as: MS PowerPoint -

Notes on running the practical experiments
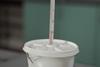
The video uses a copper calorimeter but you can use a conical flask instead. The practical shown demonstrates how to measure the enthalpy change of combustion of ethanol. Ensure that the spirit burners have lids as learners will use these to snuff out the flame and stop any hot alcohol from evaporating at the end. It is easy to break the thermometer by knocking it out of the calorimeter. The video shows the thermometer carefully clamped into position and suggests using a glass stirring rod to ensure even heat distribution. By telling everyone to stop when the temperature reaches 70°C with 100 cm3 of water, a class set of results will provide the repeats needed. You can instruct learners to stop at a different final temperature, too.
They will calculate the heat energy change in joules using the equation Eh, or Q, = mcΔT. Learners can also determine the heat energy change per gram and per mole of fuel (molar enthalpy) as a challenge.
Use the Johnstone’s triangle, available in the PowerPoint slides, to help learners link their observations to what’s going on at the submicroscopic level.
We only used ethanol (CLEAPSS student safety sheet 60) as a fuel in the video, but you can use other alcohols and compare their heat energy changes using the same method.
Health, safety and technical notes
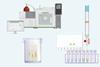
Read our standard health and safety guidance and carry out a risk assessment before running any live practical. Refer to SSERC/CLEAPSS Hazcards, recipe books and student safety sheets. Hazard classification may vary depending on supplier. Download the technician notes for the full equipment list, safety notes and tips.
Procedure
- Clamp the calorimeter, or conical flask, using a clamp stand, boss and clamp so that it is approximately 1 cm above the spirit burner when the lid is on.
- Clamp the thermometer using the same clamp stand and another boss and clamp so that it is in the water but not touching the base of the calorimeter/conical flask. Be careful not to overtighten the clamp as the thermometer might break.
- Measure 100 cm3 of cold tap water in a measuring cylinder and pour it into the calorimeter or conical flask.
- Use a thermometer to record the starting temperature of the water.
- Measure and record the mass of the spirit burner containing ethanol, with the lid on, using a mass balance. Keep the spirit burner the correct way up to avoid spillages.
- Take the lid off the spirit burner and keep it close.
- Place the spirit burner on the bottom of the clamp stand and light the wick of the spirit burner. Don’t move the spirit burner when it’s lit.
- Using tongs, put the lid on the spirit burner to put out the flame when the temperature of the water reaches 70°C or your planned temperature change.
- Measure the mass of the spirit burner containing ethanol and the lid again and record.
- Wait until the calorimeter/conical flask is cool before emptying the water and looking at the bottom for soot. Wipe the bottom of the container with some paper towel to remove any soot.
Find the integrated instructions for this experiment in the PowerPoint slides.
Real-world contexts
- Engage learners in fire safety with this problem-solving activity where they investigate how to make fire extinguisher foam.
- Link the environmental impacts of burning fuels to UN sustainable development goal 13, climate action. Download the flow diagram with questions to improve learners’ conceptual understanding.
- Highlight careers that are fixing the future, such as Raquel’s role as head of research and sustainability. She reduces carbon dioxide emissions by using pineapple leaf fibres to make a leather-like material, Piñatex, instead of burning the leaves.
- Provide context to thermodynamics with this infographic poster, which you can display in your classroom, and use the activity to explore more on energy with 16–18 year-old learners.
- Demonstrate the ‘alcohol gun’ experiment to show learners what happens in an internal combustion engine.
Key terms
Learners will need to have a clear understanding of the following scientific terminology:
- Complete combustion – a chemical reaction that occurs when a substance (fuel) reacts in a good supply of oxygen to give out heat and light.
- Incomplete combustion – a chemical reaction that occurs when a substance (fuel) burns in a limited supply of oxygen to give out heat and light.
- Enthalpy change – the difference between the heat/thermal energy of the reactants and the energy of the products.
- Energy – the ability to ‘do work’.
- Exothermic reaction – a chemical reaction where energy is transferred from the chemicals to the surroundings (usually in the form of heat).
- Fuel – a substance that stores energy and produces heat when burned.
- Alcohol – a homologous series of compounds containing the -OH functional group, with the general formula CnH2n+1OH.
- Energy transfer – the movement of energy from one energy store to another energy store.
- Activation energy – the minimum amount of energy needed for a chemical reaction to happen.
- Molar enthalpy change (challenge only) – the heat/thermal energy change per mole of substance.
You will find a template, example Frayer models and suggested answers for the terms: ‘exothermic’, ‘combustion’ and ‘incomplete combustion’ in the PowerPoint slides. Find more examples and tips on how to use Frayer models in your teaching.
Cross-curriculum links and skills
- The follow-up worksheet provides an opportunity for learners to apply their mathematical skills through converting units and calculations.
- In physics, learners may measure the specific heat capacity of other substances so make links to these practicals to embed their learning.
- Learners can also perform a similar experiment to find out the energy stored in food, such as crisps.
Common misconceptions
Fuels are energy stores from which energy is ‘released’.
Language used when discussing energy both in everyday life and in school, such as ‘fuels contain energy’, can give learners the impression that energy stored inside the fuel is ‘released’ when a fuel burns. Reinforce that combustion of a fuel is a chemical reaction that also involves oxygen and transfers heat energy to the surroundings. Research suggests using the phrase fuel-oxygen system helps learners to understand this point.
Use the same language learners will hear in their physics lessons on energy stores and transfers. The idea of energy being ‘released’ can lead to misconceptions about chemical bonds. Learners often form the idea that energy is released when bonds break, when in fact bond breaking is an endothermic process.
Energy can be created or used up.
When a combustion reaction transfers energy to the surrounding air, the energy dissipates. This everyday experience may reinforce the idea that energy can be ‘lost’. Make links between chemistry understanding and physics understanding to help learners in overcoming this area of misconceptions. It is important to reiterate the law of conservation of energy whenever discussing energy in chemistry: energy cannot be created or destroyed.
Variable: using the same mass of fuel or burning the fuel for the same length of time.
Reiterate that the same amount of energy is transferred to the water so learners must measure the mass of fuel needed to raise the temperature of the same mass of water between the same temperatures. For different fuels this will involve a different mass of fuel.
Some fuels are just ‘stronger’ than others.
Draw out the idea that the longer the carbon chain, the more heat energy is transferred. Avoid using terms such as stronger or weaker in this context. You could compare propan-1-ol and propan-2-ol as an extension.
When using Eh, or Q, = mcΔT, mass must be measured in kilograms.
It is more useful to have the mass measured in grams. Learners can then convert to moles for extension work. In physics the mass measured in a specific heat capacity experiment will usually be in kilograms and is 4200 J kg-1 °C-1 for water. In chemistry, we use a specific heat capacity for water of 4.2 J g-1 °C-1. As long as learners are consistent with the unit of mass used in the calculation, they will get the same answer.
When using Eh, or Q, = mcΔT, m is the mass of alcohol used.
The mass, m, in the equation can also be the volume of water heated because the density of water is 1 g cm-3 so a mass of 1 g has a volume of 1 cm3. For some learners you may need to revisit the concept of density and use a more structured approach to work out the volume. A common misunderstanding of this equation is for learners to enter the mass of fuel used instead of the mass of water.
More resources
- Use the tips and resources in the CPD article How to teach chemical energetics.
- Enhance practical work as learners progress through their chemistry education with these ideas, including a microscale approach to measuring energy changes in solution.
- Discover more experiments to develop learners’ understanding of energetics and improve their research skills.
Downloads
Enthalpy change of combustion supporting resources
Handout | PDF, Size 0.89 mbEnthalpy change of combustion technician notes
Handout | PDF, Size 0.58 mbEnthalpy change of combustion slides
Editable handout | PowerPoint, Size 0.29 mbEnthalpy change of combustion supporting resources
Editable handout | Word, Size 0.77 mb
Additional information
The original video script, supporting resources and slides were written by Karen Marshall. The technician notes were adapted by Sandrine Bouchelkia.


Practical videos | 14–16 years
- 1
- 2
- 3
- 4
- 5
 Currently reading
Enthalpy change of combustion
- 6
- 7
- 8
- 9
- 10
- 11
- 12
- 13
- 14


No comments yet