


Shed some light on spectroscopy
This practical on cold light provides an interesting way to emphasise the importance of making detailed observations. It allows students to practice following a flow chart and is a good lead-in to teaching spectroscopy. It could also be followed up with individual or group projects on the applications of cold light – these could include examples of bioluminescence or research on how a TV or flat screen works for instance.
If teaching a biology unit, the example of chlorophyll from spinach may well be worth using to show a little more clearly how chlorophyll works.
Equipment required
A darkened room or a box for each group of students to create their own dark area.
For each group of students:
- White light – from a lamp or torch
- UV lamp (these can be purchased at reasonable prices from many internet sites – they are often sold as security devices for checking whether bank notes are genuine)
- 2 or 3 spinach leaves
- Knife (blunt ones such as ordinary table knives are fine)
- Tile or plate
- Approx 20 cm3 ethanol
- Beaker (100 or 250 cm3)
- Boiling tube with bung
- Glass rod
- Wrapped clear boiled sweet – if you can get Lifesavers® from the USA in ‘oil of wintergreen’ flavour they work best, but mints such as Fox’s Glacier Mints or similar are fine
- Clear plastic bag (eg sandwich bag)
- Pliers
- White paper
- Washing machine powder
- Fluorescent pens
- Brown paper (back of an old envelope is fine)
- Glow-in-the-dark sheet (available at a reasonable price from http://www.mutr.co.uk (accessed November 2005))
- Tonic water (the bottle does not need to be opened so the same one will last for a long time)
- Samples of gyspum, calcite and/or fluorite minerals
- Some resealable envelopes – optional (they give a flash of light when opened in a darkened room but not all work so it is worth checking before giving them to students)
- Eye protection.
Health, safety and technical notes
- Read our standard health and safety guidance
- Warn students not to look at the UV lights. They should always be pointing away from the eyes and students should shine the light only on the item that they are observing.
- Ethanol is flammable – it should not be used near flames.
- Pliers can crush fingers if they are not used correctly.
- Warn students not to eat in the laboratory
How it works
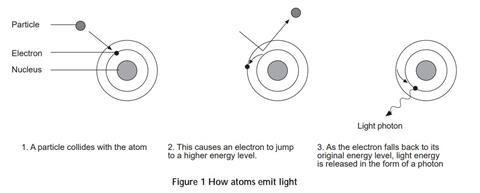
The way in which the light is produced varies according to which type of luminescence occurs. Fluorescence and phosphorescence are most closely related to the way in which Infra-red (IR) and UV-VIS spectroscopy work. In both fluorescence and phosphorescence, light is absorbed at one wavelength and released at another.
When the substance is exposed to certain wavelengths of light this radiation is absorbed and causes electrons in the atoms to be excited to a higher energy level. As these electrons fall back to a lower energy level (which may or may not be the original one) they release the ‘extra’ energy in the form of light.
The diagram below helps to explain this:
In the case of chemiluminescence (and bioluminescence, which is just a form of chemiluminescence) the light is the energy that is released during the course of a reaction. Some reactions produce light rather than heat or sound.
Triboluminescence is light emitted when mechanical forces act on the structure of a substance.
Cold light
Cold light is also known as luminescence. It is light that is emitted when things are cold. Light emitted when things get hot is called incandescence – for example, the light from a Bunsen burner, a standard light bulb or an electric cooker when hot.
There are many types of cold light, given different names depending on the conditions under which the light is emitted.
The flow chart below shows how you can decide which type of light an object is emitting.
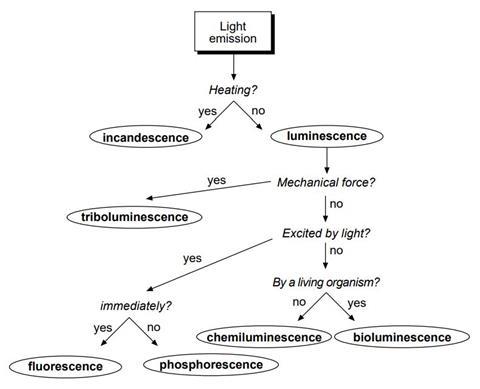
You are going to examine a number of different items under white and UV light and observe what happens. From your observations it will be possible to decide which type of light emission you have observed.
What to do
- Set up a table like the one below for your observations.
- Cut up the spinach into very small pieces. Wearing eye protection, scrape these into the beaker and just cover them with ethanol. With the beaker on the bench, gently press on the spinach leaves with the glass rod. When the leaves are looking pale and the ethanol is very green, carefully decant the ethanol into the boiling tube and put a bung into it.
- Using the fluorescent pens, write or colour on the brown paper.
- In a darkened room, shine a white light on each of the items in turn. Look carefully at the items and note the colour and intensity (bright, dim etc) of any light given off by them. Make sure you observe the spinach extract in the boiling tube from several angles and note any differences.
- Turn off the light and make the same observations.
- Repeat the above using UV light.
- Leave the boiled sweet in its wrapper and place it inside the plastic bag. Make sure that the area where you are working is dark and then crush the sweet using the pliers. Watch the sweet carefully as you crush it.
- Decide if each item is luminescent and what type of luminescence it shows.
| Item | White light on | White light off | UV light on | UV white off | Luminescent | Type of luminescence |
|---|---|---|---|---|---|---|
Downloads
Cold light
PDF, Size 0.39 mb
Additional information
This resource is a part of our Inspirational chemistry collection.
Inspirational chemistry book
A collection of resources, aligned with GCSE bodies, to support learners in England, Wales, and N Ireland.
- 1
- 2
- 3
- 4
- 5
- 6
- 7
- 8
- 9
- 10
- 11
- 12
- 13
- 14
- 15
- 16
- 17
- 18
- 19
- 20
- 21
- 22
- 23
- 24
- 25
- 26
- 27
- 28
- 29
- 30
- 31
- 32
- 33
 Currently
reading
Currently
reading
Cold light
- 35


No comments yet