In this practical, students experiment with magnification by placing water drops on top of lettering.
Student Sheet:
In this practical I will be:
- Carefully observing how the size of objects alters when water drops are placed over them.
- Testing how altering the distance between the object and the lens changes the object’s appearance.
- Using my scientific knowledge and understanding of shape of lenses, how we see objects, explain my observations of the water droplets.
Introduction:
Recently, you have managed to trade one of your paintings for a jeweled bracelet. When you return to your workshop you place the bracelet in a box with some drachma. When you look at the bracelet again, in one of the gems you can see an image of letters on the coins. However, something unexpected has happened to the letters. Like all good ancient Greek science-artists, you decide to investigate further…
Equipment:
- 1 microscope slide or clear plastic ruler
- 1 sheet of newspaper
- 1 crayon or non-permanent marker pen
- Petroleum jelly
- 1 eyedropper or plastic pipette
- A small amount of water
- Diagram of the eye
Method:
- Get a microscope slide or plastic ruler and put it on top of a piece of newspaper that has small print on it.
- Use a crayon (or non-permanent marker pen) to draw a small circle on the slide. Look closely at the newsprint that is within the circle and try to measure the circle that would surround the letter.
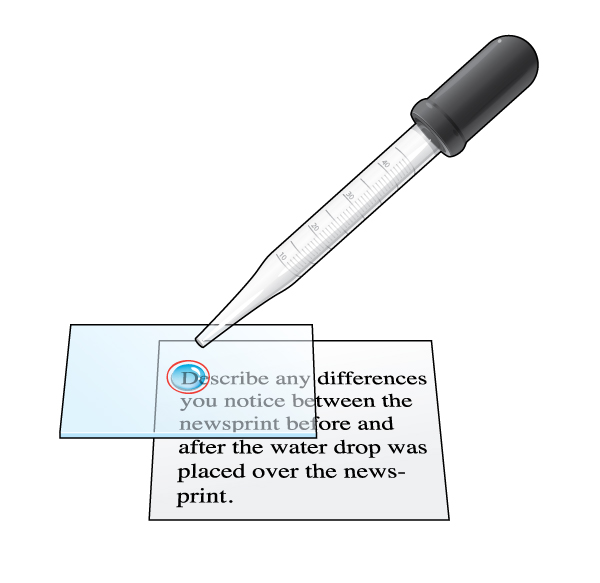
- With an eyedropper or plastic pipette, carefully put a drop of water (about 5–6 mm) across in the circle, so that it keeps its shape.
Peter Bull
- If the drop flattens out completely get a clean microscope slide and make a circle of petroleum jelly on the slide. Make sure you keep the centre very clean. Put the water drop inside the circle as before.
- Look down at the newsprint, through the top of the water drop. You might need to get quite close to the water drop to be able to see.
- Experiment with carefully lifting the slide up or lowering it towards the newsprint.
- What do you notice about the size of the newsprint beneath the water drop?
- Describe any differences you notice between the newsprint before and after the water drop was placed over the newsprint.
- What do you notice about the shape of the water drop on top of the glass?
- What is the shape of magnifiers?
- How do you think water and magnifiers bend light?
- Do you think the shape is important?
- How do you see the newsprint?
Going further:
As an extension activity examine salt, sugar, leaves, etc.
It may be easier to use a straw to place a few grains of salt or sugar onto the microscope slide or ruler. To do this, dip the end of the straw into the salt or sugar and scrape along the salt or sugar to get a few grains into it. Then carefully place the end of the straw onto the slide or ruler and tip them very gently onto it.
You could also experiment with different sized water drops and see if the magnification changes.
Explain why you think this is happening.
Research the life of the scientists Anton van Leeuwenhoek and Robert Hooke.
Theory:
Surface tension is the name for the attractive forces between the particles or molecules in water, which make the water drops become ball shaped or spherical. This is because the molecules inside a drop are attracted to each other in all directions, from the surface inward.
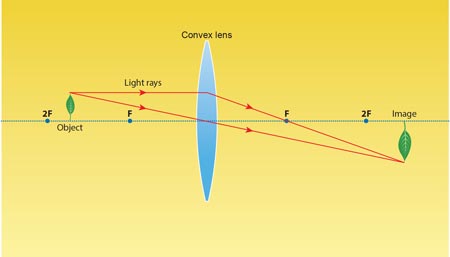
The outward curvature of the water droplet is similar to the curved surface of a lens. The more outwardly curved the lens, the stronger its magnification. This is because it is bending or refracting more light in a shorter space. This type of outwardly curving lens is called a convex lens.
A convex lens bends the light rays to focus on a point in space somewhere beyond the lens as you can see in the diagram below:
Peter Bull
By moving the lens toward and away from the object, you can adjust where the point of magnification strikes your eye.
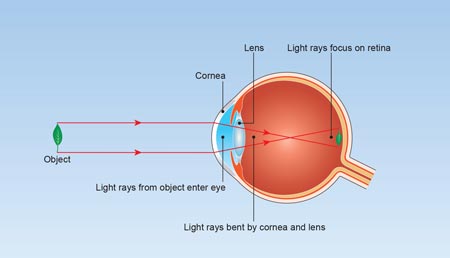
When light strikes your eye, the cornea and lens project it onto your retina, as shown in the diagram below.
Peter Bull
You should find the water drop magnifies by a factor of 4 - 5. The smaller the droplet the more the magnification, but it is also harder to look through and focus.
This was the principle behind the early microscopes, such as that used by the 17th century Dutch trader and scientist Anton van Leeuwenhoek (1632-1723). He perfected these early microscopes by using carefully prepared glass beads, similar in shape to your water droplet. Although difficult to use, these microscopes were powerful, able to magnify up to 200x.
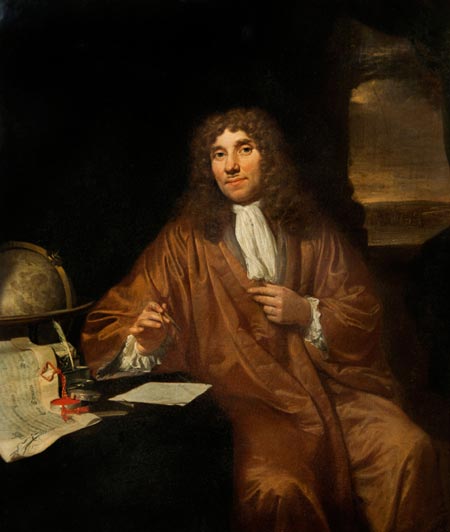
Anton van Leeuwenhoek.
© Peter Horree / Alamy
Teacher and Technician Sheet
In this practical students will:
- Carefully observe how the size of objects alters when water drops are placed over them.
- Test how altering the distance between the object and the lens changes the object’s appearance.
- Use their scientific knowledge and understanding, of the shape of lenses and how we see, to explain their observations.
Introduction for teachers:
(This topic could start with a group discussion about magnifying glasses during which the teachers introduce the following ideas especially the words in bold.)
Small things can be magnified to appear larger than they really are. This can be done using a magnifyingglass, lens or a combination of lenses in a microscope. A water droplet can act as a simple lens and magnify an object.
Pupils will make their own magnifiers out of a drop of water and learn how a magnifier works by exploring some properties of water, such as its ability to bend (or refract) rays of light, and form spherical droplets under surfacetension.
Pupils can work individually then come together in groups to discuss results and ideas.
Curriculum range:
All ages can take part in this activity since the aim is to gain some understanding of the thinking of the scientist when investigating artefacts in close detail. It links with:
- setting up simple practical enquiries, comparative and fair tests;
- reporting on findings from enquiries and observations, including oral and written explanations, displays or presentations of results and conclusions;
- using straightforward scientific evidence to answer questions or to support their findings;
- building a more systematic understanding of light by exploring and comparing the properties of light as it interacts with a transparent material;
- asking questions and developing a line of enquiry based on observations of the real world, alongside prior knowledge and experience;
- using appropriate techniques, apparatus, and materials during laboratory work, paying attention to health and safety;
- making and recording observations and measurements using a range of methods for different investigations; and evaluating the reliability of methods and suggesting possible improvements;
- presenting observations and data using appropriate methods;
- interpreting observations and identify patterns using those observations to draw conclusions;
- presenting reasoned explanations, including explaining data in relation to predictions and hypotheses; and
- learning about the concept of magnification by a lens and the way surface tension helps to form a lens.
Hazard warnings:
Always be careful when handling glass and sharp objects. You can get a magnification using a clear transparent plastic ruler.
It might also be prudent to remind pupils they should never look directly at the Sun (with or without a lens).
Equipment:
- Microscope slide or clear plastic ruler
- 1 sheet of newspaper
- 1 crayon or non-permanent marker pen
- Petroleum jelly
- 1 eyedropper or plastic pipette
- A small amount of water
- Diagram of the eye
Technical notes:
It might be useful to have some petroleum jelly available so the pupils can create a circle of jelly and place the water drop inside the circle. This is because sometimes the slide still has soap on it and this causes the water droplet to spread out and wet the glass surface rather than forming a spherical drop.
Magnification increases as the slide/ ruler is lifted up to a maximum of approximately 4x.
A clear plastic ruler can be substituted for a microscope slide if they aren’t available.
The newspaper should have some small print text on it.
The colour of the crayon is not important.
Results:
The pupils should see the newsprint magnified something like 2–5x original size.
Going further:
As an extension activity, pupils can use their lens to examine salt, sugar, leaves, etc.
It may be easier to use a straw to place a few grains of salt or sugar onto the microscope slide or ruler. To do this, dip the end of the straw into the salt or sugar and scrape along the salt or sugar to get a few grains into it. Then carefully place the end of the straw onto the slide or ruler and tip them very gently onto it.
They could also experiment with different sized water drops, see if the magnification changes and try. Using a larger water drop results in needing to lift the microscope or ruler higher from the print but this still achieves 4 x magnifications visible.
Pupils and students can be asked to explain what they think is happening.
Alternatively they could research the life of the scientists Anton van Leeuwenhoek and Robert Hooke.
Anton van Leeuwenhoek.
© Peter Horree / Alamy
Downloads
Making a water magnifier: student sheet
Experiment | PDF, Size 0.31 mbMaking a water magnifier: teacher sheet
Experiment | PDF, Size 0.17 mb