Discover the reactivity and reactions of alkenes with your 14–16 students with these classroom ideas and activities
We don’t directly use alkenes in our everyday lives, but they are important in the synthesis of everyday materials. Alkenes are used to synthesise alcohols, plastics, lacquers and detergents. They make possible the production of polythene bags, buckets and bowls, for example.
What students need to know
The alkenes are an homologous series of hydrocarbons with the general formula CnH2n. Alkenes are unsaturated because they contain a carbon–carbon double bond, which can react with a variety of other substances. They are made from oil through a process called cracking and are the main feedstock compounds in the synthesis of polymers, alcohols and haloalkanes. At 14–16, students are just beginning to learn about organic chemistry. It is important that they have a solid foundation before they move onto post-16 education, when they will study mechanisms to help explain how these reactions occur.
Common misconceptions
Students can develop some misconceptions based on how we teach organic chemistry at 14–16. For example, we often draw organic molecules with the atoms in parallel or perpendicular lines (figure 1). However, the shapes of molecules, and hence the bond angles, are important to explain reactivity. For example, the carbon atoms in ethene are trigonal planar and each has bond angles of approximately 120°. At post-16 we use the ‘valence shell electron pair repulsion’ theory to predict the bond angles and hence shapes of molecules. Essentially, bonding pairs and lone pairs of electrons repel each other. Pairs of electrons in the outer shell arrange themselves to be as far apart as possible to try to minimise repulsion – causing different bond angles and hence molecular shapes.
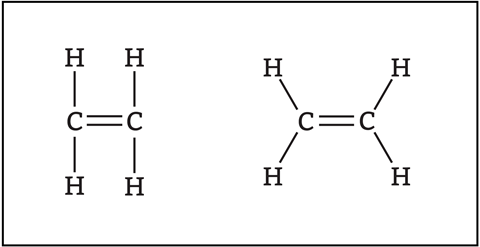
My students use Molymod molecular model sets to build simple organic molecules, which helps them see these in three dimensions with more realistic bond angles.
Suggestions for your teaching
Learning the basics of alkenes and their chemistry can take some time to master, but with practice all students can have a solid understanding of the fundamental ideas.
- Explain that most reactions involve two or more steps — make sure that students understand that they are learning just a simple model.
- Mention that how we draw organic molecules isn’t necessarily an accurate representation of their 3D structure. We simplify to help with learning the different families of compounds.
- Include some post-16 terms, such as electrophilic addition, when discussing why bromine water changes from orange to colourless.
- Use mini whiteboards to check students can accurately draw displayed formulas of alkenes and their addition products.
- Have students map the organic reactions of the alkenes as a starting point for organic synthesis to set them up well at post-16.
Ideas for the classroom
Introducing isomers
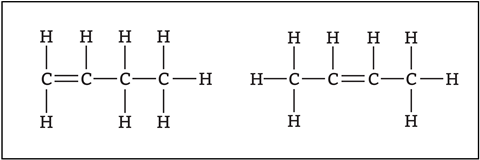
When drawing the displayed formula of butene, students may come across two different formulas (figure 2). These are isomers, compounds with the same molecular formula but with the atoms bonded in different orders. Students don’t need to know the names but-1-ene and but-2-ene at 14–16. However, it will be useful to practise drawing the displayed formulas of both.
Organic reactions mechanisms
At 14–16, students will look at how alkenes react with steam, halogens and hydrogen. The overall reaction may lead to the misconception that all chemical reactions happen in one step (figures 3 and 4).
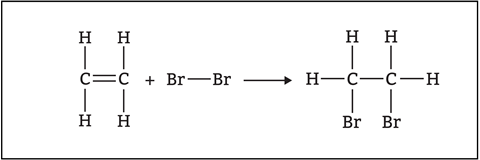
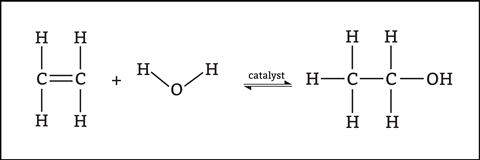
In some reactions, we can convert reactants into products in one step (concerted reactions). However, it is more common for reactions to occur in two or more steps (stepwise reactions). In these reactions, unstable reactive intermediates form, which then react to form products in subsequent steps.
At post-16, students will study organic reaction mechanisms, which is the step-by-step guide to how reactants become products. Mechanisms reveal which bonds break, where a reactant attacks and in what order the various steps of a reaction occur.
Students will learn about curly arrows, reactive intermediates, electrophiles and nucleophiles. Some of these ideas are discussed here.
Curly arrows
In organic reactions, covalent bonds are broken and made. We show the movement of pairs of electrons as curly (curved) arrows with a full head. When there is movement of more than one pair of electrons in a reaction step, the arrows tend to look like they chase each other around the structures.
- The tail of a curly arrow shows where electrons start.
- The arrowhead shows where electrons end up.
The tail of a curly arrow shows where electrons start, and the arrowhead shows where electrons end up.
Nucleophiles and electrophiles
These are chemical species that donate electron pairs (nucleophiles) or accept electron pairs (electrophiles). There is a nice bit of literacy here, teaching the etymology of words – nucleo- for nucleus or positive, electro- related to electrons hence negative, and -phile for loving.
Starting mechanisms
The chemical test for unsaturation — addition of bromine water — is a powerful demonstration to show addition reactions in action. If you have a group of students who aren’t satisfied with just learning the test and observation, this electrophilic addition reaction mechanism may interest them.
Essentially, electrophilic addition is a reaction in which electrophiles can attack the double bond. At this level, we teach that one part of the alkene double bond breaks and forms a new bond between a carbon and a bromine atom (figure 5). To allow this, the bond in the Br2 molecule must also break. This leads to the formation of a positive carbon atom and a negative bromine atom that react together to form a second carbon—bromine bond.
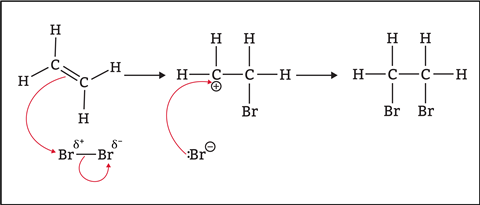
Be clear with the students that there is a lot more detail to learn, and other addition reactions can be more complex. For example, how does the double bond break? Why are there partial charges in the bromine molecule? And how does phosphoric acid catalyse the hydration reaction? We are only lifting the lid a little here.
Checking for understanding
After alkene reactions, students go on to study alcohols, carboxylic acids and esters. At the end of this series of lessons, provide students with an organic reactions map that shows all the organic reactions encountered so far. Students can practise by filling in a blank version of the map. Maps provide a good way to show the links and reactions between organic molecules and consolidate the basics before students move on to more in-depth organic chemistry at post-16.
Resources for your classroom
- Use the Alkenes worksheet to give learners context for this topic and use the flexible questions for assessment.
- Follow up with ideas from this additional worksheet that provides assessment questions on the reactions of alkanes and alcohols.
- Use the ideas and resources in this article on teaching curly arrows at post-16 to help your students master mechanisms.
- Help students understand electrical changes with this article on drawing reaction mechanisms.
- Use the Alkenes worksheet to give learners context for this topic and use the flexible questions for assessment: rsc.li/3wLtgnw
- Follow up with ideas from this additional worksheet that provides assessment questions on the reactions of alkanes and alcohols: rsc.li/3VboObh
- Use the ideas and resources in this article on teaching curly arrows at post-16 to help your students master mechanisms: rsc.li/3K8lQho
- Help students understand electrical changes with this article on drawing reaction mechanisms: rsc.li/3yrqwfv
Dan Beech is a science teacher and subject leader for science at Beamont Collegiate Academy





No comments yet