

Teachers and technicians share their favourite microscale practicals and why they love them
Microscale practicals can transform the way students work in the lab, reducing risk and cost, simplifying set-up and removing many of the logistical barriers associated with traditional experiments. Students use simpler equipment and it makes practical work less environmentally damaging. Teachers also report that it can improve student focus by reducing the load on working memory.
The experiments involve much smaller amounts of acids and alkalines, and the equipment is more easily accessible. For example, dimple tiles are used for displacement reactions between metals and solutions – something which is now regarded as standard practice. Expensive glass burettes are replaced by safer and more user-friendly plastic dropper bottles, and many activities can be carried out in an ordinary classroom, very helpful when lab space is limited.
Although there is some initial work involved – you may need to design templates, laminate resources and prepare labelled dropper bottles – this quickly pays off. Once established, many practicals fit neatly onto a single tray, use only tiny amounts of chemicals, significantly reducing risk and cost, and generate hardly any waste.
Here, five advocates of the microscale method share their top tips. Why not give it a go in your classroom?
There’s hardly any waste
Fleur Radford, science technician at Hedingham School and Sixth Form, Essex
As a chemistry technician, I’ve always tried to scale down practicals where possible. Doing this reduces waste, makes it easier for students to successfully complete the practical and makes it safer.
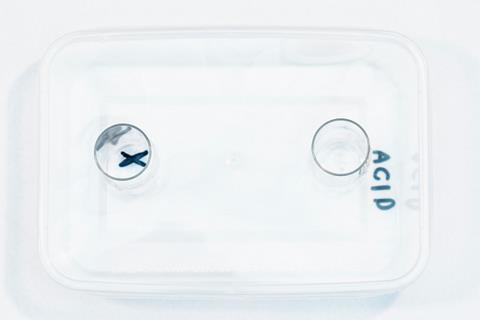
We use the microscale version of the disappearing cross experiment as developed by CLEAPSS. This is now the only version requested by our teachers as it cuts down on all the glassware, avoids the use of communal water baths at the back of the lab and reduces the sulfur dioxide released, making it a safer alternative.
Technicians can easily provide 12 sets to a class so student groups can be smaller. It’s quicker for students to complete the task because they each have their own water bath using hot water from kettles, which is important for us as lessons are only one hour long.
‘It’s much easier for students to gather results’
My personal favourite is the microscale laminated sheet I designed for the Edexcel testing for anions practical using the idea from CLEAPSS for anion testing. The practical consists of three different anion tests, five different known samples and five different unknown samples to be tested.
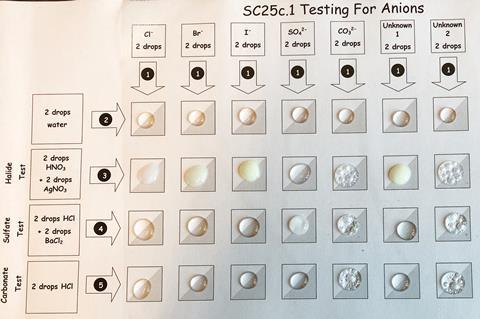
The test tube method required a lot of test tubes per group along with all the reagent bottles, sample bottles and pipettes. The microscale version is completed on one A3 laminated sheet so all the results can easily be compared to each other, much easier for students to gather their results as all the rows and columns are already labelled and much quicker to complete – again important when our lessons are only one hour. All the samples are provided in eye-dropper bottles which are kept specifically for this practical, hardly any waste compared to the test tube method. Easy to tidy away, simply wipe the sheets down.
It’s more sustainable
Helen Scally, head of chemistry at Turnbull High School, Glasgow
I’d like to share a microscale neutralisation experiment that has had a positive impact. Students add acid from a dropper bottle to an indigestion tablet and count the number of drops needed to neutralise the base.
The microscale version was developed from an older experiment that was unsuitable for younger learners as it involved the more expensive burette method. Instead of a burette, we use a dropper bottle of acid that will neutralise the bases in the tablet. The more drops of acid you add, the more effective the tablet is at neutralising excess stomach acid. We use this experiment as an investigation and compare different brands of tablets.
I’ve found there are several benefits to this technique: the smaller volume of acid means the method is more sustainable, expensive glassware is not used and the experiment is easier to run. Apparatus that requires precision and skill (usually introduced to more senior learners) is not used at this stage.
Students love this everyday example of neutralisation and it contextualises the learning perfectly. We calculate the cost per tablet, which helps with numeracy skills, and they also develop critical thinking by discussing which tablet might be best – and why – before beginning the practical experiment.
We use leftover Covid-testing resources
Andrew Symonds, technician at Swanshurst School, Birmingham
We have been using microscale experiments for quite a while now. It was successful early on with halogen displacement experiments; after the initial set up, it reduced chemical usage. The instructions are included on the laminated sheet, which makes it much easier for teachers to run the experiment. This experiment was requested by a teacher who wanted something simpler for a class who he knew would struggle with lots of different containers and pipettes, and it may have been inspired by the microscale templates published by CLEAPSS.
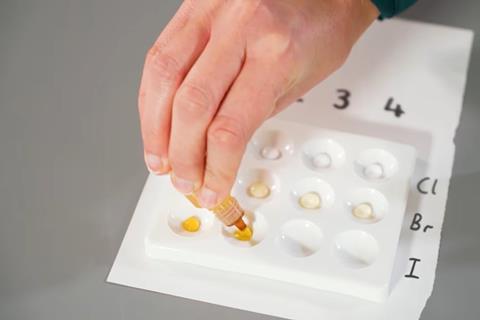
We have also used some of the CLEAPSS resources for testing cations and anions. This can involve more work in the initial set up as we provide class sets of 10 with each chemical in little dropper bottles. Simple food dye chromatography has been reduced to microscale by providing class sets of dyes in 3 ml centrifuge tubes – students dip cocktail sticks in each dye to apply it to the chromatography paper (you do have to remind them that they can use both ends of the stick).
On acid and alkali testing, we use a simple laminated sheet with a range of indicator papers and dilute chemicals. A number of classes have used it, and the reduction in wastage of indicator paper in particular is significant. I think it is better to use paper rather than liquid indicators as the paper absorbs the drops of chemical and the laminated sheet can be wiped with a paper towel.
The little bottles, dropper tubes and cardboard holders that came with the Covid lateral flow stuff have proved very useful. There is some work required with designing templates, laminating them and labelling lots of containers, but once done some experiments fit in one tray and still do the job.
There’s a positive knock-on effect
Niall Begley, chemistry teacher at Our Lady and St Patrick’s College, Belfast
I have adapted several practical activities to microscale over the past few years, particularly where it improves efficiency, reduces costs and gives students more opportunities to carry out practical work independently.
One of my favourite examples is the GCSE-prescribed practical on the reactivity series of metals. Traditionally, this requires numerous test tubes, racks, spotting tiles and relatively large volumes of metal ion solutions. By moving to a microscale approach, students complete the entire practical on a laminated reaction mat with a printed grid that replicates a spotting tile. The mat also includes simple instructions and diagrams, providing dual coding to support students as they work independently.
One of my favourite examples is the GCSE-prescribed practical on the reactivity series of metals (rsc.li/4qsTxyu). Traditionally, this requires numerous test tubes, racks, spotting tiles and relatively large volumes of metal ion solutions. By moving to a microscale approach, students complete the entire practical on a laminated reaction mat with a printed grid that replicates a spotting tile. The mat also includes simple instructions and diagrams, providing dual coding to support students as they work independently.
‘Microscale significantly reduces chemical use’
Using only a few drops of each metal ion solution and very small pieces of metal significantly reduces chemical use and waste, lowering departmental costs while also making preparation and clean-up much quicker.
The compact layout allows students to compare all of their results side by side, making patterns in reactivity much easier to identify. I have found that students are more confident completing the practical because the method is straightforward to follow and the immediate visual comparisons reinforce the learning.
The same approach works equally well for precipitation reactions, such as testing for halide and sulfate ions, where the small-scale format makes colour changes easy to observe and compare.
Another activity I have successfully adapted is the A-level acid-base titration. Before students progress to the full-scale practical, they complete a microscale version using a Pasteur pipette as a burette and a small plastic shot glass as the conical flask. This allows them to practise adding solution dropwise while swirling, developing the coordination and technique required for a conventional titration without using large volumes of reagents.
I have found that this approach dramatically reduces chemical consumption while allowing students to repeat the procedure several times if needed, building confidence before attempting the assessed practical. There’s a positive knock-on effect, as students make fewer procedural errors when they move on to the full-scale titration because they have already mastered the key practical skills in a low-risk, low-waste environment. It also makes the activity much easier to run in a busy classroom, with less preparation, less to clean up, and fewer concerns about wasted chemicals.
Overall, microscale practical work has enabled me to reduce costs, minimise waste and make practical lessons more accessible for students, while maintaining, and often improving, the quality of the learning experience.
I can’t find any downsides
Liza Smith, lead technician at Newcastle and Stafford Colleges Group
We started trialling some A-level microscale experiments a few years ago, after I attended a course at the technicians’ conference. The aim was mainly to reduce the amount of waste that needed proper removal (halogen displacement, electrolysis and oxidation of alcohols, etc.).
I met some resistance from the more ‘old school’ teachers – until they actually tried it. We now have about 12 experiments that are done this way.
A big positive for me is that I’m not making litres of 10 different solutions just for one experiment. I can make 100 ml of each one and they will cover at least five different classes. I’m also not washing hundreds of test tubes!
The students love microscale and get very protective of their little kits. At first I was using the Edulab sets, but as we’ve gone along I’ve found cheaper and more useful alternatives. I enlisted the help of our engineering department here at the college. I adapted laminated sheets from the RSC and CLEAPSS to fit our requirements, including a step-by-step guide to the experiment, colour coding for the 10ml bottles of solutions and hazard warnings.
Most popular with the students are TM ions and reactions of phenol. I found some old clear plastic dimple trays that have 96 wells for the TM ions. They make the experiment much more visual and students can snap a pic on their phone to help during revision; very useful for the BTEC students too.
For me, the fact they’re not walking around the labs with bottles of chemicals is a big plus on the health and safety side.
The reactions of phenol is probably my favourite. Again, I adapted a sheet from the RSC, which made the process so much easier. Phenol is always one chemical I’m very wary around, but students each have their own little jar, so they don’t have to wander around the lab or pass a jar between them. As we are using reduced amounts, chemicals can be easily neutralised with some 1 M sodium hydroxide and rinsed away. I don’t have to worry about stray phenol crystals in the washing-up bowls.
To be honest, I’ve yet to find any downsides to microscale. It does what it needs to do, and much more safely and for less expense, both in terms of purchasing chemicals and equipment and paying for chemical removal.
More resources
- Get started with our fast guide to microscale practical work.
- See the apparatus and techniques that make microscale chemistry possible.
- Read more first hand experiences of using microscale.
- Explore our full collection of microscale practicals, activities and teaching resources.
More resources
- Explore our full collection of microscale practicals, activities and teaching resources: rsc.li/3UKe3yD




1 Reader's comment