


The big benefits of small-scale practical experiments for chemistry teaching
What is microscale practical chemistry?
Microscale (or small-scale) chemistry refers to practical activities that use much smaller amounts of reagents, and often with simpler equipment. Traditional practical work typically uses up to 100 cm3 of gas, 1–50 g of solid and 10–100 cm3 of liquid. For microscale activities, less than 100 cm3 of gas, 1 g of solid or 0.5–1 cm3 of liquid is needed. Microscale activities have been used for a long time and some of the activities have become standard practice, for example, doing displacement reactions between metals and solutions in dimple tiles.
What are the advantages?
A microscale approach removes barriers that get in the way of carrying out practical work in schools, such as expense, risk and logistics. Teachers also need to find the time to teach theory alongside practical skills. Using microscale chemistry reduces cost and waste, which makes practical work more sustainable and less environmentally damaging.
Students can carry out practical activities more easily, even in conditions where space is restricted. Some activities can be carried out in ordinary classrooms – a boon during pandemics when students are bubbled into one classroom the whole time. Some teachers report that they can manage their classrooms better because students sit down for this work (so there is less walking around) and even work on their own. Students can note observations more clearly and carry out otherwise very hazardous activities (for example, microscale reduction of copper oxide with hydrogen). Teachers can also encourage the use of new experiments.
Another consideration is that doing practical work on this scale can improve student focus by reducing the load on working memory. For some large-scale experiments, students need to follow and remember a long series of steps. Sometimes this means that the main objective of the practical experiment is lost.
But are there disadvantages?
Yes. Getting going with microscale activities does require some investment of time and money to purchase and set up new equipment, such as dropper bottles.
Some teachers worry their students will be disadvantaged in exams if they don’t do practical work the right way. Microscale techniques are not yet present in exam questions. Others are worried about students not being able to transfer information from microscale to the larger scale, and have concerns over the accuracy of quantitative work (for example, during microscale titrations).
Other concerns include whether inexperienced students can cope with small equipment, and whether teachers will lose the wow factor associated with larger scale experiments.
How can I start to incorporate microscale practical work?
One way to start is with simple replacements, for example using the bottle top crucible rather than ceramic crucibles, or the spirit burner instead of a Bunsen burner.
You can add in microscale techniques to enhance students’ learning. For example, students can do a microscale titration first to learn about mixing two solutions and look for the endpoint, and use measured data to calculate the concentration.
What experiments should I start with?
Simple activities, such as comparing indicator colours, are a good place to start. Students mix solutions and indicators, and place small drops on a special laminated sheet; the students can readily spot changes in colour and the sheet can be wiped clean easily.
Microscale diffusion is also straightforward to set up and quick to observe. You can even project demonstrations onto a screen. Examples include dissolving microgram amounts of coloured solids in puddles to see the colour spread, and then using a homemade LED conductivity indicator to illustrate the existence of ions.
Microscale cracking of hydrocarbons requires much smaller amounts of chemicals than traditional experiments and reduces the amount of fumes produced. With a microburner, students heat paraffin and a catalyst (aluminium oxide) to produce an alkene that turns bromine water colourless.
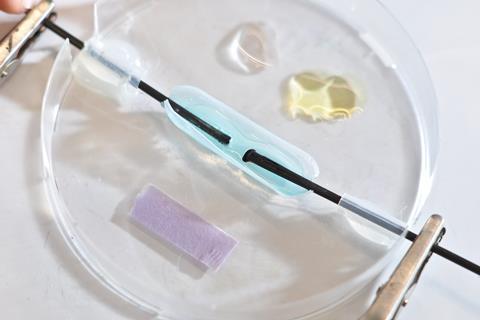
Electrolysis on the microscale can be demonstrated by using a Petri dish fitted with carbon–fibre electrodes and ionic solutions, such as potassium bromide, potassium iodide and copper chloride. Metallic copper is produced at the cathode, and bubbles of chlorine at the anode, which can be viewed through a digital microscope, if necessary.
What do I need to consider when transitioning to microscale work?
It’s important to spend time with your school’s science technicians exploring how the equipment will work, and time with other teachers trialling new activities before using them with classes.
Some expenditure is necessary, but the new equipment – dropper bottles, dimple tiles, Petri dishes, pipettes, bottle tops, carbon–fibre rods and plastic pipettes – is inexpensive, especially compared to the cost of glassware. There is a strong economic argument for investing in microscale activities because of the significant reduction in chemical costs over time.
Is there training available in microscale techniques?
Some teacher training organisations cover microscale reactions in their courses, such as the University of Cambridge and St Mary’s University, Twickenham. And those lucky enough to benefit from the RSC’s teacher training scholarship programme get training in microscale chemistry practical work. The RSC also includes microscale training sessions as part of its CPD offering, so keep on an eye on their upcoming events.
Where to go next
- Bob Worley and David Paterson’s book, Understanding chemistry through microscale practical work, is a useful introduction to microscale for teachers and technicians.
- The RSC has a range of classroom resources for teachers.
- CLEAPSS provides teacher training and has a large range of microscale experiments. It also has a selection of demonstration videos.


No comments yet