


Get your students fired up with these teacher-tested tips
In my experience, most students love burning things. This means lessons on combustion appeal to many.
A special type of oxidation, combustion always involves heat and light. Using the oxygen-focused definition, an oxidation reaction is one where a substance reacts with oxygen and produces oxides.
Combustion is not often mentioned in the chemistry syllabus, but we can use it as an example of a chemical change when teaching 11–14 chemistry. At 14–16, courses commonly feature the burning of hydrocarbon fuels and its associated pollution. Follow these strategies to meaningfully use burning to teach combustion and oxidation.
1. Tell them why
Simply burning substances for the sake of it undermines the core goal of a chemistry lesson. While students might think that a whole lesson spent burning things is great, they may lose sight of the purpose of experimental work, making practical, focused learning less effective in the long term. When deciding to do a combustion experiment, make sure its purpose is clear and is communicated fully to the students. What do you want them to observe? What do you want them to measure? How does the practical work relate to underlying theories?
2. Choose carefully
Fifteen pairs of students burning fuels can end up being chaotic, noisy and smelly. Even with good classroom management, it would be unrealistic to think all students are learning effectively as they merrily set fuels alight. Preparing a well-chosen demonstration with a clear explanation is a good way to include the impact of an experiment, while keeping students focused on the learning objectives. There are some combustion experiments like the ethanol rocket that you can only do as demonstrations. Practising these in advance and rehearsing verbal explanations is always time well spent.
3. Reduce scale to reduce risk
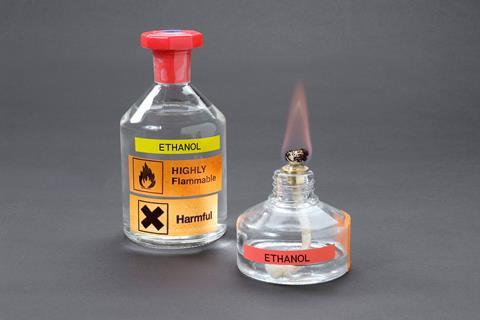
Burning substances is inherently dangerous and chemistry labs are busy places. However, there are some effective whole-class combustion practicals worth doing. You can scale down the quantities to make them safer. For example, I reinforce student understanding of concepts such as bond enthalpies by burning alcohols of different chain lengths. This is commonly carried out by burning the alcohols in spirit burners, but many commercial burners contain volumes of 100–150 cm3 of flammable liquid. That’s a lot of fuel that could set alight if a burner is accidentally knocked over. The jam jar burners advocated by CLEAPSS are a great tool for reducing the experiment’s risk in a busy classroom.
Innovation is great, but some experiments and demonstrations are true classics that stand the test of time
Don’t be afraid to modify experiments in published resources. This comparing heat energy investigation suggests a relatively large scale for a combustion experiment. I wouldn’t run the experiment like this as it would take too long to get a reasonable temperature rise and the wait could be boring for students. Reducing the scale of the experiment would give quicker results and would fit better into a single session, allowing time to revisit the relevant calculations and core concepts. Remember to revise your risk assessment and take advice from CLEAPSS or SSERC and your technicians.
4. Embrace the classics
Innovation is great, but some experiments and demonstrations are true classics that stand the test of time. The demonstration to identify the products of the combustion of a candle is one such classic that draws together several concepts. Its core purpose is to prove the presence of carbon dioxide and water in the product gases, but you can also use it to look at conservation of mass and state changes. If you are new to teaching this chemistry, ask your technicians or experienced colleagues which combustion experiments they return to time and time again.
5. Include the chemical equations
Provide lots of practice identifying oxidation and reduction processes in both word and symbol equations. Understanding the definition in terms of oxygen comes before introducing the definition with electrons. Plan plenty of opportunities for students to practise writing equations, balancing them – it’s amazing how quickly students seem to forget that oxygen is O2 – and identifying which elements are oxidised or reduced.
Kristy Turner


3 readers' comments