


Probe your students’ understanding of this fundamental concept and reflect on your demonstrations with our practical tips
The key learning objectives for this topic are:
- how to measure the enthalpy change accompanying the burning of a fuel using simple laboratory apparatus;
- appreciate the limitations of experimental procedures when measuring the enthalpy change accompanying the burning of a fuel using simple laboratory apparatus;
- understand how to modify the experimental procedure when measuring the enthalpy change accompanying the burning of a fuel to improve the accuracy of the data obtained;
- know how to measure the enthalpy change accompanying reactions in solution; and
- understand how to modify the experimental procedure when measuring enthalpy changes accompanying reactions in solution to improve the accuracy of the data obtained.
What do students find difficult to understand and what can teachers do to explore this?
Measuring enthalpy changes when burning fuels
Students usually find the idea of measuring enthalpy changes that accompany burning fuels using simple apparatus quite straightforward. They will appreciate that energy is transferred to surroundings other than the water.

Spirit burners
It is much more effective to have a different spirit burner for each fuel than it is to use the same burner for different fuels.
- This avoids the need for burners to be emptied and refilled.
- The wicks of spirit burners will get burnt as the burner is used and need to be replaced from time to time.
- Take care that the ‘stock’ bottles containing liquid fuels are kept separate and well away from the area where spirit burners are used.
Follow the safety instructions with the experiment linked above to ensure safe use of spirit burners.
Teaching tip 1
Explore your students’ understanding of fine detail by asking the following questions:
What is the black deposit (soot) on the underside of the metal calorimeter and how it might affect the accuracy of the enthalpy change that you determine?
- The soot suggests that there has been incomplete combustion of the fuel which will tend to reduce the value found for the enthalpy change.
Why do you need to reweigh the spirit burner as soon as possible after you have extinguished the flame?
- To minimise the loss of fuel through evaporation that you will assume to have been burnt.
Teaching tip 2
Students find the idea of allowing for energy losses by ‘calibrating’ the apparatus with a fuel for which we know the enthalpy change quite demanding. The idea behind this approach is that the same proportion of the total energy transferred is transferred to the water in the calorimeter when different fuels are burnt.
Why do we assume that the the same proportion of the total energy transferred is transferred to the water in the calorimeter when different fuels are burnt?
- If we assume that the energy losses are similar then the same amount of energy must have been transferred to all of the surroundings.

Teaching tip 3
Ask students what must be kept the same when using the different fuels. They will usually mention using the same beaker and the same mass of water. Some will say the same temperature change which is subtly different from the same initial and final water temperature. Other students will incorrectly suggest using the same mass of fuel or burning the fuel for the same length of time.
Why is the same mass of fuel an incorrect answer?
- The key point is that the same amount of energy is transferred to the water and so we must measure the mass of fuel needed to raise the temperature of the same mass of water between the same temperatures. For different fuels this will involve a different mass of fuel.
Teaching tip 4
Ask students why we don’t measure the temperature of the water in the calorimeter at regular intervals and use the data to determine the highest temperature more accurately as we might do in an experiment using an expanded polystyrene cup.
Why don’t we measure the temperature of the water in the calorimeter at regular intervals?
- Students need to appreciate that doing this cannot account for the large amount of energy transferred to the apparatus and the surrounding air and so it would only make a minor improvement in the accuracy of the value calculated for the enthalpy change.
Measuring enthalpy changes of reactions in solution
Quite accurate values can easily be obtained for the enthalpy changes of reactions in solution using simple apparatus.
What changes to the apparatus would make the experiment more accurate?
- The more accurate the thermometer used to take temperature measurements the better. A lid on the cup also helps prevent heat loss.
Practical tips
Cups are easily knocked over. Supporting them in a 250 cm3 beaker will prevent this happening.
When mixing two solutions together why is it is best to use an excess of one of the reagents?
- To ensure that the reaction goes to completion. The two solutions should both be at the same temperature.
A microscale method
As an alternative to using an expanded polystyrene coffee cup as an insulated calorimeter, enthalpy changes can be carried out in a glass phial surrounded by cotton wool in a beaker.
This method uses much smaller volumes of solution that the polystyrene cup method.
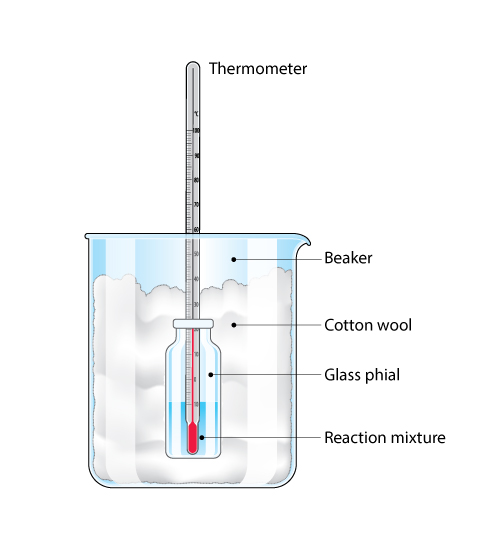
What are the advantages of this microscale technique for measuring enthalpy changes?
- Materials cost less and there are smaller amounts of materials to dispose of after the experiment has been carried out. It is also easier to ensure insulation of the reaction vessel.
Additional information
These tips originally appeared in an online CPD course developed by Derek Denby and Tim Jolliff.
Visit our Professional development for teachers page to view our current courses.

2 readers' comments