


Use this microscale experiment to illustrate hydrocarbon cracking using paraffin, bromine water and aluminium oxide
Cracking the hydrocarbons in paraffin to form shorter alkanes and alkenes can be done as a class practical. However, safety concerns by many teachers and availability of equipment in some schools mean that this key and interesting experiment is often done as a demonstration. This microscale experiment offers a potential solution. It uses a far smaller quantity of chemicals than the traditional set-up (reducing the amount of fumes produced) and does not have the problem of suck-back of cold water into a hot tube.
This experiment is far quicker than the traditional version. How long it takes a class depends on how familiar students are with the microscale equipment, but should easily be completed in 30 minutes. You also need to leave enough time for the equipment to cool before it is dismantled. The equipment can be set up for the students if they are likely to find putting all the pieces together very difficult.
It may be that you do not wish to buy the microscale equipment for just this one experiment. If you already have the Comboplates® in your school, or are considering purchasing some, this is a great way to use them.
The main hazards are ethanol, the glass tubing and bromine water. Due to the nature of the hazards, eye protection should be worn at all times during this experiment, including set up and dismantling.
Students should be warned about the dangers of the ethanol in the microburners. They should keep the burner upright and should not take off the lid. Ethanol produces highly flammable vapour and can catch fire very easily. To minimise any risk, ensure that the burners are filled prior to the lesson. Students need to light their burners, and the easiest way to do this is with matches - take a flame to the burner, not the burner to a flame. It is probably advisable to have a box of matches per bench, to know how many boxes you have and to count them out at the start and in at the end of the session. Having a limited number of matches in each box reduces the potential for mischief. As an alternative, have a lit Bunsen or two in the laboratory and have students use splints to light their burners. However, they can be tricky to light this way.
The students should take care when handling glass tubes to ensure that they do not break and cut their hands. The tube should be held near the end that the tubing is being attached to to allow minimal flexion and a lower likelihood of cuts. The tubing could be pre-attached for students.
Apart from these hazards, the main management issue in this practical is likely to be how well students cope with being asked to set up perhaps unfamiliar equipment. It is worth checking that their equipment is set up correctly and that they understand how to use it before they begin heating.
Equipment
Apparatus
- Eye protection
- Comboplates®, x2 (see note 7 below)
- Lids for the Comboplate (with one long and one short port), x2
- Syringe, 10 cm3
- Straight glass tube, 10–15 cm, about 2–3 mm bore (must be narrow enough to allow silicone tubing to expand over it)
- L-shaped pieces of glass tube, 5–6 cm in height, 2–3 cm for the L piece and 2–3 mm bore, x2
- Silicone tubing, 1–2 cm length, 3 mm bore, 1 mm wall, x4
- Dropping pipette
- Matches
Chemicals
- Microburner filled with ethanol (HIGHLY FLAMMABLE) or industrial denatured alcohol, IDA (HIGHLY FLAMMABLE, HARMFUL)
- Mineral wool (preferably ‘Superwool’)
- Aluminium oxide, microspatula per group
- Liquid paraffin (also known as medicinal paraffin), about 0.5 cm3 per group
- Bromine water, 0.01 M (HARMFUL), about 3 cm3 per group
Health, safety and technical notes
- Read our standard health and safety guidance.
- Wear eye protection throughout.
- Ethanol (HIGHLY FLAMMABLE) or Industrial denatured alcohol, IDA (HIGHLY FLAMMABLE, HARMFUL), C2H5OH(l) – see CLEAPSS Hazcard HC040A.
- Alumimium oxide, Al2O3(s) – see CLEAPSS Hazcard HC002B.
- Liquid paraffin – see CLEAPSS Hazcard HC045b.
- Bromine water, Br2(aq), (HARMFUL) – see CLEAPSS Hazcard HC015b and CLEAPSS Recipe Book RB017, and refer to this guidance on handling liquid bromine and preparing bromine water.
- Microscale equipment can be sourced on the internet. Philip Harris has a range of suitable equipment.
Procedure
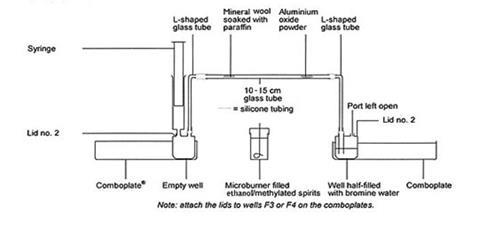
Setting up the equipment
- Pull the plunger of the syringe until it is fully extended. Fit this to one of the lids. Attach the lid to well F3 on one of the comboplates. The syringe and the well should be empty.
- Half-fill well F3 on the other comboplate with bromine water and attach the other lid.
- Attach one of the pieces of silicone tubing to each end of both the L-shaped glass tubes. Hold the tube near the end that you are attaching the silicone tubing to reduce the likelihood of breaking the glass and cutting yourself – it may help to warm the ends of the silicone tubing in hot water.
- Attach the long end of each L to the lids.
- Put a plug of mineral wool in one end of the straight tube. Push it at least 2 or 3 cm down the tube (a piece of wire or small stick helps.) Add five or six drops of liquid paraffin to the mineral wool using a pipette. About 0.5 cm of the tube should be filled with paraffin.
- Holding the tube as horizontal as possible so as not to lose the paraffin, put one microspatula of the aluminium oxide in the other end.
- Attach the glass tube in-between the L-shaped pieces, making sure that the paraffin is at the end with the syringe.
Cracking the hydrocarbons
- Light the microburner, pick it up and begin to heat the aluminium oxide. Make sure that it is very hot before you go any further. As you heat, you need to depress the plunger on the syringe very slowly. If at any stage the plunger gets to the bottom, remove the syringe, pull out the plunger, reattach it and carry on pressing it down slowly.
- Begin to flick the microburner over the paraffin to heat that up too – making sure that you heat the aluminium oxide enough to keep it hot. You can see when the paraffin is boiling. As it turns to a vapour, it passes through the mineral wool and over the catalyst.
- Watch what happens to the bromine water. When you see no more changes or you have run out of paraffin, stop heating.
- Put a few drops of paraffin in one of the other large wells and add a few drops of bromine water.
Teaching notes
The hole and therefore the drop size of a pipette can vary. Therefore it is a good idea to try out this practical before the students do it. This is to ensure that sufficient alkene is being generated to discolour the bromine water. If the bromine water is dilute, then this is less of a problem.
For the best results the catalyst should be heated strongly initially. Once this is hot, then the paraffin can be heated. The catalyst should continue being heated, with the occasional flick of the burner over to the paraffin – it is possible to see when it is boiling.
Gently depressing the syringe ensures that there is no suck-back, and that the gases flow through the system to end up at the bromine water. When the syringe is empty, simply remove it, pull back the plunger, reattach and continue depressing it. This is a big advantage over the traditional version of this experiment.
The expected observations are that a gas is produced which turns the bromine water colourless. (If there are difficulties in getting the bromine water to change completely, use a more dilute solution.) This is mainly ethene gas. You may also observe some liquid, which is often yellowish in colour, near to the end of the glass tubing. This is almost certainly a shorter chain alkane that is the second product from the reaction. The yellow colouration comes from impurities produced during the experiment. It is unlikely to be unreacted paraffin.
The disadvantage of this experiment is that it is not possible to collect a container-full of the product to show that it is a gas at room temperature. However, at the end of the reaction it is possible to light any remaining ethene which comes out of the open port hole on the lid over the bromine. This should be done carefully. An impressive 10–15 cm flame can be achieved. It is possible to compare this to the paraffin by trying to set fire to it. Put a few drops in a watch glass and attempt to light it, using a splint not the microburner. It does not catch fire easily.
The bromine water does not change colour when paraffin is shaken with it.
Equations
If the paraffin is assumed to have six carbon atoms in the hydrocarbon chains (it is actually more than this), then an equation is given below.
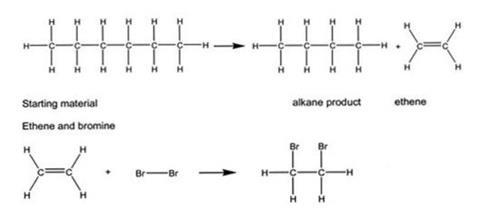
The paraffin does not react with the bromine because it is an alkane. Alkanes do not react with bromine because they do not have a carbon-to-carbon double bond. The double bond can open up and allow other atoms to bond to the carbons.
Additional information
This is a resource from the Practical Chemistry project, developed by the Nuffield Foundation and the Royal Society of Chemistry. This collection of over 200 practical activities demonstrates a wide range of chemical concepts and processes. Each activity contains comprehensive information for teachers and technicians, including full technical notes and step-by-step procedures. Practical Chemistry activities accompany Practical Physics and Practical Biology.
© Nuffield Foundation and the Royal Society of Chemistry
No comments yet