


Why your students struggle to follow written instructions and how to help them

The amount students struggle with practical instructions has always bothered me. After reading through the practical, students still don’t seem to know what to do. They get to step two or three, then ask what to do next. When they reach the end, they can’t effectively explain what they did and why.
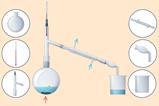
The reason is that practical instructions often comprise an apparatus diagram with a numbered list of directions. Students have to look back and forward between the two sources of information to make sense of the task and to progress. This continual redirection of attention between sources of information is a form of learning distraction termed the split-attention effect.
Split attention makes it harder for students to understand what they are doing. Cognitive load theory (CLT) can help explain why. CLT discusses two main forms of memory, working memory and long-term memory. We create meaning in working memory, which can then be transferred to long-term memory. However, working memory has a limited capacity compared with long-term memory. Too much to think about overloads our working memory and impedes our ability to make meaning – we are cognitively overloaded.
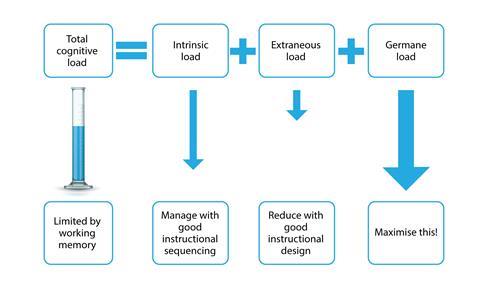
CLT also describes three forms of cognitive load: intrinsic, ideas we’re trying to understand; extraneous, information or processes not related to what we’re trying to understand; and germane, integrating new and old knowledge together. To maximise learning, we want to maximise germane load. Teachers can reduce intrinsic load by planning how learning is sequenced. Extraneous load can be reduced by minimising learning distractions.
Tackling split-attention
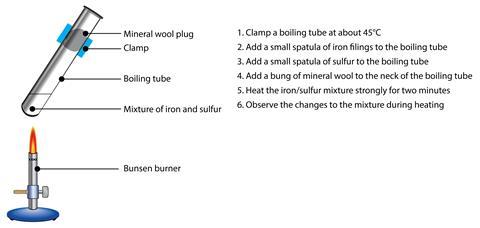
Having read about CLT and split-attention, I tried a simple adaption of practical work instructions using ideas from published work about effective lab manual design. I simplified written directions as much as possible and removed labels from apparatus diagrams. I put directions and diagrams together in an ‘integrated instruction’. The new instructions use clear numbering, arrows and simple pictograms, like an eye to show where observations are required.
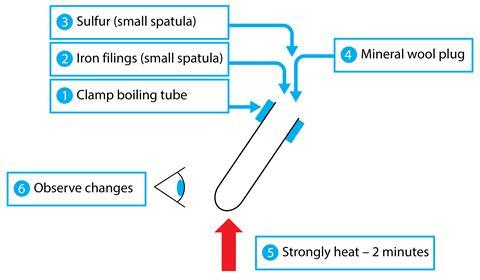
My thinking, based on CLT, was that if I reduce unnecessary information, I reduce extraneous load on students, and increase their working memory capacity to think about what they are doing and why.
I tested my new instructions for melting and freezing stearic acid with a group of 11–12 year olds, and for rates of reactions practicals with 14–15 year old groups. The students seemed to like it – they spoke about being able to ‘see what to do’ and being ‘confident to get on with it’.
Encouraged, I wanted to gather data about how effective this style of practical instruction was. I set about creating a range of GCSE practicals in the integrated-instruction style, including synthesis of copper sulfate, investigating neutralisation and properties of crude oil fractions. I received a small grant and support from the Royal Society of Chemistry Chemical Education Research Group to develop strategies and tools for data collection on the effectiveness of the practicals. I focused on how well students answered questions about what they did and observed, what questions they asked during practicals, and how they felt about the practical work afterwards.
What I have discovered encouraged me to continue using and developing this style of practical work. In general, students complete practicals in good time, are confident in their work and find it easier. They show good understanding when questioned about observations and steps – for example, ‘What is the purpose of the evaporating dish?’ This style of practical instruction also proved useful for microscale work.
Students continue to struggle with more abstract or unfamiliar steps, for example observations that show distillation is occurring. However, practical work has become more efficient, freeing up time for discussion and consolidation around these areas of misunderstanding.
I also plan to use integrated instructions more with 11–14 age groups. I tend to draw instructions directly onto the board for these students, so I’m creating the practical as I go, discussing each step in turn and allowing them to ask questions at each stage. I think this approach works better for younger students who are still learning about standard equipment, correct sequencing of steps and how to observe.
So far, a lot of the instructions I have developed are for GCSE practical work, in particular AQA chemistry required practicals. During this year, I will test out and improve the instructions for each of these. I will try some A-level practicals, although I need to ensure students get sufficient experience of ‘following written instructions’ to satisfy the requirements of the practical endorsement.
Try it yourself
If you are interested in creating your own integrated instructions, a set of templates are available, along with plenty of exemplars. When thinking about developing a set of instructions, consider what the minimum required equipment will be. Ensure instructions use minimum text, clear numbering, arrows and tick boxes for students to track their progress. Try to arrange instructions either clockwise or anticlockwise around the page. Include pictograms of eyes to direct observations and clocks to indicate timings. Think about what the key practical steps and observations are, and write post-practical follow-up questions that focus on these. You can use these prompts to design your instructions:
| Equipment | Instructions | Flow | Pictograms | In lesson |
|---|---|---|---|---|
| Consider what the minimum required equipment is | Use clear numbering | Try to arrange instructions clockwise or anticlockwise | Use of ‘eyes’ to direct observation | Project the diagram on screen |
| Minimum text necessary | Use of ‘clocks’ to indicate timings | Issue paper copies to all students | ||
| Use of arrows to direct movement | ||||
| Use tick boxes so students can track their progress |
Also, gather students’ feedback on how they found the instructions and use this to improve the instructions for next time. Finally, a useful consolidation activity is having the students write a practical method in the traditional numbered list form.
Consider sharing your instructions with others, for example via Twitter using #integratedinstructions or uploading to a shared folder. Social media has been very useful for developing and spreading the idea of integrated instructions. Other chemistry and physics teachers have created their own examples, sharing their work with others. I’ve also had interest from biology teachers who are trying the idea out with their practical work.
David Paterson is a teacher of chemistry and physics at Aldenham School, Elstree. He blogs at dave2004b.wordpress.com and is on Twitter @dave2004b.
Downloads
Copper sulfate synthesis worksheet
Word, Size 0.2 mbCopper sulfate synthesis worksheet
PDF, Size 0.38 mb


5 readers' comments