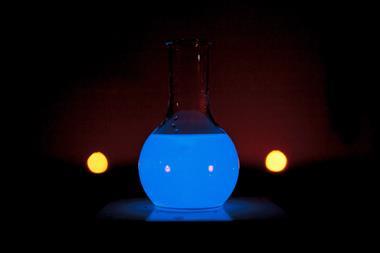
The ‘blue bottle’ demonstration is one of the most well-known and best-loved chemistry demonstrations. A flask containing a colourless liquid (consisting of an alkaline solution of glucose and methylene blue) is shaken. The resulting increase in dissolved oxygen concentration oxidises the colourless form of the dye back to the blue form, until the glucose reduces it once again.
Despite the fact that instructions for this demonstration often suggest using other dyes, it’s uncommon for teachers to do so. This is a great shame, because these dyes can produce some really beautiful colour changes. Presumably this is because methylene blue is commonly used in schools for other experiments. However, indigo carmine is very cheap, safe, easily obtained and produces a range of stunning colours.
Kit
- 70 cm3 0.4M sodium hydroxide solution (irritant)*
- ~0.02 g indigo carmine (harmful)
- ~2.5 g D-glucose (dextrose)
- Three 100 cm3 beakers
- 250 cm3 conical flask with stopper or a 250 cm3 reagent bottle with lid
- 500 cm3 beaker to use as a warm water bath (to heat to ~50°C)
*0.4M NaOH is likely to be available in school labs ‘off the shelf’. The reaction rate is first order with respect to hydroxide ions, so similar concentrations are well tolerated, although those of 0.5M and above are classified as corrosive.
Preparation
Wear eye protection. Place 20 cm3 of water in a 100 cm3 beaker. Measure out 70 cm3 of 0.4M sodium hydroxide into a second 100 cm3 beaker; in a third, dissolve 2.5 g of D-glucose in 10 cm3 of water. Warm the beaker of sodium hydroxide to 40–50°C in a warm water bath. Add approximately 0.02 g of indigo carmine dye to either a 250 cm3 conical flask with bung or a 250 cm3 reagent bottle with lid. There should be little enough dye that unless students are looking for it, they may assume the flask is empty.
In front of the audience
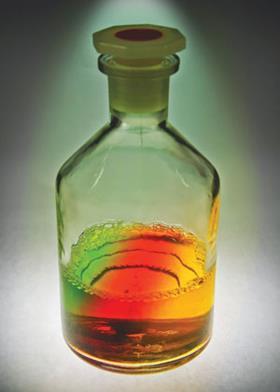
You will now have three colourless liquids in beakers and a seemingly empty bottle. First, add the water and shake to dissolve the dye, giving a deep blue solution. Next, add the warm sodium hydroxide to give a vibrant green solution. Finally, add the glucose solution, which will give a different shade of green. If the solution appears more yellow than green at this stage, add a few more crystals of dye until the colour is convincingly green. Replace the stopper or lid and wait. Over the next few seconds, the green colour will change first to red and then to yellow. Shaking the flask briefly makes the colour go red, and shaking further makes it go green. Each time, the colour will change back to red and then yellow. With a little practice, it’s possible to get the first colour change with a single vigorous shake and the second change with a second vigorous shake.
Teaching goal
This demonstration can be used to support teaching of redox topics, as well as illustrating aspects of colour chemistry. The more I researched what was happening, the more interesting things emerged. The reaction has been studied in more detail by Laurens Anderson and colleagues at the University of Wisconsin-Madison, US,2 since it was last discussed in this column. They suggest the reaction proceeds as follows: under alkaline conditions, the glucose is ionised and tautomerises to the straight chain aldehyde and then to the key intermediate, an enediolate anion. This anion can reduce the dye, forming a keto-aldehyde, glycosulose, in the process. Shaking the flask introduces oxygen into the solution, which reoxidises the dye to the blue form, ready to repeat the process. The hydroperoxide anions this produces can cleave the keto-aldehyde in the presence of excess hydroxide to finally give the sodium salt of arabinonic acid.

Indigo carmine itself acts as both a pH and redox indicator. Below pH 11.4 we see the initial blue colour. It has a yellow form above pH 13, but at intermediate pH takes on a green hue. As well as the pH-dependent colours, there are three distinct redox-dependent colours that are the subject of the main demonstration.
Repeating the experiment with 1M NaOH (corrosive) eliminates the green colour. Instead, it goes from one yellow, to red, then to the reduced yellow (which is indistinguishable by eye from the first yellow).
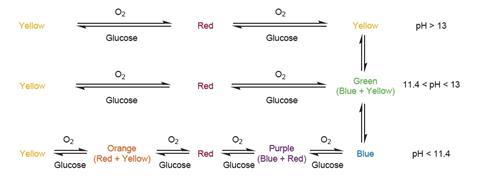
It is much more interesting to make up a dye solution at a lower pH: add 0.4M NaOH dropwise until it is close to changing colour to green, then add some glucose and wait. Ask students to predict what will happen to the colour. As you might expect, the reaction proceeds through mixtures of the different forms. The blue colour gradually becomes a beautiful purple colour, then red, orange and finally yellow. Shaking regenerates the blue colour.
Presumably the dye catalyses glucose oxidation in a similar way to methylene blue. Following extensive reading, it’s unclear how well characterised the structures of the reduced species are. But the fact that the demonstration can be started from the low pH blue or the high pH yellow, as well as the traditional green, suggests that the green colour consists of a mixture of indigo carmine (blue) and its conjugate base (yellow).
Indigo carmine itself has been extensively studied and it has been shown that the
E-isomer is favoured, with an efficient hydrogen bond between the C=O and the N–H locking the configuration. Presumably these hydrogen bonds also weaken the N–H bond when compared to that in indole, which explains the lower pKa (12.2 vs 16.2) that facilitates the first colour change in the experiment.
The colour of indigo dyes comes, for the most part, from the cross-linked conjugated system3 dubbed the ‘H-chromophore’ by Dähne and Leupold,4 after its shape. As such, the molecule can tolerate substitutions to the benzene rings without affecting the colour too much. Indigo carmine is an acidic, sulfonated indigoid, which is much more soluble, but also binds strongly to basic –NH groups, such as in the amide links of natural wool fibres. Adding the sulfonic acid groups does little to affect the colour.5 However, the redox chemistry of the reaction in this demonstration goes right to the heart of the chromophore, bringing about significant colour changes through small changes in the oxidation states of these atoms.
Alternate methods
If you wish to prepare a bottle in advance, it is better to make up all the solutions at room temperature. Initially, it will take around two minutes for the full yellow colour to return after shaking. However, between approximately 15 and 45 minutes after making up the solution, the colour change will be much faster. After 45 minutes, the colour becomes less impressive, particularly the green. It is possible to rejuvenate by adding a little extra dye, but there are diminishing returns to be had from this and it may be better to make up a fresh solution.
Guidance on the use of other dyes (phenosafranine and resazurin) can be found online.6
Disposal
All liquids can be safely washed down the sink with plenty of water.
Safety
Wear eye protection
Downloads
Indigo Blue
PDF, Size 1.39 mb
References
- Exhibition Chemistry, November 2006, p155 (http://rsc.li/PU1DyD)
- L Anderson et al, J. Chem. Educ., 2012, 89, 1425 (DOI: 10.1021/ed200511d)
- L Serrano-Andrés and B O Roos, Chem. Eur. J., 1997, 3, 717 (DOI: 10.1002/chem.19970030511)
- S Dähne and D Leupold, Angew. Chem., Int. Ed., 1966, 5, 984 (DOI: 10.1002/anie.196609841)
- Further information and suggested practicals can be found in Education in Chemistry, May 1986, p71
- http://bit.ly/1gOJ7x6





No comments yet