When I was asked this year to teach a course centred around the structure of (and transport across) cell membranes, I wanted to include some aspects of hydrophobic and hydrophilic behaviour. That’s when I was reminded of Tom Kuntzleman’s Go blue! experiment in which a mystery green solution separates into a blue and a yellow layer. Here’s how I successfully recreated Tom’s trick.
Get started
Watch a demonstration of this experiment and download the technician notes from the Education in Chemistry website: rsc.li/3TXMI7K
When I was asked this year to teach a course centred around the structure of (and transport across) cell membranes, I wanted to include some aspects of hydrophobic and hydrophilic behaviour. That’s when I was reminded of Tom Kuntzleman’s Go Blue! experiment (bit.ly/3JTR64m), in which a mystery green solution separates into a blue and a yellow layer. Here’s how I successfully recreated Tom’s trick.
Kit
- Food colouring (see notes)
- Coloured glitter (see notes)
- ≈ 15 cm3 propan-2-one (acetone) or propan-2-ol (isopropyl alcohol) per demo
- ≈ 5 g sodium chloride (table salt)
- ≈ 5 g anhydrous sodium or potassium carbonate
- Sample vials with lids, or medium test tubes with bungs
Preparation
There are two variations, based on either using glitter (variation 1) or a dye/pigment (variation 2) to colour the organic layer. If using glitter, work in a fume cupboard with eye protection and gloves. Add a spatula of glitter to a sample vial and roughly 5 cm3 of acetone to produce a coloured solution (see notes on colour choices).
Fill your vial or tube one third with water and note the mass of water used. Separately, weigh out one third of this mass of salt. This is more than enough to saturate the water. Transfer a roughly equal volume of acetone (variation 1) or isopropyl alcohol (variation 2) into a small bottle for use in class.
In my demonstrations I use 40 cm3 sample vials, with 15 cm3 of water, 15 cm3 of organic solvent and 5 g of salt.
Safety and disposal notes
- Acetone and isopropyl alcohol are highly flammable liquids and vapours which can cause serious eye irritation.
- When opening stock bottles of acetone or isopropyl alcohol, work in a fume cupboard, wearing eye protection and gloves. Make sure the lab is well ventilated and there are no ignition sources.
- Anhydrous sodium or potassium carbonate can cause serious eye irritation.
- Filter out any remaining glitter when finished. The remaining solvents can be diluted to below 5% vol/vol and poured down a foul water drain.
In front of the class
Variation 1
Wear eye protection. Add the acetone to the water and close the top of the vessel. Students sitting close to you will be able to see that the acetone sits on top of the water. A visualiser can be helpful here. Shake the contents and a homogeneous mixture will form. Note any change in temperature.
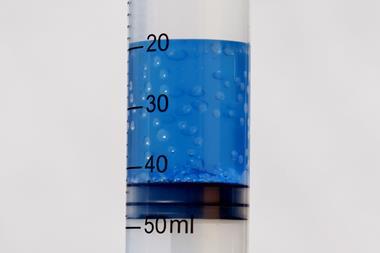
Add a few drops of blue-coloured glitter solution to give a pale blue solution. Add drops of yellow food colouring to this mixture. The mixture will turn green. Finally, add the salt and mix thoroughly. After a few seconds, the green colour will separate from the top and bottom to reveal a blue layer on top and a yellow layer below.
Variation 2
Avoid using PVC/PET-based glitter by instead choosing the right combination of yellow and blue, or simply green food dye. Repeat variation 1 but use isopropyl alcohol for the top layer. Add brilliant blue and tartrazine food colouring to achieve a bright green colour (I needed to add more tartrazine).
I struggled to get the layers in this version of the demonstration to separate with sodium chloride, but you could use potassium carbonate as the salt. I only had access to sodium carbonate and it worked just fine. However, Tom found otherwise but this may be due to using the hydrate. Practise with what you have on hand to make sure the separation works well.

In front of the class
Variation 1
Wear eye protection. Add the acetone to the water and close the top of the vessel. Students close by will be able to see that the acetone sits on top of the water. A visualiser can be helpful here. Shake the contents and a homogeneous mixture will form. Note any change in temperature.
Add a few drops of blue-coloured glitter solution to give a pale blue solution. Add drops of yellow food colouring to this mixture. The mixture will turn green. Finally, add the salt and mix thoroughly. After a few seconds, the green colour will separate from the top and bottom to reveal a blue layer on top and a yellow layer below.
Variation 2
Avoid using PVC/PET-based glitter by instead choosing the right combination of yellow and blue, or simply green food dye. Repeat variation 1 but use isopropyl alcohol for the top layer. Add brilliant blue and tartrazine food colouring to achieve a bright green colour (I needed to add more tartrazine).
I struggled to get the layers in this version of the demonstration to separate with sodium chloride, but you could use potassium carbonate or anhydrous sodium carbonate as the salt, the latter of which I used. Practise with what you have to make sure the separation works well.
Teaching goal
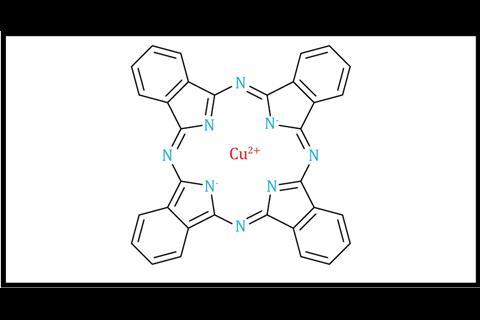
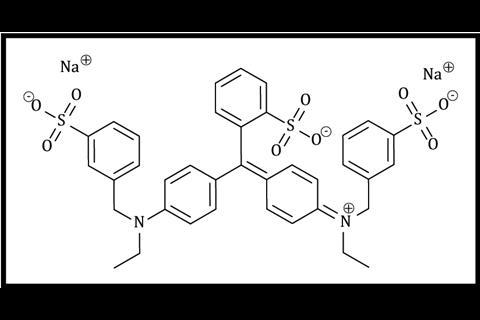
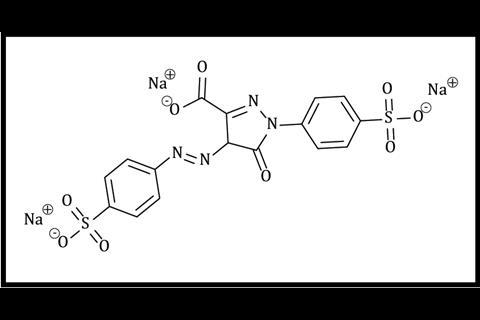
The principal focus of this demonstration is intermolecular forces. Initially, the acetone layer sits above the water because it is less dense (0.78 g cm–3). On shaking, although the acetone cannot hydrogen bond with itself, it can accept hydrogen bonds from water molecules, which allows the two solvents to mix. The pigments used to colour PVC and PET are often relatively non-polar eg phthalocyanines (figure 1), or neutral azo pigments. However, food dyes (figures 2 and 3) tend to be charged to enable them to form ion–dipole attractions to water. The smaller the molecule is, and the more highly charged, the more efficiently it will be able to do this.
As other ions are added to the mixture (eg sodium and chloride ions), the acetone–water mix becomes less stable. This is because the number of ion–water interactions increases, which are not only stronger than the hydrogen bonds between water and acetone, but each ion can lock up many water molecules in a hydration shell and prevent them from aligning with acetone molecules.
As a result, the acetone and water separate from one another, and the more highly-charged food dye concentrates in the lower aqueous layer. It’s worth noting that when the liquids separate, even if you started with equal volumes, the layers will not look to be of equal volume. This difference indicates imperfect separation and a change in volume from dissolved salt.
Teaching goal
The principal focus of this demonstration is intermolecular forces. Initially, the acetone layer sits above the water because it is less dense (0.78 g cm–3). On shaking, although the acetone cannot hydrogen bond with itself, it can accept hydrogen bonds from water molecules, which allows the two solvents to mix. The pigments used to colour PVC and PET are often relatively non-polar eg phthalocyanines or neutral azo pigments. However, food dyes tend to be charged to enable them to form ion–dipole attractions to water. The smaller the molecule is, and the more highly charged, the more efficiently it will be able to do this.
As other ions are added to the mixture (eg sodium and chloride ions), the acetone–water mix becomes less stable. This is because the number of ion–water interactions increases, which are not only stronger than the hydrogen bonds between water and acetone, but each ion can lock up many water molecules in a hydration shell and prevent them from aligning with acetone molecules.
As a result, the acetone and water separate from one another, and the more highly-charged food dye concentrates in the lower aqueous layer. It’s worth noting that when the liquids separate, even if you started with equal volumes, the layers will not look to be of equal volume. This difference indicates imperfect separation and a change in volume from dissolved salt.
Notes
Colours: This demonstration relies on the principle of subtractive colour addition. If you are familiar with printing processes, then thinking in terms of the CMYK colour space can be helpful. The most dramatic combinations for mixing will be from binary mixes of cyan, magenta and yellow. As such, look for glitters and colours that make a blue, pink or yellow solution. Green food colouring is generally a mixture of yellow and blue dyes.
Food colouring: Here, practise is important – different colours behave uniquely. I have tried glucose-based pastes and found these work very poorly. Look for concentrated liquids. Although curcumin has been reported to work, I struggled to get it to dissolve and had more success with tartrazine. Sunset yellow works, but partitions less effectively. For reds, I found amaranth dye works well but erythrosine partitions poorly. Blue food colouring typically contains brilliant blue FCF and this partitions reasonably well.
Glitter: Traditional glitter is a metallicised plastic film chopped into small pieces, similar to the Mylar used in crisp packets. The plastic film (traditionally PVC or PET) is dyed and acetone will break this down and dissolve the dye. For the demonstration to work well, more traditional formulations of glitter are ideal because they contain water-insoluble dyes like phthalocyanine blue. With concerns around the accumulation of microplastics in the environment, biodegradable cellulose-based glitter alternatives are available, but you should test these first because they sometimes use water-soluble dyes.
Keeping the mixtures: I have decanted the liquid from any precipitated salt and found these mixtures can be stable for months at a time. The glitter dyes can sometimes be less UV-stable and benefit from an extra drop to top up the colour after a few months.
Notes
Colours: This demonstration relies on the principle of subtractive colour addition. If you are familiar with printing processes, then thinking in terms of the CMYK colour space can be helpful. The most dramatic combinations for mixing will be from binary mixes of cyan, magenta and yellow. As such, look for glitters and colours that make a blue, pink or yellow solution. Green food colouring is generally a mixture of yellow and blue dyes.
Food colouring: Here, practise is important – different colours behave uniquely. I have tried glucose-based pastes and found these work very poorly. Look for concentrated liquids. Although curcumin has been reported to work, I struggled to get it to dissolve and had more success with tartrazine. Sunset yellow works, but partitions less effectively. For reds, I found amaranth dye works well but erythrosine partitions poorly. Blue food colouring typically contains brilliant blue FCF and this partitions reasonably well.
Glitter: Traditional glitter is a metallicised plastic film chopped into small pieces, similar to the Mylar used in crisp packets. The plastic film (traditionally PVC or PET) is dyed – acetone will break this down and dissolve the dye. For the demonstration to work well, more traditional formulations of glitter are ideal because they contain water-insoluble dyes like phthalocyanine blue. With concerns around the accumulation of microplastics in the environment, biodegradable cellulose-based glitter alternatives are available, but test these first because these sometimes use water-soluble dyes.
Keeping the mixtures: I have decanted off the liquid from any precipitated salt and found these mixtures can be stable for months at a time. The glitter dyes can sometimes be less UV-stable and benefit from an extra drop to top up the colour after a few months.
Declan Fleming
Downloads
Battle of the forces technician notes
PDF, Size 0.36 mbBattle of the forces technician notes
Word, Size 1.57 mb










1 Reader's comment