

Watch this
A demonstration of this experiment and download the technician notes from the Education in Chemistry website: rsc.li/3K7My81
The reaction between sodium and chlorine is a classic chemistry demonstration that highlights how different the properties of a compound can be from its constituent elements.
If you perform this experiment incorrectly, however, you can end up with broken gas jars and confusing results. We’ll look at the right way to do this demonstration and then delve into why I avoid using this experiment when talking about the alkali metals or structure and bonding.
Kit
- Gas jar containing chlorine (toxic) with lid
- Sodium (highly flammable, corrosive)
- Brick
- Bunsen burner
- Heat-resistant mat
- Forceps
- Scalpel or sharp knife
- White tile
- Tissue paper or paper towel
Preparation
Prepare a gas jar full of chlorine. CLEAPSS members should see recipe 24 for guidance on how to do this. The chlorine does not need to be dried before use, but you should make sure the jar has a distinct green colour before performing the demonstration. This indicates there is a high enough partial pressure of chlorine.
Also, check the mouth of the gas jar is smaller than the brick on which the reaction will be performed, to ensure no chlorine will seep out. Leave the chlorine jar (lidded end down) and the brick (smooth side up) on a heat-resistant mat in a fume cupboard for the demonstration.

In front of the class
Students should wear eye protection and the demonstrator should wear goggles. Perform this demonstration in the fume cupboard with the sash down to minimise chlorine escape and eliminate the need for additional safety screens.
Ensure all materials used to handle the sodium are dry. Remove a sample of sodium from the stock bottle, using a pair of forceps, and place it on a tile. Slice off a 6–8 mm (approx 0.3 g) cube of sodium with a sharp knife, pointing out to your students the softness of the metal and its lustre beneath the fresh cut in the process.
Return the rest of the sodium to the stock bottle and use a piece of paper towel to remove as much oil as possible from the sodium cube.
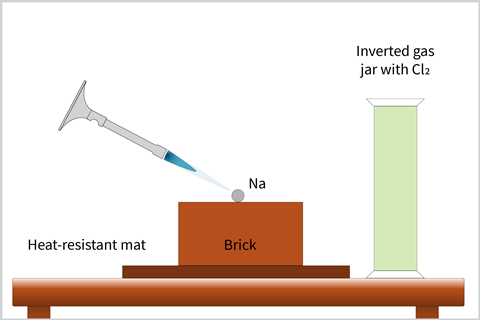
You will need to heat the sodium with the air hole open on the Bunsen. First the sodium will melt, then any residual oil will burn off and finally the metal itself will ignite. If the gas tap is fully open, the Bunsen can blow the sodium around when it melts and forms a ball. To prevent this, you can reduce the gas pressure at the tap. Once alight, remove the lid of the gas jar containing the chlorine and place over the top of the burning metal (it can be helpful to have an extra pair of hands here).

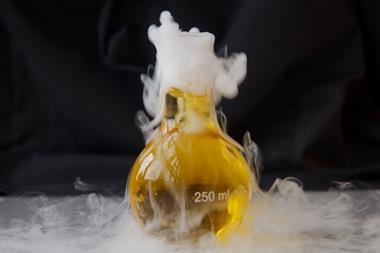
Once the glass jar is in place, the yellow sodium flame intensifies and the white ‘smoke’ of sodium chloride is produced.
Alternatives
If you don’t have a brick, then you can use an upside-down porcelain crucible lid on a small bed of sand as a substitute – but this may break during the demonstration. Do not attempt to use porcelain with other alkali metals.
It’s not advised to perform this demonstration with a deflagrating spoon as brown iron chloride smoke (from a steel spoon) or copper chloride smoke (from a brass spoon) will be produced and spoil the effect.
Safety and disposal notes
- Do not attempt to clean the oil off the sodium using solvent – fires have occurred.
- Always keep a container, such as a large, labelled, clean soft drink bottle, of clean, dry sand on hand for extinguishing fires when working with alkali metals.
- Stick to the advised size of sodium cube. Larger lumps may only react on the outer surface, leaving sodium below, which can catch fire or explode during clean-up.
- When the brick has cooled after the reaction, submerge it in a large container of cold water. You may wish to moisten the area with isopropyl alcohol (propan-2-ol) before submerging it to remove all remaining traces of alkali metal. Consider doing this behind safety screens or in a fume cupboard with the sash lowered.
Teaching goal
In my first year of teaching, I used this demonstration alongside a variation of an activity described by Vanessa Kind in her report Beyond appearances: students’ misconceptions about basic chemical ideas to introduce structure and bonding. Using chocolate buttons for electrons, I laid out the electronic configuration of a sodium atom and a chlorine atom on my desk. The students made observations about the forces between the electrons and the nucleus, and the student who noticed that there was ‘an extra electron on the sodium atom and a gap on chlorine’ was rewarded with the rest of the chocolate while I went on to explain that ionic compounds form when metals give their outer shell electrons to non-metals. Then, we witnessed this with the demonstration outlined above.
The above description of what happens when sodium and chlorine react is, of course, not true! The ionic bond is simply the electrostatic attraction between oppositely charged ions, and electron transfer models like the one I used as a new teacher are known to lead to learners constructing incorrect ‘simple molecular’ models of ionic compounds. Such models lead to all kinds of problems with visualising and explaining reactions, especially those in solution.
Currently, I follow a bonding teaching sequence suggested by Keith Taber in his book Teaching secondary chemistry. Metals are introduced first to normalise the existence, and indeed prevalence, of ions before we look for them in solutions of ionic substances using conductivity probes, electrolysis and precipitation reactions. Arriving at the ionic model this way illustrates that most of the sodium chloride students are ever likely to encounter comes not from electron transfer between atomised elements, but rather from the crystallisation of ions which already existed in solution.
So, when do I use this demonstration? I find it sits neatly alongside other reactions of elements for a younger audience where bonding is less important than stressing the differences in the properties of compounds from those of their constituent elements (also see this Exhibition chemistry article on Clarifying compounds and mixtures). After all, I’m sure we’d all agree that crisps with sodium and chlorine is an unappetising proposition.
In my first year of teaching, I used this demonstration alongside a variation of an activity described by Vanessa Kind in her report on students’ misconceptions about basic chemical ideas (rsc.li/3wXKThS) to introduce structure and bonding. Using chocolate buttons for electrons, I laid out the electronic configuration of a sodium atom and a chlorine atom on my desk. The students made observations about the forces between the electrons and the nucleus, and the student who noticed that there was ‘an extra electron on the sodium atom and a gap on chlorine’ was rewarded with the rest of the chocolate while I went on to explain that ionic compounds form when metals give their outer shell electrons to non-metals. Then, we witnessed this with the demonstration outlined above.
The above description of what happens when sodium and chlorine react is, of course, not true! The ionic bond is simply the electrostatic attraction between oppositely charged ions, and electron transfer models like the one I used as a new teacher are known to lead to learners constructing incorrect ‘simple molecular’ models of ionic compounds. Such models lead to all kinds of problems with visualising and explaining reactions, especially those in solution.
Currently, I follow a bonding teaching sequence suggested by Keith Taber in his book Teaching secondary chemistry. Metals are introduced first to normalise the existence, and indeed prevalence, of ions before we look for them in solutions of ionic substances using conductivity probes, electrolysis and precipitation reactions. Arriving at the ionic model this way illustrates that most of the sodium chloride students are ever likely to encounter comes not from electron transfer between atomised elements, but rather from the crystallisation of ions which already existed in solution.
So, when do I use this demonstration? I find it sits neatly alongside other reactions of elements for a younger audience where bonding is less important than stressing the differences in the properties of compounds from those of their constituent elements (see also this Exhibition chemistry article on Clarifying compounds and mixtures: rsc.li/3wXN4ly). After all, I’m sure we’d all agree that crisps with sodium and chlorine is an unappetising proposition.
Lithium, sodium and potassium
Use this teacher demonstration to help students visualise the reactions of lithium, sodium and potassium in air and in chlorine. This experiment can also be used as preparation for demonstrating the reactions of group 1 metals in water, revealing the trends in reactivity of this group.
Use this teacher demonstration to help students visualise the reactions of lithium, sodium and potassium in air and in chlorine: rsc.li/3LD8mZL. This experiment can also be used as preparation for demonstrating the reactions of group 1 metals in water, revealing the trends in reactivity of this group.
Declan Fleming
The disposal notes in this article were updated on 16 February 2024.
Downloads
The reaction between sodium and chlorine technician notes
PDF, Size 0.13 mbThe reaction between sodium and chlorine technician notes
Word, Size 0.42 mb


4 readers' comments