


Andrew Turley investigates a build-it-yourself 3D printer you can use in your classroom
It is often said that we are most creative when we’re young. Mozart was composing music at five. Einstein was 26 in the year he published special relativity. Zuckerberg started Facebook as an undergraduate. The evidence is everywhere you look.
The truth, of course, is a little more complicated. Plenty of luminaries burned their brightest later in life. But either way, there’s certainly no harm in starting early. With this in mind, access to tools becomes the key concern, and three issues stand out most prominently: cost, safety and basic mechanics.
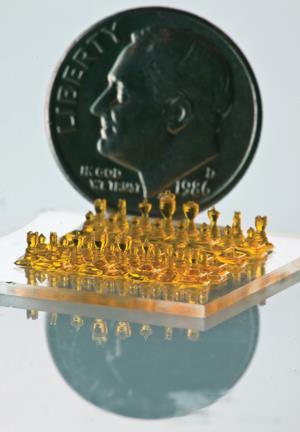
In order to play, child chess genius Bobby Fischer needed just a board and some pieces, relatively cheap items to procure and harmless. And the rules of chess are pretty simple – a young Fischer could start experimenting, learning and creating pretty quickly. Chess might be considered one of the easier disciplines for a young student to access.
Chemistry, meanwhile, must rank as one of the hardest. Equipment is expensive, labs are dangerous and the basic mechanics are complex.
As US high school chemistry teacher Matt Ragusa, puts it, ‘it’s not like I can just let the kids loose with the chemicals’.
Stereolithography
Matt’s solution has been the build-it-yourself 3D printer, designed by an education outreach team at the University of Illinois.1 The team is led by Joe Muskin, an education coordinator at Illinois tasked with finding new ways to take the university’s research into classrooms. Matt worked extensively on the printer while an undergraduate at the university. He was then able to take the skills, knowledge and experience gained with him into his teaching career.
The printer uses stereolithography, a printing process in which the product is built up, layer by layer, through polymerisation of a photoreactive resin by a light source of some kind, usually a laser. The process is well established, and consumer units are commercially available, but are too expensive for most educational environments.
The Illinois printer swaps out the most expensive components of the consumer units for parts that might be commonly found in schools and colleges or could be acquired at minimal expense.
The light source is an off-the-shelf computer projector. This is linked to a laptop running Microsoft PowerPoint. Next to this is a vertical stand with a right-angled arm that can be incrementally raised or lowered. At the base of the stand, beneath the arm, sits a beaker containing the resin. The arm holds an aluminium disc that acts as the stage onto which the product is printed. This is lowered into the beaker until the stage sits just below the surface of the resin (see Figure 1).

Objects are printed by shining light from the projector on to the surface of the resin, using a mirror above the beaker. The PowerPoint presentation is made up of horizontal cross-sections of the object you’re making, displayed in black and white. When the slide is shown, the white light initiates the polymerisation of the resin. You’ve made the first layer. The light is turned off using an all-black slide on the presentation, and the stage is manually lowered by about 150 microns. Fresh resin flows over the top of the stage, covering the first layer of the object, and the process is repeated for the next layer.
When the object is complete, it is removed, washed and exposed to either sunlight or light from a UV lamp in order to finish the hardening process.
As a teaching aid
In his classroom, Matt uses the printer to demonstrate several key chemistry concepts, such as polymerisation, energy of activation and Lewis dot structures. But he also encourages his students to be creative with it. They can, for example, design their own objects for printing or modify the printer in various ways.
In the past, students have attempted to automate stages of the printing process. First, they altered the stand to make the raising and lowering of the stage computer controlled. Then, they wrote some code that would synchronise the PowerPoint presentation with the movements of the stage. This gave them a printer that could run the printing process from start to finish without the need for human intervention.
Other students have found ways to export CAD (computer aided design) plans to PowerPoint so they can design their objects in fully-realised 3D rather than having to work with 2D layers.

Matt, however, usually wants his students to work with 2D layers, at least to begin with. The manual manipulation required forces the students to interact with the printing process and thereby experience the underlying principles more closely.
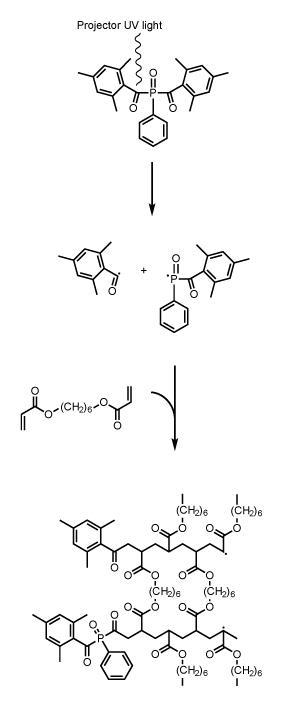
Those underlying principles reflect key chemistry concepts. The resin is a mixture of a monomer, 1,6-hexanediol diacrylate (HDDA), and a photoinitiator, phenylbis(2,4,6-trimethylbenzoyl) phosphine oxide.
In light, the photoinitiator molecule absorbs photons and generates a free radical. The free radical attacks the double bond at the end of HDDA monomer to form a combined radical, which then attacks another HDDA monomer to start the chain propagation. The polymerisation terminates when two propagating chains meet and react together. 1-phenylazo-2-naphthol, also known as Sudan I, is added to control the depth to which the light penetrates. It does this by absorbing photons that would otherwise energise the photoinitiator too deep into the resin. Thus, the more Sudan I in the resin, the thinner the polymer layers will be.
Once the fundamental chemistry has been explored, Matt can take his students into other areas.
Student experiments
He may for example ask them how they would scale up the process in order to print larger items. Simply raising the stage by a larger amount to make the layers thicker produces a vertical stack of layers with no attachment between them. The problem is insufficient light penetration. The answer is to investigate the relationships between the intensity of the light coming from the projector, the intended thickness of the layers and the concentration of Sudan I.
If the students have an interest in engineering, he may ask them to design a better stand. If they are more commercially minded, they can produce a business case or advertising campaign for sale of the printer.
Alternatively, the students can follow their own ideas. One group challenged themselves to speed up the step in the process that involves moving the stage. In commercial units, the light is projected up on to the bottom of the stage, which is raised between each layer, rather than lowered, so that the product is manufactured underneath. This is faster because it reduces the time the fresh resin takes to flow into place – there’s no surface tension to hamper the flow.
However, the students found that with the light coming from below, the polymer would stick to the bottom of the flask. They needed a coating that would be transparent, like the glass, but would not interfere with the polymerisation. With Matt’s help, they tested a few materials and settled on poly(dimethylsiloxane), which they spin-coated onto the glass.
The printer can also be used as a teaching aid for mathematics (see Mathematical follies) and physics. For physics classes, Joe has experimented with using blue and red for the slides instead of white. The polymerisation then demonstrates that the blue light has enough energy for the polymerisation whereas the red does not.
The point, he says, is to demonstrate how in the ‘real world’ chemistry is inextricably linked with many other disciplines.
Mathematical follies
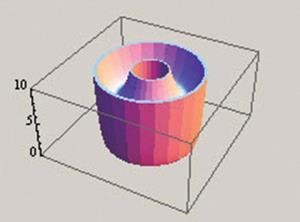
Adam Poetzel, a professor in the education department at Illinois, helped Joe adapt the printer for use in mathematics classes. Adam and programmers at Wolfram developed a Mathematica program that allows students to turn 2D functional plots, of the kind y = x3 + 4, into 3D models for printing. Two plots are used as upper and lower bounds of a shaded region and then rotated around the y axis to form a solid of revolution. By experimenting with polynomial, trigonometric, absolute value and exponential functions, students can create a variety of models with a wide range of complexity.
For more advanced classes, the group developed a second Mathematica program that worked with 3D functional plots. Using this, students can create objects by defining planes, spheres, cylinders and curved surfaces.
A bright idea
In this regard, the printer, as a teaching aid, benefits from having come from real research – the research of Nick Fang, to be precise, an expert in the manufacture of nanoscale objects. In 2009, Nick was a professor at Illinois, where he was working on stereolithographic techniques for the rapid manufacture of 3D objects that could serve as tiny bioreactors. He was using a heavily modified projector, but he thought his process might be adapted to suit an unmodified projector and thereby make it of use as an education resource.
So Nick found Joe, who took the idea and ran with it – all the way to the machine shop to design an elevator based on a micromanipulator he borrowed from a colleague. The printer Joe created worked, but it required a lot of tinkering to get it working well. As part of his outreach activities, he brought in high school students and Illinois undergraduates, such as Matt, to help.
One change they made was to the monomer. The initial setup used HDDA, but slight changes in density during polymerisation led to buckling and distortion. The team were able to overcome this be swapping out the HDDA for poly(ethylene glycol) diacrylate (PEGDA). There is a downside, Joe explains. The polymer swells with water making it slightly harder to clean. But after bathing it in light – Joe uses a light box designed for curing dental moulds – it hardens up.
Joe also had to ensure it was cheap enough for schools and colleges to replicate. The most expensive item, he says, is the projector. But most people will be able to get hold of one. It doesn’t have to be a new one, he adds. ‘We’ve used projectors from the eighties and nineties and they work just as well.’
After that, you’ll need a lens of some kind. It’s worth spending a few dollars more on this, Joe says. Get a $40 (£26) one rather than a $10. You’ll also need to spend a couple of dollars on a small mirror. A micromanipulator of the type he started with costs several hundred dollars at least, So Joe and his team have designed an alternative based on a drawer slide that should cost no more than about $20.
Lastly, the chemicals can be obtained from lab suppliers. $60 will get you more Sudan I than you’ll ever use. The other two chemicals combine at about $120 per half litre, which Joe calculates is enough for about 500 objects.
Getting started
Teachers interested in building their own version of the Illinois printer would have to invest some time to get the printer set up, fine tune its performance and gain some experience with the printing process, Matt says. ‘I’ve played with all the variations – it’s hard to impart all that knowledge to my colleagues.’
They should also expect to have to find some extra time in their teaching schedule to introduce the printer. In his first year of teaching, Matt received a grant from the Indian Prairie Education Foundation in order to pursue the printer as a teaching aid.
With his 15 and 16 year old students, Matt would work himself ahead so he could set aside two weeks for the printer work. Now, after six years of teaching, increasing leadership responsibilities are making this harder.
But Matt and Joe have both seen the creative sparks fly as a result of the printer. One group of students made an impressive combination lock, says Joe. The project required a lot of planning to ensure the finished product would actually function.
The first time a student tries to make something, it generally doesn’t work out, Matt explains. Some part comes out back-to-front or totally out of proportion. It’s hard to translate a 3D object into a series of 2D cross-sections using just your imagination. But one student was able to think in printed layers right from the outset.
‘I explained how the printer worked and printed a few standard items,’ says Matt. ‘The next day, this student came into class and told me he’d made the slides for his entire house. It was amazing. Everything was there, right down to the furniture. Unfortunately, I had to explain to him that they weren’t going to work as they were because the roof would trap a load of resin inside. We got there in the end by making it floor by floor and putting it together afterwards.’
Andrew Turley is a writer based in Cambridge, UK
Lesson plans, instructions, sample projects and videos for using this printer in your own class can be found at http://bit.ly/1JwAyKb
References
1. J Muskin, M Ragusa and T Gelsthorpe, J. Chem. Educ., 2010, 87, 512 (DOI: 10.1021/ed800170t)


No comments yet