Help your students learn how to describe observations scientifically

In his Nobel lecture of 1945, Alexander Fleming said, ‘penicillin started as a chance observation. My only merit is that I did not neglect the observation.’ Daily life is enhanced by many accidental scientific discoveries made by following up observations. From smoke detectors to Teflon, these discoveries have emphasised the importance of observation skills.
While it’s easy to assume that students know how to describe observations scientifically, it’s not instinctive. It needs to be taught and practised in class.
Confusing language
Students are often required to describe or to explain phenomena. They often confuse description and explanation. Students need to know that describe means look and say what you see in scientific terms. ‘It went blue’ is too vague. What did it look like at the start? Words like clear and colourless are often muddled. Check students’ understanding with mini whiteboards by showing them two solutions to describe: one coloured and see through (clear), and one that has no colour (colourless).
Explain deals with inferences, commenting and writing why this might be the case and drawing out further questions. You can help students understand this distinction with an observing and inferring classroom activity, Tricky tracks that accompanies another article in this series.
Explain deals with inferences, commenting and writing why this might be the case and drawing out further questions. You can help students understand this distinction with an observing and inferring classroom activity (rsc.li/3ZxSPkw).
-

Download this
Microscale precipitation and neutralisation reactions, for age range 11–14
Everything you need to run these two microscale experiments, perfect for students to hone their observation skills.
Download the teacher and technician notes as MS Word or pdf and the student integrated instructions as MS Word or pdf.
Download this
Microscale precipitation and neutralisation reactions, for 11–14 years
Everything you need to run these two microscale experiments, perfect for students to hone their observation skills.
Download from theEducation in Chemistry website: rsc.li/431z9Z9
Classroom methods
In a little you can see a lot – and ask a lot more. In the classroom, you can use microscale methods to promote thoughtful work by students viewing closely things that are not evident on a big scale.
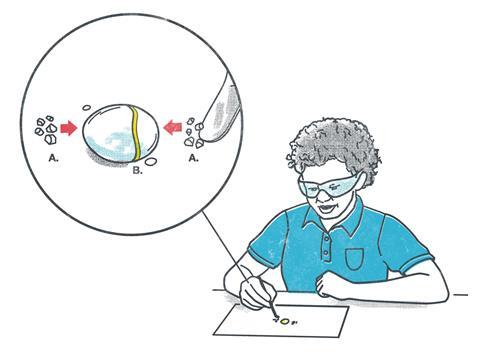
For example, try diffusion and precipitation with potassium iodide and lead nitrate; download the resource above. It’s easy to see the reactions in small drops of water on the instruction sheet using a crystal of each reactant. The appearance of a yellow band of tiny crystals is visually appealing, with a colour change as well as precipitate to describe.
Ask follow-up questions, such as:
- What has happened to the lead nitrate?
- What has happened to the potassium iodide?
- What is the yellow band appearing?
- Why is the yellow band nearer one side than the other?
Draw out inferences about dissolving, diffusion and the fact that ions can move. Checking solubility data confirms that lead iodide is insoluble, while the other combination of ions, potassium nitrate, is indeed soluble. Probe students for the observation that the yellow band appears nearer to the side where lead nitrate started and then draw out ideas that lead ions are heavier and less mobile.
Students can observe more complicated practical procedures in smaller chunks
Use a slow practical, where all students do each step at the same time following teacher demonstration of each small step, as an excellent opportunity to coach observations. This method is particularly useful as students can observe more complicated practical procedures in smaller chunks. It also works extremely well for observing simpler reactions, allowing students to pause at the same time to discuss their observations, make inferences and then draw symbol representations on mini whiteboards.
Use a slow practical, where all students do each step at the same time following teacher demonstration of each small step, as an excellent opportunity to coach observations. For more on this, read Adam Boxer’s excellent article, ’Take a walk on the slow side’ (rsc.li/3MgGmie). This method is particularly useful as students can observe more complicated practical procedures in smaller chunks. It also works extremely well for observing simpler reactions, allowing students to pause at the same time to discuss their observations, make inferences and then draw symbol representations on mini whiteboards.

This article is part of our Teaching science skills series, bringing together strategies and classroom activities to help your learners develop essential scientific skills, from literacy to risk assessment and more.
Displacement reactions offer effective examples to observe, particularly if performed in tiny puddles on worksheets in a plastic folder. Students place a little of each metal part in and part out of each solution, helping them to see changes more clearly. Puddle worksheets allow more freedom to select more metal combinations, beyond the typical 4x3 grid constraint of a tile. Iron in the form of small nails can be tricky to tilt into a dimple tile but is simple to push into the side of a puddle.
Displacement reactions offer effective examples to observe, particularly if performed in tiny puddles on worksheets in a plastic folder. Students place a little of each metal part in and part out of each solution, helping them to see changes more clearly.
Combine a puddle approach with live projection on a big screen, using a tablet with screen mirroring, or visualiser. Projecting a tiny puddle on a big screen gives you the opportunity to provide a commentary, modelling how to describe what you are seeing in real time.
To encourage observations for larger demonstrations, eg for alkali metals with water, use this method to provide a closer view than crowding and safety shields allow. Develop this by asking students to create the voiceover or commentary for a video showing the reactions as each alkali metal is added to water. They should describe keenly what is happening then offer explanations.
Recommended reading and resources
- Inspire keen observation skills with stories of accidental discoveries that impact our daily lives.
- Watch a close-up video demonstration of miscroscale displacement reactions of iron, copper and zinc reacting.
- Find lots of opportunities to practise observation skills in this series of experiments with video, exploring the relative reactivity of metals, for 14–16 years.
- Help students connect observations to theory with useful activities and approaches to deepen understanding at macro, sub-micro and symbol levels.
- Introduce your learners to Ben, who is observing how oceans are responding to climate change to protect our marine environments.
- Inspire keen observation skills with stories of accidental discoveries that impact our daily lives: rsc.li/42VU4N7
- Watch a close-up video demonstration of microscale displacement reactions of iron, copper and zinc reacting: bit.ly/3K6kbIM
- Find lots of opportunities to practise observation skills in this series of experiments with video, exploring the relative reactivity of metals, for 14–16 years: rsc.li/3lW5f86
- Help students connect observations to theory with useful activities and approaches to deepen understanding at macro, sub-micro and symbol levels: rsc.li/3m0rOIF
- Introduce your learners to Ben, who is observing how oceans are responding to climate change to protect our marine environments: rsc.li/3McQQz4


1 Reader's comment