In this experiment, students record what is seen when a Benham top spins at different speeds, comparing their perceptions with those of group members.
Student Sheet
In this practical I will be:
- Carrying out the practical, making careful observations about what is seen and whether there are any differences between group members.
- Using my knowledge and understanding of how we perceive objects to explain my observations and the differences between group members’ observations.
- Applying and testing my explanations by altering the speed and designs on the spinners.
- Thinking about how differences in observations and misinterpretations of information may apply to other experiments, and what implications this may have.
Introduction:
The year is 438 BCE and as a well-respected, ancient Greek science-artist, you have been invited to the opening of the Parthenon, in Athens. You speak to the architect, in charge of the project, and he explains that he used several tricks to alter how people perceive the temple. This gets you thinking about how people see objects, and in particular colour. Like all good science-artists, you decide to investigate further…
Equipment:
- 1 piece of white card
- 1 pencil with a good depth of eraser on the end of the pencil
- 1 black crayon or felt tip pen
- 1 protractor
- 1 pair of scissors
- 1 drawing pin
- Photocopies of the disk patterns (below)
- Electric hand held mixer (if available)
Method:
- If you are given a photocopy of a disk then cut it out. You will need to stick this onto some card and cut that out too. Then go straight to step 6.
- If you have been given a piece of stiff white card, cut out a circle of about 10–12 cm diameter.
- Draw a line across the centre of the disk and colour one half black using a black crayon or a black felt tip pen.
- Use the protractor to divide the white half into four equal parts. To do this draw a line at 45° to the centre line then repeat by drawing a line at 45° to the line just drawn. Repeat until you have four sections.
- Now use a black crayon to draw the following design. Each set of drawn lines is about 2 cm thick.
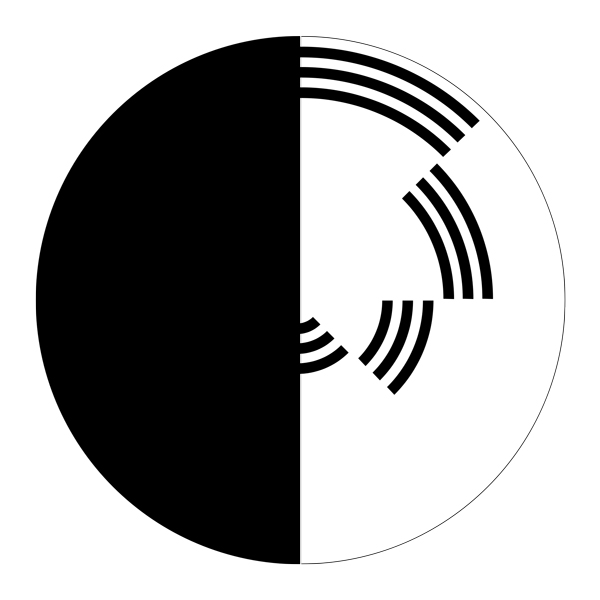
Image courtesy of Wikipedia
- Carefully push a drawing pin through the centre of the disk and pin the disk to an eraser on the end of a pencil.
- Spin the disk clockwise and anticlockwise at different speeds.
- Write some notes about what you see and in groups of three discuss what you have seen.
Questions
- What do you observe when you spin the disk?
- Do others see exactly the same colours or shapes as you?
- Do you see any colour?
Going further:
Try different patterns on the white half of your disk. Try spinning the disks at different speeds.
Use the same group of people to observe and compare the range of results.
- Is there any pattern?
- Does the same person see the same range of effects?
Theory:
We do not always get it right when we observe things. Our brains can misinterpretinformation especially if we perceive things moving at speed. The phenomenon seen here in Benham’s Disk is not entirely understood but there is an accepted theory.
The colourreceptors (cones) in our eyes react at different rates to red, green and blue, and fast moving objects. This difference in response rate can deceive our brains when interpreting the signals.
When stimulated the cones and rods in the retina send a signal to the neural ganglion cells. Different ganglion cells become selectively tuned to detect subtle features of the visualterrain; colour, size, direction and speed of motion. These are called ‘triggerfeatures’. Signals detected by the ganglion cells do not have a unique interpretation. The same signal might result from an object changing brightness, changing shape, or moving. The brain determines the most likely interpretation of events and, in the context of events detected by the other ganglion cells, takes appropriate action based upon the mass of information.
So, the different types of colour-specific ganglion cells respond differently to the effect of spinning objects. When the disk is spun, arcs of pale colour, called Fechner colours or pattern-induced flicker colours, are visible at different places on the disk. These can range from brown to pink depending upon the individual and speed of rotation. Neural activity in the retina and the ability to interpret the edges of shapes in the primary visual cortex of the brain is thought to create the different pattern-induced flicker colours. Importantly, because each person’s eyes and their ganglion cells respond slightly differently to different signals, not everyone sees the same colours.
In 1826 Benedict Prévost observed colours when he waved his hands about, which he described as being like a heavenly light on his fingers. He experimented with white cardboard designs and realised that it has a physiologicalorigin, in the eye. He attributed it to different rates of action of specific colour mechanisms of the retina. He was essentially correct but Provost’s discovery was forgotten until 1838 when Fechner described the same phenomenon. In 1895 Charles Benham, an English toy maker, was the first to use the effect and that gave it its name, he sold a spinning top called an ‘Artificial Spectrum Top’.
Research is currently being carried out on the use of the Benham Disk effect as a diagnostic tool for diseases of the eye.
Teacher and Technician Sheet
In this practical students will:
- Carry out the practical, making careful observations about what is seen and whether there are any differences between group members.
- Use their knowledge and understanding of how we perceive objects to explain observations and the differences between group members’ observations.
- Apply and test their explanations by altering the speed and designs on the spinners.
- Think about how differences in observations and misinterpretations of information may apply to other experiments, and what implications this may have.
Introduction for teachers:
(This topic could start with a group discussion on the idea of an optical illusion. Have they seen one and if so can they describe it? During this discussion the teacher introduces the following ideas, especially the words in bold.)
When we see, it is because the eyes have received stimulation from light and the brain has translated that stimulation into information.
The strange thing is that our ‘eyes’ can be deceived. This is because our brains can misinterpret the stimulation. When this happens we call it an opticalillusion. An optical illusion is any effect that deceives the eye and brain into perceiving something that is not present or incorrectly perceiving what is present. There is a known strobing effect caused by some patterned (checked) clothing on black and white television or B&W programs on television that causes a colour effect.
An important area of illusion in art is the creation of the perception of a three-dimensional (3D) object from the two-dimensional (2D) surface of a painting. This is usually done using shadow, line and shape. In the eye, depth is perceived by a colour-blind process in which it is the different hues or luminance that determines depth to our vision of an object. Often an object is perceived because we fill in the detail based upon strategically placed shapes or upon the perception of an object at speed. This experiment is concerned with speed. The next experiment (How many black circles can you see?) is concerned with line, shape and colour.
Pupils can work in groups of three for the activity, each with a different style of Benham Disk. Three examples are provided on a separate sheet. This would allow for group work and promote discussion between groups of pupils.
It is important that the pupils discuss what they see without any prompts since each will see something slightly different. This can form the basis of a discussion about whether we can trust our eyes and what we see.
Curriculum range:
All ages can take part in this activity since the aim is to gain some understanding of the thinking of the artist and psychologist when trying to understand sight and perception. It links with:
- setting up simple practical enquiries, comparative and fair tests;
- reporting on findings from enquiries and observations, including oral and written explanations, displays or presentations of results and conclusions;
- using straightforward scientific evidence to answer questions or to support their findings;
- asking questions and developing a line of enquiry based on observations of events in the real world, alongside prior knowledge and experience;
- using appropriate techniques, apparatus, and materials during laboratory work, paying attention to health and safety;
- making and recording observations and measurements using a range of methods for different investigations; and evaluate the reliability of methods and suggest possible improvements;
- presenting observations and data using appropriate methods;
- interpreting observations and data, including identifying patterns and using observations, measurements and data to draw conclusions;
- presenting reasoned explanations, including explaining data in relation to predictions and hypotheses;
- the concept of an optical illusion and how it relates to the perception of the world around us; and
- how we see things and how that sight can be fooled by the use of line, shape and colour.
Hazard warnings:
There are no hazards in this practical other than the use of a pin to hold the card circle onto a pencil to allow it to spin freely.
Equipment:
- 1 piece of white card (about A4)
- 1 pencil with a good depth of eraser on the end of the pencil
- 1 black crayon or felt tip pen
- 1 protractor
- 1 pair of scissors
- 1 drawing pin
- Photocopies of the disk patterns (below)
- Electric hand held mixer (if available)
Technical notes:
Pupils can draw their own disks but they do need to be carefully drawn so for the first run it might be better for each to have a photocopy of one of the disks below. Once they have tried this they can make their own.
An alternative to the use of the pin method is to glue the disk on to a dowel rod, hold the dowel in an electric drill, and use the drill to spin the disk. Alternatively the disk is attached to a pencil or attached with blue tack to a hand held fan.
A hand held electric food mixer could be used and then the speed could be varied.
The higher the speed, the more stroboscopic artefacts can occur, due to the interaction of the cycle rate of some types of lamps and the display of the rotating wheel. The effect is similar to that of the backward rotating spokes on wheels in some movies. It might be better to do the experiment in daylight.
Students will probably be able to see the black and white effect give way to colour. Different colours can be observed in the different bands of the disk. These change depending on the pattern on the disk, the speed used and, perhaps, the observer.
Results:
To start with spin the disk at high speed. The arcs will appear in weak (unsaturated) colours, for example, a red-brown in the centre three arcs. By reversing the spin, you can change the colours. The effect is also present at slower speeds but in this case the hues may change. Different colours can be observed in the different bands of the disk. These change depending on the pattern on the disk, the speed used and, perhaps, the observer.
If you take a photograph of the spinning disk the colours will not be there.
Going further:
Try making different patterns such those examples of Benham Disks below.
Try drawing your own design on the white half of your disk. Try spinning the disks at different speeds.
Use the same group of people to observe and compare the range of results.
- Is there any pattern to the perceptions of the colour and shapes seen?
- Does the same person see the same range of effects in each disk design?
Examples of Benham Disks:
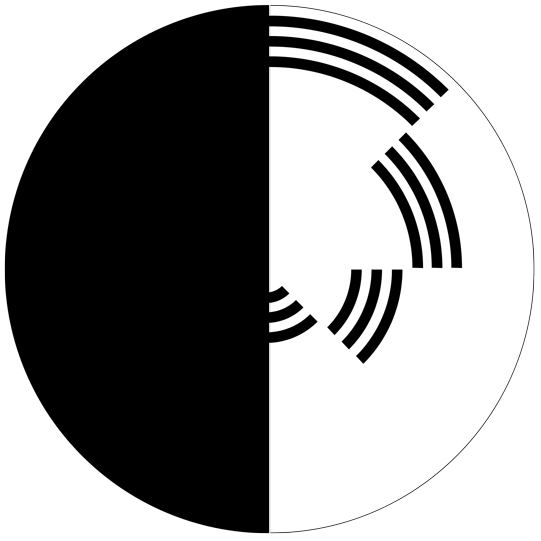

Images courtesy of Wikipedia
Downloads
Benham top: student sheet
Experiment | PDF, Size 0.22 mbBenham top: teacher sheet
Experiment | PDF, Size 0.18 mb