In this experiment, students observe what happens to white light as it passes through water droplets.
Student Sheet
In this practical I will be:
- Carrying out an experiment and observing what happens when light passes through water droplets.
- Reporting my findings, using scientific evidence to explain my observations.
- Comparing my initial drawings and my results, and reflecting on how my understanding of rainbows has changed.
Introduction:
Whilst travelling north from Athens to Pella, in Macedonia, your route takes you by some awe inspiring sites- the Edessa waterfalls. When you stop to paint a picture of the waterfalls, you see light of various colours. Like all good ancient Greek science-artists, you decide to investigate further…
Equipment:
- Hose pipe connected to a water tap
- White paper, 1 piece
- Dark paper, 1 piece
- Crayons (various colours)
- Felt pens (various colours)
- Towels
- Clear glass bottle or beaker with water
- Good torch with a strong white beam of light
Method:
Your teacher might show you the following experiment but if you are supervised at home you could do it for yourself.
The ‘rainbow’ will be created with water coming out of a hose pipe. Working with another person one of you will spray the water while the other observes the water spray from a number of different angles.
On a sunny day early in the morning, when the sun is low on the horizon, use a garden hose with a fine spray nozzle on to spray a fine mist arc of water so the sun shines through it. One of you is to stand in different positions to look through the spray of water and see if you can see the ‘rainbow’.
Do not look directly at the sun. Change over so you can both make observations. Draw a picture of the rainbow you saw.
Questions:
- In relation to the sun and the spray of water, where were you looking when you saw the best rainbow?
- Compare your first drawings of rainbows to the final drawing of the rainbow. Did you get the right colours? If not, which colour(s) were different?
- Did you get the order of the colours right? If not, which colours were out of order?
- What was the order of colours in the rainbow you saw?
- When you drew the rainbow using different types of pen and crayon did you get the same colours? If not, why do you think there were differences?
- Which pens or crayons and which colour paper would you choose to draw a rainbow accurately?
- Why do you think the colours are so different from the pens and crayons, compared with the rainbow you saw?
Going further:
Equipment:
-
clear glass bottle with screw top lid, full of water
-
good torch with a strong white beam of light
Method:
Set the water bottle on a table and shine the flashlight at a sharp angle down through the bottle until the light beam is split into its colours.
Take turns to hold the sheet of white paper where the rainbow appears and to draw the rainbow on to another piece of white paper.
Questions:
-
Which rainbow is strongest; the one made by the spray of water or the one made by the bottle of water?
-
Why do you think there are differences in the two rainbows?
Theory:
If we split white light into its component parts, known as the spectrum we get sevencolours that form the colours of the rainbow. They are Red, Orange, Yellow, Green, Blue, Indigo and Violet sometimes written as ROYGBIV which can be remembered as a mnemonic ‘Richard Of York Gave Battle In Vain’, see Fig 1. Indigo is a blue violet colour and often hard to determine so in some diagrams, as below, we see blue and then violet.
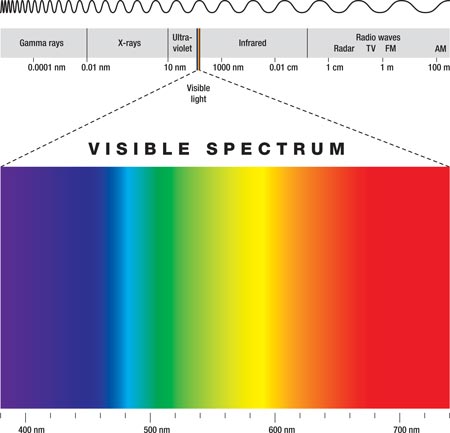
Figure 1: The Electromagnetic Spectrum. © Shutterstock
The rainbow is formed as the sun hits the arc of falling water droplets which act as prisms. The white light is bent and split, or refracted, into the component colours or spectrum. The light hits the other side of the water droplet and is reflected off the surface back through the water drop to be refracted again as it leaves the drop. Red light is refractedless than the violet light so it appears on the top of the rainbow spectrum. The colour pattern of a rainbow is less distinct than that from a glass spectrum, and the colours are less saturated.
Light is made of all the colours in the rainbow. When it hits a coloured object, most of it is ‘soaked up’ or absorbed and only one colour is ‘bounced off’ or reflected. A red object, for example, absorbs almost the full spectrum of light and reflects the red light only.
Our eye is able to see the colour because of light-sensitive photoreceptor cells called rods and cones that are in the retina, a layer of tissue in the back of the eye.
Rods and cones are stimulated by the different light waves reflected off surfaces. The rod or cone cells send signals to the brain. If no light is reflected, all the colours are absorbed and the surface will look black. If no light is absorbed but all the light is reflected, the object will appear white.
Primary colour is defined as the lowest number of colours that can be used to make the largest range of colours. In art, artists mix the primary colours of red, yellow, and blue, but scientists use a different set of primary colours when talking about the visible light spectrum: red, green, and blue. These colours can be used to explain how the entire spectrum of colours mixed together makes white light.
When two primary colours of light are mixed together, a secondary colour is created. For example, red and green light mix to make yellow light. If you mix all three primary colours of light (red, green, and blue) on a single spot on a screen, they form white light. This is called colour addition. Colour addition involves combining different colours of light to form a new colour of light. The new colour is made by adding different colours of light together.
When an artist mixes red and green paint the mixture is closer to brown than to yellow. This is because paint colours combine by colour subtraction. Colour subtraction is the process of filtering out colours. For example, red paint filters out (subtracts) green light and green paint filters out (subtracts) red light, so when you mix red and green paint the mixture becomes a muted drab colour, close to brown. As more colours of paint are mixed in, more colours are subtracted, and the mixture becomes darker, eventually becoming black.
Teacher and Technician Sheet
In this practical students will:
- Carry out the experiment and observe what happens when light passes through water droplets.
- Report their findings, using scientific evidence to explain observations.
- Compare their initial drawings and the experiment results, reflecting on how their understanding of rainbows has changed.
Introduction for teachers:
(This is an important experiment designed to establish some key concepts of light and colour. It should precede the Spinning Colour Disk and Benham’s Disk practical.)
To initiate this activity ask the pupils to discuss rainbows – when and where are they seen? How do you think they form? Pupils can then individually draw their own rainbows using different types of coloured medium and on different types of coloured paper.
Ask pupils to draw two rainbows on a piece of white paper; one using any kind of coloured crayons and one using felt tip pens.
They should then draw two more rainbows, using the same coloured crayons and felt tip pens, on dark paper.
Ask the pupils to get into groups of two or three to discuss their drawings and the colours.
They should compare their drawings and comment on how similar or different they are, particularly the colour depth, combination and order of the colours.
Next, using the methods on the student sheet, they will check their work by creating and drawing a ‘real’ rainbow. In one method a simulated rainbow is formed by light passing through flowing water. In the other, a spectrum is created by light passing through a ‘water’ prism.
The results are for discussion, along with the theory behind these ideas, to establish a concept of the spectrum. For this, pupils can work in groups of three.
Curriculum range:
All ages of children can take part in this activity, but it is probably best used with upper junior pupils. The aim is to gain some understanding of the thinking of the artist and scientist with regard to colour. It links with:
- setting up simple practical enquiries, comparative and fair tests;
- reporting on findings from enquiries and observations, including oral and written explanations, displays or presentations of results and conclusions;
- using straightforward scientific evidence to answer questions or to support their findings;
- building a more systematic understanding of light by exploring and comparing the properties of light as it interacts with a transparent material;
- asking questions and developing a line of enquiry based on observations of the real world, alongside prior knowledge and experience;
- using appropriate techniques, apparatus, and materials during laboratory work, paying attention to health and safety;
- presenting reasoned explanations, including explaining data in relation to predictions and hypotheses; and
- learning about the concept of refraction to create a spectrum of visible light.
Hazard warnings:
There are no real hazards in this practical. However it is possible that the water will be an inviting distraction and a pupil might get wet. It is also worth warning the children not to look directly at the sun.
Equipment:
- Hose pipe connected to a water tap
- White paper (one per pupil)
- Dark paper (Black or a dark primary colour one per pupil)
- Crayons (various colours)
- Felt pens (various colours)
- Clear glass bottle or glass beaker of water
- Good torch with a strong white beam of light
Technical notes:
The rainbow works best on a sunny day early in the morning, when the sun is low on the horizon.
A torch with a good strong beam of white light is best for the bottle experiment.
Results:
Looking through the water arc with the sun coming from behind them the children should see a rainbow.
The students should see a rainbow if they stand with their back to the sun and look through the water arc in front of them that has the sun shining through it.
It is important they see the range of colour in the order: Red, Orange, Yellow, Green, Blue, Indigo and Violet.
Then they should note the correct order and the mnemonic ROYGBIV = ‘Richard Of York Gave Battle In Vain’ can be introduced to them. See if you can make up your own mnemonic for the spectrum.
Going further:
Pupils shine a torch through a clear glass screw top bottle, or a glass beaker, full of water
The light beam is split into its colours.
Hold the sheet of white paper where the rainbow appears.
The bottle is acting as the prism and is similar to a very large water drop.
Downloads
Making a rainbow: student sheet
Experiment | PDF, Size 0.18 mbMaking a rainbow: teacher sheet
Experiment | PDF, Size 0.17 mb