


Students can discover the reduction of copper oxide and apply their critical enquiry skills into the methods used
Use these diverse methods of reduction in your learning space to show how different chemicals can achieve the same result by different means.
This experiment should take 10 minutes.
Equipment
Apparatus
Basic method
- Eye protection
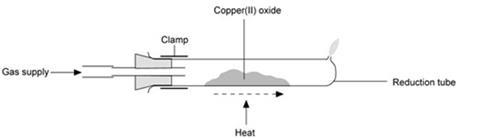
- Reduction tube, ie a Pyrex boiling tube with a small hole blown about 1 cm from the closed end
- A one-hole rubber bung to fit the reduction tube, fitted with a short length of glass tubing
- Rubber tubing to connect the reduction tube to the hydrogen cylinder or gas tap
- Stand, boss and clamp
- Bunsen burner
- Access to a top pan balance that weighs to 0.01 g
- Safety screens
- Circuit board, batteries, bulb, ammeter and leads to test the electrical conductivity of the product (optional)
Bubbling through ethanol method
- Conical flask fitted with a two-holed bung with one long and one short glass tube, 250 cm3
- Beaker, 1 dm3
Chemicals
- Copper oxide, 3 g
- Copper, 3 g
- Hydrogen cylinder with valve gear and regulator
- Ethanol, 100 cm3 (needed for method 2)
- White firelight, 1 cm x 1 cm x 2 cm (needed for method 3)
Health, safety and technical notes
- Read our standard health and safety guidance.
- Always wear eye protection.
- Use safety screen.
- For safety information on copper and copper oxide, see CLEAPSS Hazcard HC026.
- For safety information on hydrogen, see CLEAPSS Hazcard HC048.
- For safety information on ethanol, see CLEAPSS Hazcard HC040a.
- Do NOT light the gas before testing it – this can cause the whole apparatus to explode.
- Wait until the flame has gone out before removing the bung. Otherwise, as air is drawn into the reduction tube, there will be a loud pop which can be disconcerting.
- If you are not confident that you can safely conduct this experiment, please consult an experienced colleague.
Procedure
Before the demonstration
- Dry the copper oxide in an oven at about 100 °C and store it in a desiccator until the demonstration
Basic method
- Weigh the reduction tube empty.
- Place about 3 g of copper(II) oxide along the base of the tube so that it is spread out over a length of about 4 cm, centred in the middle of the tube.
- This is to ensure that it will not be necessary to heat too close to the rubber bung, and so that there is no tendency for the powder to be blown out of the hole when the hydrogen is turned on.
- Reweigh and note the mass of the tube plus copper(II) oxide.
- Clamp the reduction tube at its open end (a clamp without cork or rubber padding is preferable, as the tube may get hot).
- Place a safety screens between the tube and the audience and demonstrator.
- Connect the bung and glass tube to the hydrogen cylinder with rubber tubing, turn on the gas and adjust to get a gentle flow which can just be felt on the cheek.
- Place the bung in the mouth of the reduction tube.
- Check that the hydrogen is coming out of the hole in the reduction tube by collecting the gas in a micro test-tube and seeing if it burns quietly rather than ‘pops’ when placed in a Bunsen flame.
- Once you are sure, it is burning quietly, leave for a further 30 seconds to flush out the air, and light the gas emerging from the hole.
- Adjust the gas flow to give a flame about 3 cm high. Light the Bunsen burner and with the tip of a roaring flame heat the oxide at one end of the pile.
- After a few seconds, the powder will glow and start to turn pink. Chase this glow along the tube for about 30 seconds until the whole of the black oxide has turned to pink copper.
- Continue to heat the tube for at least another minute to ensure that all the oxide has reacted. Take care that the Bunsen flame does not extinguish the hydrogen flame, and be prepared to re-light this flame if it goes out.
- Remove the Bunsen burner and allow the reduction tube to cool with the hydrogen still passing over the copper and the excess gas still burning. This prevents air coming into contact with the hot copper and converting it back to oxide.
- When the tube is cool enough to handle, turn off the hydrogen at the cylinder.
- Remove the bung and weigh the tube and contents.
With natural gas
- The method is as above, but using gas from the gas tap (about 95 % methane) instead of hydrogen.
- The reduction is much slower – it will take about 20 minutes of strong heating – and no glow is seen.
- It is difficult to be certain when reduction is complete and teachers might consider reducing to constant weight, but the time taken for several cooling, weighing and re-heating cycles seems excessive for a demonstration.
- It is important that the whole of the oxide is heated strongly
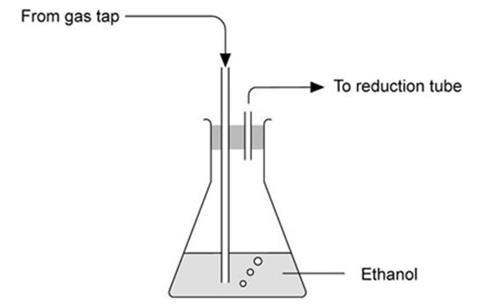
With natural gas, and ethanol
- As for above, but arrange for the natural gas to bubble through ethanol in a conical flask before it reaches the reduction tube.
- Standing the flask in warm water (about 65 °C) to increase the rate of evaporation of the ethanol speeds up the reduction.
- The reduction takes between five and ten minutes and a faint glow is seen as the oxide is reduced
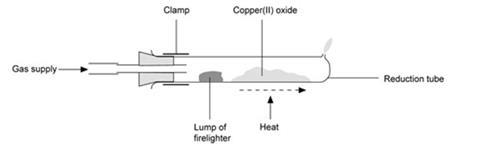
With natural gas, and a firelighter
- As for above, but place a small piece (about 1 cm x 1 cm x 2 cm) of white firelighter in the reduction tube close to the gas inlet.
- Do this after weighing the tube plus oxide.
- Heat the oxide strongly and flick the Bunsen flame occasionally onto the firelighter for a few seconds at a time.
- The firelighter contains a paraffin-like hydrocarbon which is vaporised by the heat.
- The firelighter blackens, the flame burning the excess gas goes smoky, and the reduction tube may blacken slightly.
- The reduction takes about ten minutes.
- After cooling the tube, remove the remains of the firelighter with a spatula before weighing.
Notes
During the reduction, many interesting observations can be pointed out to the audience:
- Before the tube gets too hot, droplets of water produced by the reaction can be seen near the end of the reduction tube.
- The excess hydrogen (or natural gas) flame will burn green – the characteristic colour of copper.
- During the reduction, the height of the flame will lessen as some hydrogen is being used up and replaced by water.
- Pass the copper that is produced around the class. Demonstrate that it conducts electricity by using a circuit board and ammeter.
Formulas can be determined from the combining masses in the usual way or by using the graphical method described in Revised Nuffield chemistry teachers’ guide II p71, London: Longman, 1978.
Some teachers may wish simply to demonstrate the removal of oxygen from an oxide, rather than to use this procedure to determine formulas.
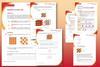
The reactions are:
CuO(s) + H2(g) → Cu(s) + H2O(l)
4CuO(s) + CH4(g) → 4Cu(s) + 2H2O(l) + CO2(g)
6CuO(s) + C2H5OH(l) → 6Cu(s) + 3H2O(l) + 2CO2(g)
Extension
The formula of red copper(I) oxide can be determined by reduction with hydrogen in exactly the same way as for copper(II) oxide.
The colour change is less clear-cut, but the powder glows, showing that reduction is taking place.
Oxides of lead can be reduced by this method using hydrogen, as can other metal oxides
Downloads
Reduction of copper(II) oxide by hydrogen - teacher notes
PDF, Size 0.24 mb
Additional information
This practical is part of our Chemistry for non-specialists and Classic chemistry demonstrations collections.


No comments yet