In this experiment, students observe, describe and explain what happens when a multicoloured disc spins at a high speed.
Student Sheet
In this practical I will be:
- Carefully observing and recording what happens when multicoloured discs spin.
- Using scientific evidence to answer questions and explain my observations.
- Testing what happens when different combinations of colours are used on the discs.
Introduction:
Whilst watching dancers perform a Dionysian dance, the dancers began to twirl faster and faster. The dancers were wearing dresses of red and blue, but as they span faster, something interesting began to happen to the colours. Like all ancient Greek science artists, you decide to investigate further…
Equipment:
- 1 colour pencil
- 1 round small plate or a paper plate
- 1 protractor
- 1 set of felt tip pens (red, orange, yellow, green, blue, indigo, violet)
- 1 hole punch
- Scissors
- Transparent sticky tape
- Paper plate (posterboard or stiff cardboard if using a normal plate)
- Ruler
- Blue tack
- Rubber bands
Method:
- Place small round plate onto a white posterboard or stiff cardboard sheet. Trace around the outside of the plate using your favourite coloured pencil.
- Use Scissors to carefully cut out the circle. If you have been provided with a paper plate you can cut out the circle in the middle (the area that is flat and easier to draw on and colour in).
- Using a ruler, draw a line across the centre of the circle to divide the circle into two halves.
- Using a protractor draw a line at 45° to the line across the centre to make four sections.
- Repeat in the other half so you have eight equal sections and it looks like a pie.
- Using coloured crayons, colour each section with a different colour.
- When you have coloured all the sections use a hole punch to punch a hole in the centre of the circle where all the lines come together. Alternatively you could also stick a small ball of blue tack on the centre point of the circle, turn the paper circle over and push a pencil through from the other side to make a hole. Remove the blue tack and push the pencil through the hole until it is in the position where you want to secure it. The card circle should be near the top of the pencil to allow enough room to roll the pencil between your hands.
- Insert a long pencil in the centre hole and tape in place using transparent sticky tape.
- Looking at the coloured side of the disk, twirl the pencil between your palms so the coloured card spins.
- What do you see?
Going further:
- Try creating spinners with different colour combinations, and try spinning the disks at different speeds.
- What different effects can you create with the different speed of spinning and different combinations of colours?
- Make a disk with one side coloured blue and the other side red. You can spin the disk quickly by putting string through two holes as shown in the diagram below:
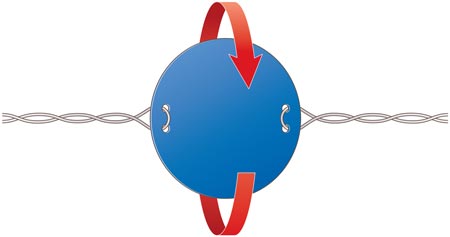
Peter Bull
Hold the disk by the string and twirl the string so the disk turns repeatedly as shown by the arrow. Two rubber bands can be threaded through and secured before winding them up. When released the disk spins quickly merging the colours.
Describe what you see as the disk spins.
- Is this a primary or secondary colour?
- Is red a primary colour? Is blue a primary colour?
- What do you think would happen if you used a disk with a blue side and a yellow side?
- Experiment with three torches with each lens covered with a coloured gel; one torch with red gel, one with blue gel and one with green gel. Coloured film can be secured with sticky tape over the torch beams to colour the light. Hold the three torches the same distance from a white wall, white board, or posterboard. Shine all of the torches onto the white surface so that the three light beams overlap with each other as shown below:
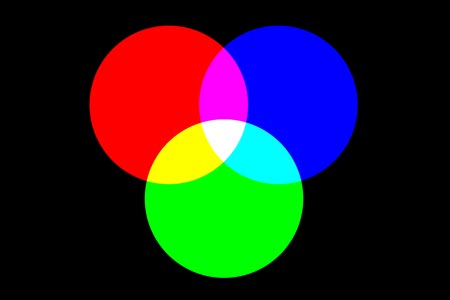
© Shutterstock
The torches may need to be adjusted to allow for a good overlap.
Try sticking your hand between the surface and the coloured lights.
- How many different colours do you see?
- What colours do you see where there is an overlap?
All of those colours are created by the three primary additive colours.
Theory:
Light is made of all the colours in the rainbow. When it hits a coloured object, most of it is ‘soaked up’ or absorbed and only one colour is ‘bounced off’ or reflected. A red object, for example, absorbs almost the full spectrum of light and reflects the red light dominantly.
Our eye is able to see the colour because of light-sensitive photoreceptor cells called rods and cones that are in the retina, a layer of tissue in the back of the eye.
Rods and cones are stimulated by the different light waves reflected off surfaces. The rod or cone cells send signals to the brain. If no light is reflected all the colours are absorbed and the surface will look black. If no light is absorbed and all the light is reflected, the object will appear white.
When the colour wheel provided with this activity spins, the colours being reflected are changing faster than the photoreceptors can communicate with the brain. This means the reflected colours blend with each other and you see white light. Whitelight is a nonspectrual colour, meaning it cannot be generated by any single wavelength of light.
When a disk which is red on one side and blue on the other is spun quickly the viewer sees purple. This is because our eyes are slow in responding to the light messages.
In art, artists mix the primary colours of red, yellow, and blue, but scientists use a different set of primary colours when talking about the visible light spectrum: red, green, and blue. These colours can be used to explain how the entire spectrum of colours mixed together makes white light.
When two primary colours of light are mixed together, a secondary colour is created. For example, red and green light mix to make yellow light. If you mix all three primary colours of light (red, green, and blue) on a single spot on a screen, they form white light. This is called colour addition. Colour addition involves combining different colours of light to form a new colour of light. The new colour is made by adding different colours of light together.
When an artist mixes red and green paint the mixture is closer to brown than yellow. This is because paint colours combine by colour subtraction. Colour subtraction is the process of filtering out colours. For example, red paint filters out (subtracts) green light and green paint filters out (subtracts) red light, so when you mix red and green paint the mixture becomes a muted drab colour, close to brown. As more colours of paint are mixed in, more colours are subtracted, and the mixture becomes darker, eventually becoming black.
Purple is a secondary colour. When we see purple painted surface, it appears purple because it is reflecting both red and blue light but within a very narrow range. It is important to note that purple is different from violet. Violet is reddish-blue and at one end of the spectrum, beyond blue. Red is at the other end of the spectrum, see Fig 1. (Indigo is a blue violet colour and often hard to determine so in some diagrams, as below, we see blue and then violet.)
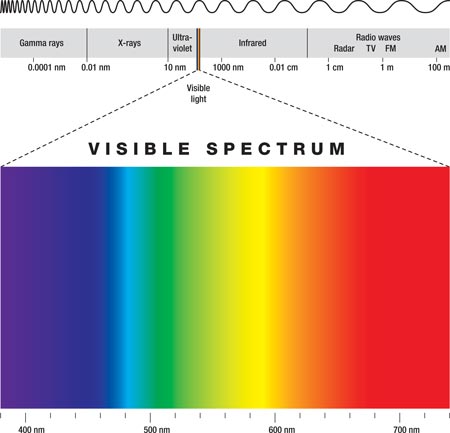
Figure 1: The Electromagnetic Spectrum. © Shutterstock
That means purple objects must absorb the green and yellow light right in the centre of the spectrum. This is a very selective process within a narrow range of light. For that reason purple objects are uncommon in nature. In art, purple has traditionally been a very expensive colour to make and in many periods it was considered a royal colour, because of its rarity.
What is happening in the eye when we look at purple?
Try looking for natural objects that are coloured purple.
In the retina of the eye one type of cone responds to the short wavelength colour red, and another type of cone responds to the longer wavelength blue. However the cones that are stimulated by the blue will be stimulated by the shorter red wavelength. The result is that, blue cones are stimulated and the sensation is the spectral colour violet that looks reddish blue. The combination of the stimulation of the red and blue cones is we see purple.
Teacher and Technician Sheet
In this practical students will:
- Carefully observe and record what happens when multicoloured discs spin.
- Use scientific evidence to answer questions and explain their observations.
- Test what happens when different combinations of colours are used on the discs.
Introduction for Teachers:
(This topic could start with a group discussion about colour around us and about the rainbow, during which the teachers introduce the following ideas especially the words in bold. This practical is best done after the Making a Rainbow experiment (A), in which case it is useful to get the children to recall what they learnt in the rainbow experiment.)
When we see it is because our eyes have received stimulation from light and the brain has translated that stimulation into information. Important information is that of colour, shape and lines discriminating the object. The eye can respond to stimulation from light to give colour and shape to an object.
In art, colour is very important for perception of shape. The colour wheel is often used by artists to explain relationships between different colours. Artists use this approach to determine which colours look good with each other. They also use the colour wheel to determine how to mix paint to produce more colours.
All colour combinations can be made by mixing three primary colours with white and black. The three primary colours of red, yellow and blue can be mixed to create the secondary colours of orange, green and violet. Using these secondary colours with the primary colours it is possible to create the tertiary colours, such as blue-green and the other in-between colours.
If we split white light into its component parts known as the spectrum we get seven colours that form the colours of the rainbow. They are Red, Orange, Yellow, Green, Blue, Indigo and Violet (ROYGBIV which can be remembered as a mnemonic ‘Richard Of York Gave Battle In Vain’). Try making up your own.
In this experiment the pupils discover what happens when colours are mixed in a physical way, by spinning a disk with the seven colours on it and a disk with just two colours on it. Pupils can work individually then come together in groups of four to discuss their results and ideas.
Curriculum range:
All ages can take part in this activity but it is probably best done with upper juniors. The aim is to gain some understanding of the thinking of the scientist and artist with respect to colour and colour mixing. It links with:
- setting up simple practical enquiries, comparative and fair tests;
- reporting on findings from enquiries and observations, including oral and written explanations, displays or presentations of results and conclusions;
- using straightforward scientific evidence to answer questions or to support their findings;
- building a more systematic understanding of light and colour by exploring and comparing the properties of light as it interacts as different colours;
- asking questions and develop a line of enquiry based on observations of the real world, alongside prior knowledge and experience;
- using appropriate techniques, apparatus, and materials during laboratory work, paying attention to health and safety;
- presenting reasoned explanations, including explaining data in relation to predictions and hypotheses; and
- learning about the concept of primary, secondary colours in relation to light and pigments.
Hazard warnings:
The only hazard is the use of the hole punch but this can be overcome by asking students to bring their disks to an adult who will punch the hole for them. Alternatively a hole can be made using a pencil.
Equipment:
- 1 coloured pencil
- 1 round small plate or paper plate
- 1 protractor
- 1 hole punch
- 1 set of felt tip pens (red, orange, yellow, green, blue, indigo, violet)
- 1 pair scissors
- 1 long pencil
- Transparent sticky tape
- Posterboard or stiff cardboard (about A4)
- Blue tack
- Ruler
- Rubber bands
Technical notes:
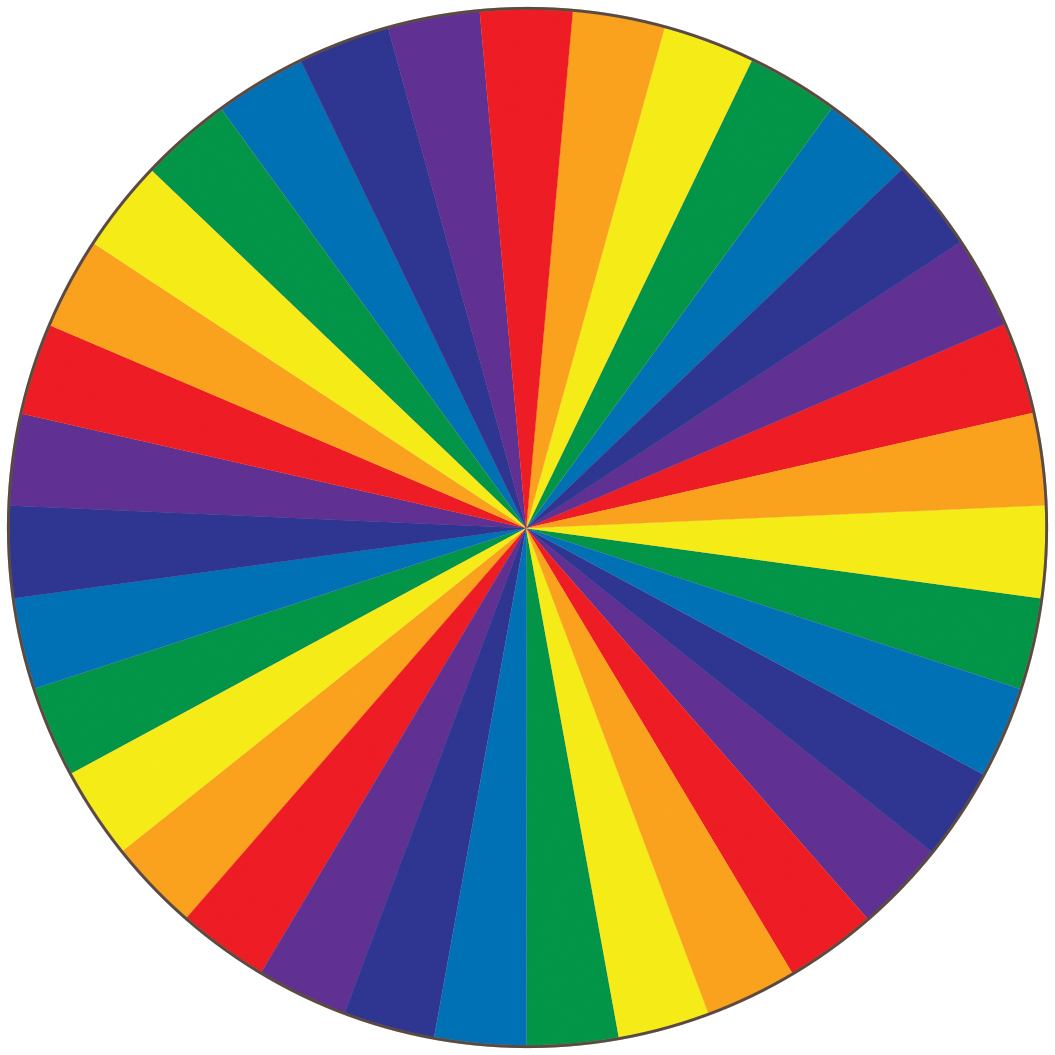
Below is a colour wheel that could be used if children find it hard to make their own disk. It can be printed using a colour printer.
This experiment is best done in daylight or in a room with white fluorescent lights.
An alternative method is to glue the coloured disk on to a dowel rod, hold the dowel in an electric drill, and use the drill to spin the disk. The disk can be secured using Blutack
Going further:
Use the spinner you first used but with different colour combinations and spin the disks at different speeds.
What different effects can you create with the different speed of spinning and different combinations of colours?
Results:
When the disk is spun at high speed the colours disappear and the disk appears white. The faster the spinning the better the result is and the clearer the effect.
Good results can also be obtained by attaching the disk to rubber bands that are wound up and then released, or by attaching the disk to a hand held fan with blue tack.
P016 Spinning Colour Top
Peter Bull
Downloads
Spinning colour top: student sheet
Experiment | PDF, Size 0.2 mbSpinning colour top: teacher sheet
Experiment | PDF, Size 0.18 mb