


Help your leaners choose appropriate apparatus and make accurate measurements with confidence
David Paterson updated this article on 3 February 2026
As a species, we have been making measurements from our earliest civilisations. Ancient units of measurement tended to be based on the human body or the natural world. For example, Sumerians used the cubit as a measure of length, running from the elbow to the tip of the middle finger, while ancient Egyptians divided the night into 12 hours due to the appearance of 12 stellar constellations.
Today, we rely on measurements in many aspects of our daily lives. Whether it is weighing a newborn baby, checking the volume of fuel dispensed at a petrol station or following a recipe to bake a cake, measurements provide us with vital information.
Why study making measurements?
Chemistry, as a science, is rooted in both observation and accurate measurement. Antoine Lavoisier’s work required careful measurements of the weights, helping to confirm the principle of conservation of mass and disproving phlogiston theory.
Measurements provide us with precise and detailed information that helps us to more fully understand and interpret the world we observe. For our students, being able to make decisions about which apparatus to use, and to make accurate and precise measurements, allows them to develop important practical competencies in the laboratory and to develop understanding of how chemistry develops as a science.
Progression in ideas and skills
As students move through their secondary education, they should carry out many reactions that require making measurements. Their practical skills will develop alongside their observation skills, as well as their conceptual understanding.
As students move through their secondary education, they should carry out many reactions that require making measurements. Their practical skills will develop alongside their observation skills, as well as their conceptual understanding (rsc.li/49TyGOf).
| Secondary range | Types of learning areas |
|---|---|
| Pre (approx 7–11) | Take measurements using a range of scientific equipment with an increasing accuracy and precision, taking repeat readings when appropriate |
| Early (approx 11–14) | Make and record observations and measurements using a range of different methods |
| Mid (approx 14–16) | Use appropriate apparatus to make and record a range of measurements accurately, including mass, time, temperature and volume of liquids and gases |
| Late (approx 16–19) |
Use appropriate apparatus to make and record a range of measurements (to include mass, time, volume of liquids and gases, temperature) Measure pH using pH charts, pH meter or pH probe on a data logger Set up electrochemical cells and measure voltages |
Formal assessment of practical skills, such as measurement, is achieved differently between nations. For example, in England, these skills are assessed indirectly in written papers at GCSE level, while in Wales, hands-on practical assessment contributes 10% to the final GCSE grade. Consider how your curriculum and schemes of work support your students’ skills development. Is there clear progression, with opportunities to practise at each level? Are there particular skills that are assumed to have been mastered at different levels? How do you support students who haven’t mastered the skills, for example those new to the school?
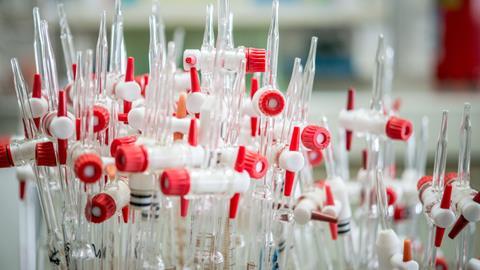
Measuring the volume of a liquid provides a useful illustration on how measurement skills develop over time as more accurate equipment is introduced. Beakers, then measuring cylinders, then burettes and pipettes require increasing levels of dexterity. Each time you introduce a new piece of apparatus, give learners time to practise how to use it accurately.
Measuring weight is one of the easier skills to develop and links directly to many key concepts. Lavoisier’s classic experiment of weighing mercury, heating it in air and weighing the resulting oxide, led the way in showing the importance of measurement in interpreting chemical behaviour. Have your students follow in Lavoisier’s footsteps by burning magnesium ribbon in a crucible to find the formula of magnesium oxide. You can use metal bottle tops as an alternative to using fragile and expensive porcelain crucibles; if you’re a CLEAPSS member, download this practical activity that uses metal bottle tops.
Measuring the volume of a liquid provides a useful illustration on how measurement skills develop over time as more accurate equipment is introduced. Beakers, then measuring cylinders, then burettes and pipettes require increasing levels of dexterity. Each time you introduce a new piece of apparatus, give learners time to practise how to use it accurately (rsc.li/4tsC2Q2).
Measuring weight is one of the easier skills to develop and links directly to many key concepts. Lavoisier’s classic experiment of weighing mercury, heating it in air and weighing the resulting oxide, led the way in showing the importance of measurement in interpreting chemical behaviour. Have your students follow in Lavoisier’s footsteps by burning magnesium ribbon in a crucible to find the formula of magnesium oxide (rsc.li/4qcHPq4). You can use metal bottle tops as an alternative to using fragile and expensive porcelain crucibles; if you’re a CLEAPSS member, download this practical activity that uses metal bottle tops (rsc.li/4rmk3bV).
Individual results from this experiment can be quite variable and run the risk of confusing students. However, try plotting the results from all groups in the class on a graph of mass of magnesium against mass of oxygen. The resultant data and graph provide plenty of opportunities for a productive discussion about outliers, experimental error and mean values.
Weighing is not only useful for solids, but also for solutions. To introduce the principles of titration, try a microscale method that simplifies measurements by using mass rather than volume. Place the solution of unknown concentration in a small vial on top of a balance. Squeeze the bulb of a plastic Pasteur pipette in a retort clamp to add drops of the known solution. This approach smoothly leads on to titrations using a pipette and burette with an increase in demand on student skills at each stage.
Weighing is not only useful for solids, but also for solutions. To introduce the principles of titration, try a microscale method that simplifies measurements by using mass rather than volume (rsc.li/3LMDqfr). Place the solution of unknown concentration in a small vial on top of a balance. Squeeze the bulb of a plastic Pasteur pipette in a retort clamp to add drops of the known solution. This approach smoothly leads on to titrations using a pipette and burette with an increase in demand on student skills at each stage.
Practical problems and suggested solutions
Some measurements present particular challenges. Students need practice to be able to adjust the volume in a pipette so the bottom of the meniscus sits exactly on the mark. Remind them that their eyes should be at the same level as the meniscus when they take a reading from a burette to avoid parallax errors.
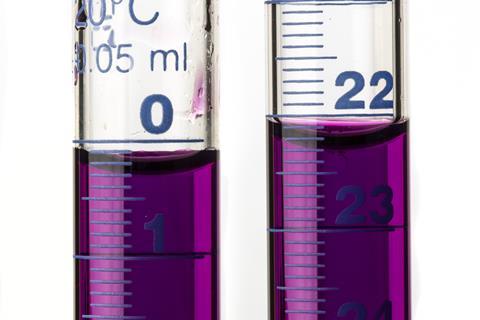
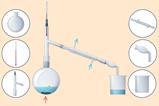
Intensely coloured solutions, such as potassium manganate(VII), cause additional problems as the bottom of the meniscus is difficult to see (see the image right). However, your students can use the top of the meniscus to take the readings, as well as holding a white tile or piece of paper behind the burette to ensure accurate readings. This kind of attention to detail illustrates the increasing level of care we expect students to take when making measurements.
Learners often struggle to measure the volume of a gas collected in an inverted measuring cylinder or burette at a particular time point. Change round the measurements and have them record the time when a particular volume is reached. In this way, their eyes can be lined up accurately. Demonstrate how to hold the timer in their sightline next to the apparatus, so they only need a small movement of their eyes to note the time.
Sometimes gas syringes are used to measure the volume of a gas. The movement of the piston inside the syringe can be erratic if it sticks in the barrel. Tap the syringe with a pencil to help alleviate this problem.
Access to sufficient electronic measuring equipment can also cause problems. For example, a limited number of balances can create bottlenecks in class experiments involving mass measurements. Inexpensive electronic balances, often marketed for weighing jewellery, can get around this problem. These balances usually read to two decimal places and make an excellent alternative to the traditional laboratory balance. When it comes to solving a similar problem in measuring elapsed time, you could try using a smartphone’s stopwatch function (if they’re allowed in your school).
Selecting equipment to make measurements
Part of the skill in making the right measurement is in choosing the right equipment. Provide your learners with a range of apparatus and ask them to select from this range. It’s a great way to get them thinking more carefully about their practical work.
| Considerations | Reasons |
|---|---|
|
Is the apparatus big enough? |
Students may need to calculate the amount of product that will be produced. |
|
Is the apparatus too big? |
The scale on the apparatus may not allow appropriate measurements. |
|
Is the measuring device accurate enough? |
Students need to decide what level of accuracy is required before making their choice. |
|
Are there any chemical limitations to take account of? |
A very soluble gas cannot be collected over water. |
Students typically measure the temperature of liquids or solutions to determine melting and boiling points, and in enthalpy change experiments. It is worth considering whether a temperature probe attached to a data logger, or a standalone digital thermometer, is an appropriate alternative to a traditional thermometer in these cases.
Both pH paper and pH meters can be used to measure the pH value of a solution. Each method has strengths and weaknesses. pH paper is cheap, but students often have difficulty in matching the observed colour to the key. pH meters are more expensive but give accurate readings if they have been calibrated against buffer solutions. When introducing the topic of measuring acidity, get learners to check values suggested by pH paper with a pH meter to clarify what particular colours mean.
The language of measurement
Learners often find the terminology used in relation to measurements confusing, as do teachers. This may be partly because in the past more than one word has been used to express the same idea, or the same word has been used by different people to mean different things, or because the scientific meaning of a word may be different from its everyday use. Words like accuracy, precision, uncertainty, error, reproducible and repeatable can all cause some difficulty. The term error can pose a particular problem because some students feel it implies they have made a mistake in their measurement.

The ASE/Nuffield publication The language of measurement provides a definitive list of the meaning of words associated with measurements together with case studies of their use in school investigations.
As an engaging (and tasty) way of introducing students to the ideas of true value, variability, outlier and measurement error, get them to weigh a batch of chocolate bars. You can also use a dartboard to develop ideas about accuracy and precision.
The ASE/Nuffield publicationThe language of measurement provides a definitive list of the meaning of words associated with measurements together with case studies of their use in school investigations (rsc.li/46tb0On).
As an engaging (and tasty) way of introducing students to the ideas of true value, variability, outlier and measurement error, get them to weigh a batch of chocolate bars with this classroom activity (rsc.li/4rcFrkx). You can also use a dartboard to develop ideas about accuracy and precision.
Maths skills
Calculating percentage uncertainty associated with measurements is helpful for students deciding on the suitability of measuring apparatus and instruments. Usually, the uncertainty associated with an analogue instrument such as a burette is taken to be + or – half the smallest graduation. For digital apparatus, such as a balance, the uncertainty is assumed to be + or – the resolution of the device. Ask your students to calculate the uncertainties in different situations. This will help them to appreciate that these values depend both on the instrument used and the quantity measured. The OCR A-level chemistry practical skills handbook contains a useful section on uncertainties, relevant to all students.
Awareness of how to use significant figures correctly is important when making measurements using different apparatus in the same experiment. The choice of which value to use when a set of numbers is available on a stopwatch is a good topic for class discussion.
Some students find the concept of pH difficult to understand because it involves a logarithmic scale. Ask students to describe how much bigger the hydrogen ion concentration is in a solution of pH 2 compared to one of pH 5 to help reinforce this.
Discover all our articles and resources covering maths skills.
Discover all our articles and resources covering maths skills: rsc.li/4k9k6We
Synoptic approach
Practical investigations provide the perfect opportunity to bring together all the practical skills learned by students. For post-16 students towards the end of their studies, you can cover many measurement techniques with the synthesis and investigation of the painkiller paracetamol. For younger learners, you’ll find lots of ideas in the Teaching science skills series.
Practical investigations provide the perfect opportunity to bring together all the practical skills learned by students. For post-16 students towards the end of their studies, you can cover many measurement techniques with the synthesis and investigation of the painkiller paracetamol (rsc.li/4q8mLkl). For younger learners, you’ll find lots of ideas in the Teaching science skills series (rsc.li/4q8kKob).
Article originally by Derek Denby, a retired UK chemistry teacher and independent science education consultant. Updated by David Paterson, a chemistry/physics teacher and assistant head
More resources and articles
- Help your learners to master aspects of quantitative chemistry with moles and titrations: rsc.li/49RJqg2
- Introduce students to accuracy and systematic error in measurement with these classroom activities: rsc.li/4qPX0q7
- Show learners why professional chemists carry out titrations: rsc.li/4r3FKhh
- Stretch and challenge your 11–14 year-old pupils with the Boiling point activity featuring a surprising measurement: rsc.li/3ZdtyOH
- Support post-16 students in developing their skills recording data and dealing with uncertainty: rsc.li/4rqyOdM
- Read this useful article from the National Physical Laboratory, the UK organisation responsible for maintaining the national primary measurement standards: bit.ly/4qWEjkO
- Moles and titrations: scary stuff? – help your students to master aspects of quantitative chemistry.
- Help students understand accuracy and error – includes classroom activities that introduce students to accuracy and systematic error in measurement.
- Why titrate? – why professional chemists carry out titrations.
- Boiling point: a surprising measurement – a discussion activity for 11–14 year-old students on why measurements may not be as expected.
- Recording data and uncertainty – an activity to support post-16 students in developing their skills.
- Difference between metrology and measurement – a useful article from the National Physical Laboratory, the UK organisation responsible for maintaining the national primary measurement standards.

Teaching practical science

Boost your confidence and your learners’ outcomes with these articles focused on practical lessons


1 Reader's comment