Explore the periodic nature of elements, their reactions, and the properties of their products in this experiment
Many elements react with oxygen. The ease with which the reaction takes place, the vigour of the reaction and the properties of the compounds made provide excellent evidence to help students understand about the periodic nature of the elements in the periodic table and about many chemical principles.
Equipment
Apparatus
- Eye protection
- Fume cupboard
- Gas preparation apparatus
- Side-arm flask, 250 cm3
- Tap funnel and bung to fit flask
- Connecting tubing
- Reaction tubes, one for each reaction
- 1-hole bung and delivery tube to fit
- Clamp stand
- Boss head
- Clamp
Chemicals
- Hydrogen peroxide solution, 15 cm3 20 vol per experiment
- Manganese(IV) oxide granular, 5 g
- Lithium
- Sodium
- Potassium
- Magnesium
- Calcium
- Aluminium foil
- Carbon
- Phosphorous red
- Sulfur
Health, safety and technical notes
- Read our standard health and safety guidance.
- Wear eye protection at all times.
- It is recommended that these experiments are done by the demonstrator before demonstrating to pupils, in order to gain experience, if they have not done it before.
- Group 1 metals are stored under oil, this can be removed using paper tissue.
- Cut pieces of Group 1 metals into cubes no bigger than 3 mm.
- For other elements, 0.1g is sufficient to see a reaction.
- Lithium, sodium and potassium are all highly flammable and corrosive (see CLEAPSS Hazcards - HC058a, HC088, HC076).
- Magnesium, calcium and phosphorous red are all highly flammable (see CLEAPSS Hazcards HC059a, HC016, HC073b).
- Aluminium foil, carbon, and sulfur are all low hazard (see CLEAPSS Hazcards HC001a, HC021, HC096a).

Procedure
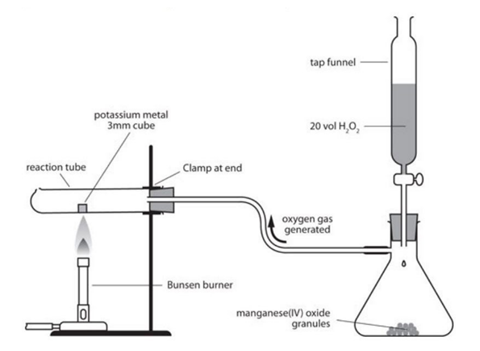
- The apparatus is assembled in a fume cupboard, according to the diagram provided.
- A reaction tube is clamped horizontally close to the bung end.
- The tubes are used to connect the gas generator to the delivery tube in the bung.
- A piece of the element is placed near the bottom of the test tube.
- The bung is pushed gently into the reaction tube.
- Start the oxygen gas generation by running hydrogen peroxide onto the catalyst. Use 20 cm3 hydrogen peroxide solution to flush the system of air for 60 seconds.
- Heat the solid element using a Bunsen burner with a blue flame.
- Add more hydrogen peroxide slowly.
- Remove the Bunsen burner when the element catches fire.
Notes
- The synthesis reactions of these binary compounds (two elements) will catch the attention of students because they are spectacular.
- Group 1 and 2 – Students see the increase in reactivity going down the group (inferred from the heating time required).
- They will see the reaction start when the metal begins to melt. Melting allows fresh metal to flow out from under the oxide coating which inevitably forms on the surface of metals.
- Students understand why metals start to react vigorously with gases when they melt.
- They will not appreciate that most combustion reactions do not involve solids.
- The temperature of reaction and the melting points of elements can be related to their structure and bonding.
- Carbon and silicon burn in the solid state, unlike the other elements.
- The melting points, reaction with water and pH of the solutions of these compounds are all logical developments of this topic.
- For a comparison of these reactions with the reactions of chlorine and the properties of chlorides, see experiment: Reacting metals with chlorine and with air.
Downloads
Reacting elements with oxygen
PDF, Size 0.17 mb
Additional information
This practical is part of our Chemistry for non-specialists collection. It was written by Mike Thompson on behalf of the Royal Society of Chemistry.


1 Reader's comment