








Use this demonstration and class practical to investigate the properties of hydrogen chloride, including its solubility in water
-
Download this
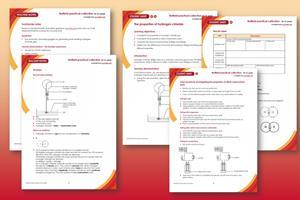
A ready-to-go practical lesson with classroom slides, scaffolded and unscaffolded student worksheets and teacher guidance, including full technical notes and answers to all questions.
Discover more resources from the Nuffield practical collection
Learning objectives
- Investigate the properties of hydrogen chloride gas.
- Investigate the properties of dilute hydrochloric acid.
- Compare the structure of bonding of HCl(g) and HCl(aq).
- Explain how the differences in structure and bonding in HCl(g) and HCl(aq) lead to different properties.
Learners will observe a demonstration where you prepare hydrogen chloride gas and use a fountain experiment to illustrate its solubility in water, forming hydrochloric acid. (LO1) Learners will then investigate some of the properties of hydrochloric acid, either as a class practical or further teacher demonstration, including conductivity and its reactions with sodium hydroxide, magnesium and marble chips (LO2). Completion of the follow-up questions on the learner worksheet, will allow learners to succeed in LO3 and LO4.
Scaffolding
There are two versions of the learner worksheet: scaffolded (✪) and unscaffolded (✪✪). The scaffolded sheet offers more support to allow learners to access the questions. For example, on the scaffolded sheet, learners are supported by gap filing activities, sentence starters, hints and multiple-choice questions.
Depending on the group, carry out the properties of dilute hydrochloric acid either as a class practical or teacher demonstration. Print out the results and conclusion tables on slides 11 and 12 for learners to complete during a class discussion of the experiments.
Technician notes
Read our standard health and safety guidance and carry out a risk assessment before running any live practical.
Equipment
- Eye protection (including goggles for generating and handling hydrogen chloride gas)
Teacher demonstration – the fountain experiment
- Access to a fume cupboard
- Safety screens
- Large round-bottomed flask, 500–1000 cm3 (see safety note below)
- Bung to fit flask, with holes for a teat pipette (with detachable teat) and delivery tube as shown (see safety note below)
- Valve, consisting of a short length of rubber tubing and a Mohr’s clip
- Glass trough or plastic bowl
- Short lengths of rubber tubing
- Clamp stands, bosses and clamps
- Small glass funnel, to fit inside a 250 cm3 beaker
- Beaker, 250 cm3
- Conductivity testing apparatus, including:
- 3 V DC power supply
- Graphite electrodes in a bung
- Leads
- Clips
- Torch bulb in holder
Class experiment – testing the properties of pre-prepared dilute hydrochloric acid
For each group:
- Test tubes, x4
- Test tube rack
- Plastic dropper pipettes
- Wooden splints
Chemicals
- Concentrated sulfuric acid (CORROSIVE), 10 cm3
- Sodium chloride, 30 g (see note 5 below)
- Universal indicator solution
For class practical, each group to have access to the following:
- Sodium hydroxide solution, 0.1 M (IRRITANT)
- Dilute hydrochloric acid, 0.1 M
- Limewater (IRRITANT), fresh, a few cm3
- Universal indicator solution (HIGHLY FLAMMABLE)
- Universal indicator papers
- Magnesium ribbon, 2 cm lengths
- Small marble chips, a few
Safety and hazards
- Eye protection (including goggles for generating and handling hydrogen chloride gas). Wear eye protection for testing the properties of dilute hydrochloric acid.
- Access to a fume cupboard for the fountain demonstration.
- Use safety screens for the fountain demonstration.
- Hydrogen chloride gas, HCl(g), is generated (TOXIC, CORROSIVE). See CLEAPSS Hazcard HC049 and CLEAPSS recipe book, refer to SSERC or contact your local safety advisory body.
- Concentrated sulfuric acid, H2SO4(aq) (CORROSIVE), see CLEAPSS Hazcard HC098a, refer to SSERC or contact your local safety advisory body.
- Sodium chloride, NaCl(s), see CLEAPSS Hazcard HC047b, refer to SSERC or contact your local safety advisory body. Powdered rock salt can be used instead of reagent sodium chloride.
- Dilute hydrochloric acid, HCl(aq), see CLEAPSS Hazcard HC047a and CLEAPSS recipe book RB043, refer to SSERC or contact your local safety advisory body.
- Universal indicator solution (HIGHLY FLAMMABLE), see CLEAPSS Hazcard HC032 and CLEAPSS recipe book RB000, refer to SSERC or contact your local safety advisory body.
- Magnesium ribbon, Mg(s), see CLEAPSS Hazcard HC059A, refer to SSERC or contact your local safety advisory body.
- Limewater, Ca(OH)2(aq), (treat as IRRITANT), see CLEAPSS Hazcard HC018 and CLEAPSS recipe book RB020, refer to SSERC or contact your local safety advisory body.
- Sodium hydroxide solution, NaOH(aq), (IRRITANT), see CLEAPSS Hazcard HC091a and CLEAPSS recipe book RB085, refer to SSERC or contact your local safety advisory body.
Demonstration set-up
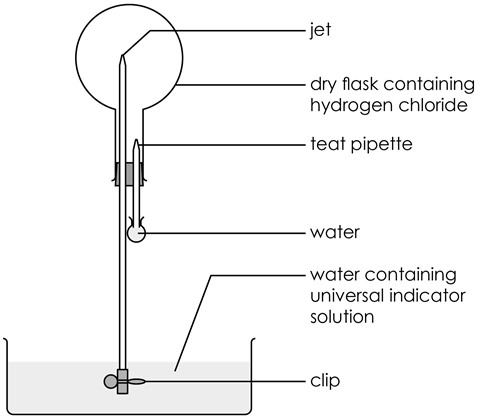
- The round-bottomed flask should be a thick-walled one made of borosilicate (Pyrex) glass and free of any flaws. Safety screens are necessary because the sudden vacuum produced when the gas dissolves in water can cause the flask to implode.
- The pipette inserted through the bung should have a removable rubber teat that can be easily attached once the apparatus is in place. Check that the volume of water the teat bulb holds, when filled, is sufficient to ensure that drops of water emerge into the flask when the teat is squeezed. Fill the teat bulb with water beforehand and place it upright in a small beaker ready to use.
- Dry the flask and the bung carrying the glass tubes in an oven at about 80°C before the experiment.
- Set up the necessary stand, bosses and clamps, safety screens and the empty trough/bowl in their correct positions on the bench in front of the class before the demonstration. Use the empty round-bottomed flask fitted with the bung and tubes (but no teat bulb on the pipette) to adjust the position of the clamps, so that the long tube and valve reaches almost to the bottom of the bowl. Make sure the flask will not topple over when it fills with water from the bowl. Do this by positioning the bowl on the base of the stand, or putting some extra weights on it.
Preparation of hydrogen chloride
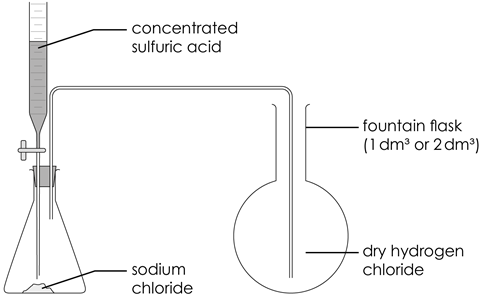
- Set up the hydrogen chloride gas generator in a fume cupboard.
- Add 30 g of sodium chloride to the conical flask.
- Add concentrated sulfuric acid to the funnel.
- Remove the empty round-bottomed flask from the demonstration set-up and clamp the flask in position near the gas generator.
- Purge the air out of the flask containing sodium chloride, by dripping about 1 cm3 of sulfuric acid onto the sodium chloride.
- Hold a piece of damp universal indicator or blue litmus paper near the end of the delivery tube. It will turn red when hydrogen chloride starts to emerge from the tube.
- Position the delivery tube in the round-bottomed flask. Slowly fill the flask with hydrogen chloride, by dripping more sulfuric acid onto the sodium chloride in the gas generator. Test to see when it is full by holding damp indicator paper near the mouth of the flask. Allow the gas to pass for a little longer, even if the indicator paper turns red.
- Stop the gas stream and remove the delivery tube from the round-bottomed flask.
Teaching notes
The demonstration of the fountain experiment takes about 15 minutes.
Try the fountain experiment before demonstrating it to a class, to make sure the flask can be successfully filled with gas. Be careful not to disconnect the flask from the gas supply too soon, even if can be detected at the outlet. Oven drying the glass apparatus beforehand improves the chance of success.
The solubility of hydrogen chloride in one volume of water at 0°C and 1 atm is 506 volumes.
During the demonstration, ask learners to answer the follow-up questions in the presentation (and on the learner worksheet).
The fountain demonstration
- Set up the equipment, as shown above before the lesson.
- Fill the bowl with tap water and add enough universal indicator solution to make the colour clearly visible.
- Refit the bung to the flask containing the hydrogen chloride gas and clamp it in position over the bowl of water. Ensure the valve at the end of the glass tube jet is well immersed in the water and the system is airtight.
- Carefully attach the bulb of the teat pipette filled with water to the pipette tube, without squeezing any water into the flask.
- Remove the clip from the valve. The water starts to rise slowly up the tube as the gas dissolves in it. To speed up this process, squeeze a few drops of water into the flask from the pipette.
- All the hydrogen chloride in the flask dissolves in the water drops from the pipette, creating a vacuum in the flask. Water is then sucked up at great speed from the bowl, creating a spectacular ‘fountain’ in the flask. The indicator in the water changes colour to red. The extent to which the flask fills with water depends on how much air was left in the flask. It can fill almost completely.
The properties of hydrochloric acid practical
Carry out the properties of hydrochloric acid as a class practical. The experimental method is provided on the student sheet and as integrated instructions in the lesson presentation.
The investigation takes about 20 minutes. Use the results table in the lesson slides to summarise key points from the experiments.
Questions
Questions can be found on the scaffolded and unscaffolded student sheets and in the lesson slides.
Answers
Answers to the questions on both levels of student sheets can be found in the teacher notes.
Downloads
The properties of hydrogen chloride student sheet scaffolded
Handout | PDF, Size 0.36 mbThe properties of hydrogen chloride student sheet unscaffolded
Handout | PDF, Size 0.25 mbThe properties of hydrogen chloride lesson slides
Presentation | PDF, Size 0.72 mbThe properties of hydrogen chloride teacher notes
Handout | PDF, Size 0.36 mbThe properties of hydrogen chloride student sheet scaffolded
Editable handout | Word, Size 0.57 mbThe properties of hydrogen chloride student sheet unscaffolded
Editable handout | Word, Size 0.52 mbThe properties of hydrogen chloride lesson slides
Presentation | PowerPoint, Size 6.05 mbThe properties of hydrogen chloride teacher notes
Editable handout | Word, Size 0.56 mb
Additional information
This is a resource from the Practical Chemistry project, developed by the Nuffield Foundation and the Royal Society of Chemistry. This collection of over 200 practical activities demonstrates a wide range of chemical concepts and processes. Each activity contains comprehensive information for teachers and technicians, including full technical notes and step-by-step procedures. Practical Chemistry activities accompany Practical Physics and Practical Biology.
The supporting resources were added and updated in 2026 by Dorothy Warren.
© Nuffield Foundation and the Royal Society of Chemistry
- Prepare(1)
 CPD article
How to teach solubility at 14–16
Concentrate learners’ minds on the key aspects of solutions
- Deliver(3)
 Resource
Solubility | Developing understanding | 14–16 years
Deepen your learners’ understanding of solubility graphs and how these connect to real-life observations for more secure mental models
 Resource
Solubility | Structure strip | 14–16 years
Use scaffolded prompts to support learners to write about solubility with confidence
 Class experiment
The effect of temperature on solubility
Hot or cold, which water is better for soluble substances? Explore your finding from this practical into the effect of temperature on solubility. Includes kit list and safety instructions.
- Literacy(2)
 Resource
Elements, compounds and mixtures | Reading comprehension | 14–16
Practise reading comprehension skills with a science research article about a new technique for extracting lithium
 Resource
Elements, compounds and mixtures | Key terms support | 14–16
Key terms list, accessible glossary, Frayer models and unscrambling definitions provide comprehensive language support for this topic
- Assess(3)
 Resource
Solubility and preparing sodium chloride | In context | 14–16
Put solubility into context with questions based on preparing sodium chloride through titration using hydrochloric acid and sodium hydroxide solution.
 Resource
Solubility | Knowledge check | 14–16
Assess learning of solubility with a higher and foundation worksheet
 Resource
Solubility | Review my learning worksheets | 14–16 years
Identify learning gaps and misconceptions with this set of worksheets offering three levels of support
- Enrich(3)
currently reading
 Demonstration
The properties of hydrogen chloride
Use this demonstration and practical to investigate properties of hydrogen chloride, such as its solubility in water.
 News
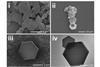
NewsResearchers crack two century challenge to form calcium bicarbonate crystals
Give students a real example of how solubility, ionic bonding and reaction conditions affect salt formation
 Resource
The solubility of aspirin | 16–18 years
This activity is a useful vehicle for reinforcing ideas relating to strong and weak acids, basicity and elementary chemical calculations. Includes kit list and safety instructions.
No comments yet