


Try this practical to test the corrosion of metals in dry air, moist air and air polluted by acidic sulfur dioxide
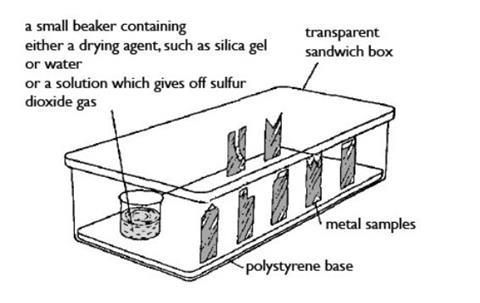
In this experiment, students place a range of metals in three identical containers with airtight lids. The three containers are set up with different atmospheric conditions, including dry air, moist air and air polluted by sulfur dioxide.
Students observe the corrosion of each metal under the three different atmospheric conditions over a number of days. They may then investigate possible ways of preventing corrosion in one of the metals they found corroded in an acidic atmosphere.
This is a straightforward class investigation in which metal corrosion trials are set up in one lesson and left for a week or more, with intermittent observations recorded in each subsequent lesson until a clear pattern of corrosion differences between the selected metals has been established. Each working group may be given an opportunity to select the range of metals it uses for this stage, provided that the science department can provide a wider range to choose from. Otherwise, the essential basic range is given in the health, safety and technical notes below.
The size of each working group may be determined by the availability of apparatus. A large group (say 6–9 students) might be divided into three sub-groups, each setting up one experimental box with different conditions. Alternatively, smaller groups may each prepare a set of all three boxes. Whatever approach is chosen, at least two boxes should be set up for each atmospheric condition.
This can be followed by a second investigation into ways of preventing corrosion of those metals which have been significantly affected. This investigation will also require monitoring over a period of a week or more in the same way as the first stage. Each working group may be asked to select one metal which corroded significantly for investigation.
The final stage is the writing of an investigation report by each student.
All this will take short periods of time at intervals over several weeks. The setting up of the first stage should take about 30 minutes, and the observations and recordings in subsequent lessons should not be allowed to take more than five minutes on each occasion. The second stage, with the formulation of a method of investigation, will again probably take about 30 minutes to set up, with five minutes allowed for observation and recording in each subsequent lesson.
Equipment
Apparatus
- Eye protection
- Access to a fume cupboard
- Access to metal cutters (see note 8 below)
- Beaker, 100 cm3
- Transparent plastic sandwich boxes with tightly fitting lids (typically 18 x 10 x 8 cm), x3 (see note 9)
- Expanded (foam) polystyrene sheet, about 1 cm thick, to support the metal samples inside box (see note 10)
Chemicals
- Aluminium foil
- Copper foil
- Iron – use thin steel sheet
- Lead foil (TOXIC, DANGEROUS FOR THE ENVIRONMENT)
- Magnesium ribbon
- Tin foil or thin sheet
- Zinc foil
- Silica gel granules, about 30 g
- For the sulfur dioxide solution (see note 11 below):
- Sodium metabisulfite (HARMFUL), 9.5 g
- Dilute sulfuric acid, 0.5 M, (IRRITANT), 100 cm3
Health, safety and technical notes
- Read our standard health and safety guidance.
- Wear eye protection throughout. Work in a fume cupboard when making and handling the sulfur dioxide solution.
- Aluminium, Al(s) HC001a, copper, Cu(s) HC026, iron, Fe(s) HC055a, magnesium, Mg(s) HC059b, tin, Sn(s) HC102a and zinc, Zn(s) HC108b, (all LOW HAZARD) - see CLEAPSS hazcards linked.
- Lead foil, Pb(s), (TOXIC, DANGEROUS FOR THE ENVIRONMENT) - see CLEAPSS Hazcard HC056.
- Sodium metabisulfite, Na2S2O5(s), (HARMFUL) - see CLEAPSS Hazcard HC092.
- Dilute sulfuric acid, H2SO4(aq), (IRRITANT) - see CLEAPSS Hazcard HC098a and CLEAPSS Recipe Book.
- Silica gel granules: the silica gel used should be in good anhydrous condition. If the blue self-indicating variety is used, care should be taken when handling as it contains a small amount of cobalt chloride (TOXIC) – see CLEAPSS Hazcard HC086a.
- Cutting the metal samples involves use of metal cutters and produces metal pieces with sharp edges. Teachers may wish these to be prepared in advance. This may also be the case if it is not possible to provide sufficient metal cutters to allow the class to cut their samples in a reasonable time. All metals used should be in good clean condition, free from significant corrosion prior to the experiment. If necessary, clean with fine sandpaper; particularly for magnesium.
If pieces are prepared in advance, each metal should be cut to a different distinguishing shape to enable identification during the experiment. See diagram for possible shapes. A further supply of some metals will be needed for the second stage.
Other metals available as sheet or foil that might be used include gold (leaf), nickel, platinum and silver. If additional metals to those in the basic list are used, CLEAPSS Hazcards should be checked for any significant hazards. - Use similar, if not identical transparent (not just translucent) sandwich boxes for each group, and preferably the same across the whole class, if possible. The most important features for all boxes are a close-fitting airtight lid and good transparency for observing corrosion of the metal samples.
- Each box should contain a sheet of expanded polystyrene cut to fit inside the base of the box. This should be of sufficient thickness (about 1 cm) to provide support to the metal samples pushed into the sheet.
- The sulfur dioxide solution should be prepared not more than 24 hours in advance, as follows (taken from CLEAPSS Recipe Book): In a fume cupboard, dissolve 9.5 g sodium metabisulfite in 100 cm3 of water. Add 100 cm3 of 0.5 M sulfuric(VI) acid and make up to 250 cm3. Store the solution in a well-stoppered bottle, labelled ‘TOXIC – sulfur dioxide will be given off’ and handle the solution in a fume cupboard.
Procedure
Stage 1: investigating corrosion
- Each metal foil or sheet is cut to form a strip about 4 x 2 cm in size, then trimmed to form a different shape for each metal (see diagram) to enable identification during the experiment. Magnesium ribbon can be cut to provide a length of about 5 cm. You will need three samples of each metal.
- Make note of the shape of each metal sample alongside its name before setting up the experiment.
- Set up each box by pressing the bottom edge of each metal sample into the polystyrene base inside the box, so that they stand upright securely. Then place the beaker in position containing one of the following:
- About 10 g of silica gel granules, to ensure an atmosphere of dry air
- Water (about one-third full), to provide an atmosphere of damp air
- About 30 cm3 of sulfur dioxide solution, to provide an acidic atmosphere – place the beaker into the box inside the fume cupboard before pouring the solution into it. Avoid breathing in the fumes from the solution. Secure the lid before removing the box from the fume cupboard. Replace the stopper on the bottle!
- Put a piece of paper inside each box you set on which the conditions inside the box (dry, damp or acidic) and your group name are noted. Set the box aside in a safe place allocated by the teacher.
- Make a table in which to record your observations. Each time you return to the laboratory, record the date, and observe (without opening the box!) and record any changes to each metal in each of your group’s boxes. Continue to do so for at least one week, as decided by your teacher.
- At the end of this stage, open the boxes containing sulfur dioxide solution in the fume cupboard, and dispose of the solution there.
Stage 2: preventing corrosion
- Make a list of some of the ways you can think of for stopping the corrosion of a piece of metal. For each way of prevention that you wish to try, give a reason why you think it will prevent corrosion.
- For one of the metals which corroded during the experiment, plan a safe investigation to study one or more of the methods for stopping this corrosion. You can use the same apparatus again, or try an idea of your own.
- Check your plan for safety with your teacher before starting to carry it out.
- As before, observe and record the changes over a period of at least a week. Dispose of the used sulfur dioxide solution in the fume cupboard.
- You will need to finish the investigation by writing a report on your findings, and whether you now think the reasons why your methods might prevent corrosion were correct or not.
Teaching notes
Students will need some prior introduction to the topic of corrosion by atmospheric pollutants, and appropriate photographs of damaged stonework as well as metal structures could help to set the scene. They may well already know that sulfur dioxide is a recognised source of atmospheric pollution, and that it comes from the burning of fossil fuels which contain sulfur compounds. However, this is likely to be the first time they have looked at this problem in detail.
When setting up the boxes, those using sulfur dioxide solution must be frequently be reminded not to inhale the fumes, and to use the fume cupboard properly. They should be aware that there is a particular danger for asthmatic people. At the end of the investigations open these plastic boxes in a fume cupboard to dispose of the solutions with plenty of water. Remind students that the concentration of sulfur dioxide in the box atmosphere is likely to be much higher than in the atmosphere itself, even in areas of high pollution.
The setting up of the boxes containing metal samples under different conditions needs careful planning, appropriate to the class concerned. The length of time the samples are left to corrode needs to be flexible – the time needs to be sufficient for clear results to be obtained, and this is likely to take at least a week, possibly two or more weeks.
The students should be asked to plan the recording table for stage 1 as a class, so that they use a common format. It is likely that by the end of the investigations, results will have to be shared. A format similar to that below is likely to be agreed:
| Number of days since experiment started | Name of metal | Changes observed |
|---|---|---|
| 1 week | ||
| 2 weeks | ||
| 4 weeks |
In stage 2, students are likely to suggest a wide range of ways of preventing corrosion, some of which will not be practicable for the class. The range will have to be narrowed down before they start to methods such as:
- Covering with grease or a film of oil
- Covering with paint
- Covering with plastic film, such as ‘Cling film’.
- Removal of sulfur dioxide by an alkali (for example, using limewater in another beaker in the box)
- Sacrificial protection (not easy at this scale, but may be worth a try)
- Electroplating
Some groups in stage 2 may wish to investigate prevention of rusting by damp air, rather than by an acidic atmosphere of sulfur dioxide. A possible variation may be for some groups to use an acidic pollutant other than sulfur dioxide, such as dilute hydrochloric acid (1.0 M), and compare it with sulfur dioxide.
Students should be reminded to consider including unprotected control samples in their Stage 2 investigations.
The effectiveness of the prevention of corrosion by covering with a barrier layer will depend on both metal and barrier. Paint is an obvious example, as effective painting of metal object usually involves several coats and different types of paint. Plastic films (or sealing in a plastic bag) will slow down the rate of corrosion, but eventually enough sulfur dioxide will diffuse through to cause corrosion.
Sacrificial protection involves attaching a piece of more reactive metal to form a good electrical contact with the less reactive metal to be protected – usually zinc or magnesium attached to prevent corrosion of steel. While there is enough of the more reactive metal, the other metal is ‘spared’!
Electroplating will have to involve commercial pieces of electroplated metal, such as a chromium-plated steel object, an electroplated nickel-silver (EPNS) teaspoon, or a zinc coated iron object, such as a piece of galvanised sheet or a zinc coated nail. The difficulty may be finding objects small enough to place in the boxes without cutting them, which would expose the steel beneath the plating. Another variant would be anodized aluminium.
Further information
- GCSE Science provides brief approaches to the topic of corrosion of metals, but some details may go beyond that needed for 14–16 year old students.
- Wikipedia features a useful introductory article on corrosion, including methods of prevention, and deals with the ways that both corrosion and the methods of prevention work. The article gives much useful background for the teacher, and some may well be suitable for more abled students.
References
Additional information
This is a resource from the Practical Chemistry project, developed by the Nuffield Foundation and the Royal Society of Chemistry. This collection of over 200 practical activities demonstrates a wide range of chemical concepts and processes. Each activity contains comprehensive information for teachers and technicians, including full technical notes and step-by-step procedures. Practical Chemistry activities accompany Practical Physics and Practical Biology.
© Nuffield Foundation and the Royal Society of Chemistry


No comments yet