Illustrate the large energy changes that take place during the combustion of alcohols with this spectacular demonstration
In this ‘alcohol gun’ experiment, students observe what happens when a mixture of ethanol vapour and air is ignited using an electric spark inside a corked plastic bottle. The resulting minor explosion fires the cork across the room.
The demonstration can provide a useful illustration of the principle behind the internal combustion engine. It needs careful pre-lesson preparation, but only takes five minutes to perform.
The class will need to be seated at a safe distance from the demonstration, while maintaining a good view of what is happening.
Equipment
Apparatus
- Eye protection for the teacher and students
- Safety screens
- Plastic fizzy drinks bottle, 500 cm3 (see note 4 below)
- Cork, to fit the bottle
- Rubber stopper, size 17
- Metal paper clips, 2 (see note 5)
- Leads, with a crocodile clip on one end, x2
- EHT power pack (5 kV) or modified piezoelectric lighter (see notes 6 and 7)
- Retort stand, with boss and clamp
- G-clamp
Chemicals
- Ethanol (IDA, Industrial Denatured Alcohol) (HIGHLY FLAMMABLE, HARMFUL) a few cm3
Health, safety and technical notes
- Read our standard health and safety guidance.
- Wear eye protection throughout. The bang is not loud enough for students or the teacher to need to protect their ears.
- Ethanol (IDA, industrial denatured alcohol), CH3 CH2 OH(l), (HIGHLY FLAMMABLE, HARMFUL) – see CLEAPSS Hazcard HC040A. Do NOT use any other alcohol other than ethanol (IDA).
- A fizzy drinks bottle is used as these are designed to withstand pressures up to 20 atmospheres. Do NOT use a bottle larger than 500 cm3. Use a heated cork borer of suitable diameter to cut a hole in the base of the plastic bottle so that the size 17 rubber bung fits very tightly in the hole.
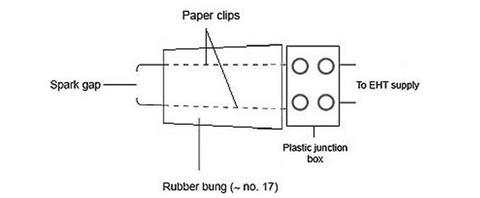
- Straighten both paper clips. Heat one clip until red-hot, and push through the rubber bung so that it protrudes about 5 mm from the narrow end of the bung. Repeat with the second clip so that it protrudes about 5 mm apart from the first to form the electrodes for a spark gap which will ignite the mixture. The ‘tails’ of the paper clips should be connected to a terminal block, as shown in the diagram below. It may be necessary to provide an insulating barrier between the exposed part of the paper clip ‘tails’ to avoid sparks occurring on the wrong side of the bung.

- To complete the spark generator connect an EHT power pack to the other side of the terminal block shown in the diagram above. Adjust the spark gap so that a large spark occurs when the voltage is turned up to about 4.5 kV. This adjustment is important if the ‘gun’ is to fire reliably. Press the spark gap assembly firmly into the hole in the base of the bottle and check that sparking is still reliable.
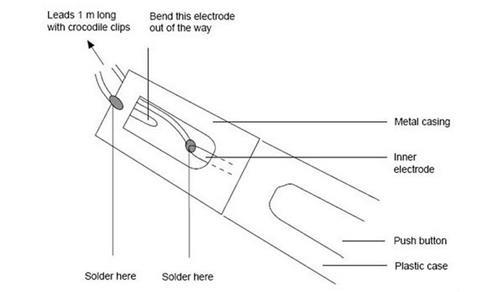
- An alternative spark generator can be made from a piezoelectric gas lighter (see diagram below). To avoid the spark occurring between the lighter electrodes, bend one of electrodes well away from the other. Solder a pair of insulated leads onto each terminal of the lighter.

- Alternatively, the spark gap of a piezoelectric lighter could be inserted directly into the hole in the bottle and glued and sealed in place. This does away with the need for leads, but leaves the teacher closer to the explosion.
- The demonstration should be practised by the teacher (with or without the cork in place) to establish the best electrode separation. If there are problems getting reliable sparking, ensure the spark assembly is dry – any moisture can cause the current to leak around the surface of the bung.
Procedure
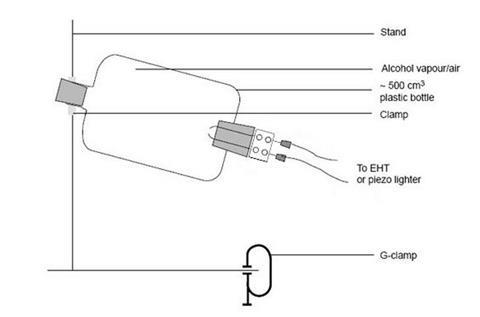
- Clamp the plastic bottle so that the mouth is pointing safely away from the class, the doorway and any vulnerable equipment or light fittings. Attach the retort stand to the bench with a G-clamp, and surround the bottle with safety screens on three sides. (A screen behind the bottle is important in case the ignition mechanism is ejected.)

- Squirt 1 cm3 of ethanol into the bottle. Shake to ensure vaporisation of the alcohol and mixing of the vapour with air. Do NOT enrich the atmosphere with oxygen.
- The flash of the explosion can be seen if the room is darkened and is more easily seen if the bottle is transparent
- Insert the cork gently in the mouth of the bottle, ensure the bottle is securely clamped, and fire the ‘gun’ by turning up the EHT voltage or squeezing the piezoelectric lighter – the latter may have to be pressed several times before the mixture ignites. There will be a bang, and the cork will be fired a distance up to 5 m.
- After use, examine the bottle for damage. If there is any deformation or cracking, do not use again.
- To fire again the air in the bottle must be replenished by removing the sparking assembly and blowing through the bottle. It may be necessary to dry the sparking assembly with a tissue.
- If using EHT to fire the gun, after launch, switch off the mains. Do NOT touch any wiring or make adjustment if the voltmeter is still registering a voltage.
Teaching notes
A car spark plug could be available to show its similarity to the sparking assembly.
The combustion energy for ethanol is –1367 kJ mol–1 corresponding to the equation:
C2H5OH(l) + 3O2(g) → 2CO2(g) + 3H2O(l)
The demonstration could be used in a variety of contexts:
- Learning about exothermic reactions, in terms of bonds - broken and bonds made
- Properties of alcohols
- Illustrating the internal combustion engine
- Ethanol as a fuel for cars
Further information
- For a wide background discussion on the use of ethanol as a vehicle fuel, see the Wikipedia article on ethanol fuel.
- For those interested in the implications of this experiment for the safety of whisky distilleries, there is an appropriate article from the Health and Safety Executive: Potential explosion hazards due to evaporating ethanol in whisky distilleries, HSL/2003/08, Project Leader: H. S. Ledin, Author(s): H. S. Ledin MSc PhD DIC, Science Group: Fire and Explosion Group. The article does contain some interesting insights for teachers into the application of physical chemistry concepts to an industrial context.
Additional information
This is a resource from the Practical Chemistry project, developed by the Nuffield Foundation and the Royal Society of Chemistry. This collection of over 200 practical activities demonstrates a wide range of chemical concepts and processes. Each activity contains comprehensive information for teachers and technicians, including full technical notes and step-by-step procedures. Practical Chemistry activities accompany Practical Physics and Practical Biology.
© Nuffield Foundation and the Royal Society of Chemistry


No comments yet