


6 experiments to reinforce students’ understanding of electrochemistry
I wrote in August 2024 about how electrochemistry doesn’t need to be difficult to teach if you spiral your curriculum to address and reinforce key ideas as learners progress from 11 to 18. Going hand in hand with this is my experience of introducing key practical activities strategically to reinforce the curriculum. Here’s my tried-and-tested approach to sequencing electrochemistry practicals.
Click on each experiment in turn for my tips and a range of resources, including equipment lists, videos, safety information and more.
1. Reaction between sodium and chlorine
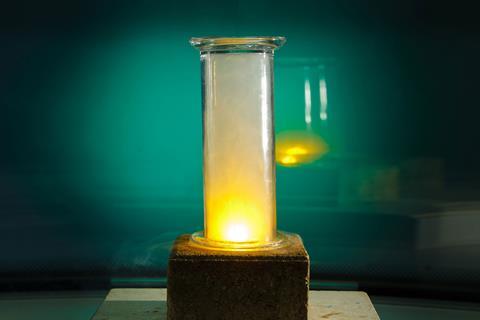
For 11–14s, this experiment is an obvious choice to ensure students experience the formation of an ionic compound from its elements. Students should be able to unpick this and devise a dot and cross diagram. At this point some classes may be ready for the introduction of OIL RIG. I’ll revisit this with my 14–16s in future retrieval questions before they go on to study reactions at electrodes during the electrolysis of molten ionic compounds.
2. Microscale conductivity meter
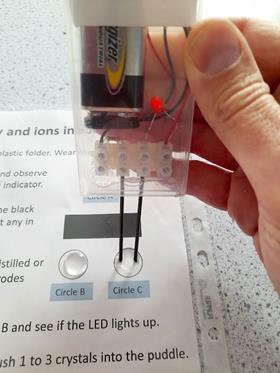
Following on, I ensure students have a concrete understanding of why some substances are conductors and others insulators. I then introduce the concept of electrolytes and how you can make ionic substances conduct electricity with my 14–16s.
A microscale activity is an easy way to do this in the classroom and you can create your own conductivity meters with these instructions.
3. Electrolysis of aqueous copper(II) chromate
My experience has taught me that it is best to introduce electrolysis with examples where students can see the movement of ions. This helps to overcome the misconception that electrons move through electrolytes during electrolysis. Options include purple MnO4-, blue Cu2+ and yellow CrO42- ions. This experiment combines the latter in a very simple practical activity for my 14–16s. Reinforcing the polarity of the power pack/battery terminals helps learners’ understanding of the movement of anions and cations at this point.
4. Electrolysis of lead bromide
Logically, the electrolysis of molten and aqueous solutions is what I cover next with my 14–16s. The electrolysis of lead bromide is the go-to example for molten substances, mainly due to the accessible melting point of the compound in a school setting. At this point I like to return to equations for the formation of substances covered during ionic bonding, for example sodium chloride and magnesium oxide. After revisiting this I’m always more confident pupils will be able to complete half-equations for reactions at electrodes.
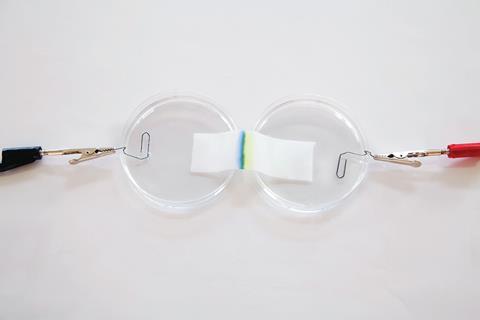
5. Electrolysis of aqueous solutions
Still with my 14–16s, I then move on to the annual obstacle of aqueous solutions. It’s an essential required practical that many students struggle with. I prefer to stick to sodium chloride to begin with as it avoids messy electrodes, before progressing to copper(II) chloride and sulfate. You can do it easily as a purposeful class practical after learners watch the practical video as part of flipped learning. Alternatively, you can demonstrate it using the electrolysis of brine.
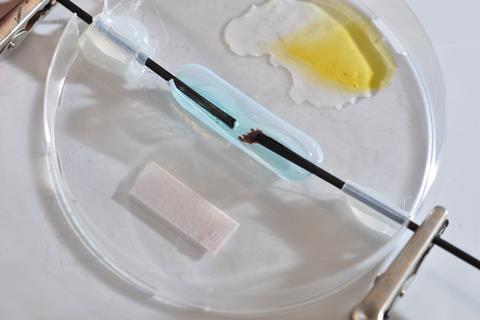
My preferred method involves the electrolyte in the middle of a Petri dish with an anode and a cathode inserted through opposite sides of the dish. In the dry areas of the dish you can place a piece of damp blue litmus and a drop of potassium iodide solution. I check whether my students are able to explain the bubbling at both electrodes, the bleaching of the litmus paper and the change in colour of the potassium iodide solution.
There’s lots to unpick here in terms of what is happening at the electrodes and identifying the products formed. You can even get a squeaky pop at the cathode. At this point, I like to ensure that my 14–16 students have a firm grasp of the ionic equations for both electrodes and use this activity by Adam Boxer for sequencing and segmenting the concept.
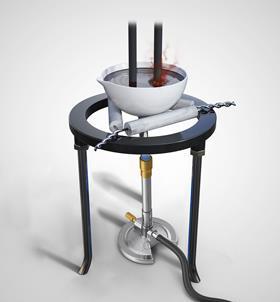
6. Oxidation states of vanadium ions
Moving on to post-16, my experience has taught me that a firm understanding of both oxidation numbers and redox equations is vital before pupils even approach the concept of the electrochemical series. Everything that’s come before this has been preparation, from OIL RIG up to writing (and perhaps even combining) half-equations at electrodes. This excellent resource is a great way of introducing and reinforcing the concept of oxidation numbers.
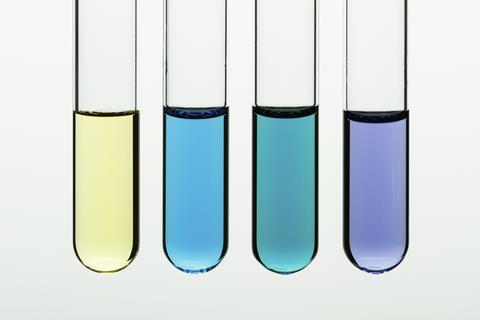
Finally, one of my favourite post-16 practicals covers the very visual oxidation states of vanadium ions. This is the perfect medium for studying the colours attributed to each oxidation state and building redox equations to explain the colour changes. Use this Exhibition chemistry video and technician notes to prepare a one-lesson approach to demonstrate vanadium’s colourful oxidation states.
This article was updated on 24 September 2025.
I wrote in the September 2024 issue about how electrochemistry doesn’t need to be difficult to teach if you spiral your curriculum to address and reinforce key ideas as learners progress from 11 to 18 (rsc.li/3DTXg3M). Going hand in hand with this is my experience of introducing key practical activities strategically to reinforce the curriculum. Here’s my tried-and-tested approach to sequencing electrochemistry practicals.
Reaction between sodium and chlorine
For 11–14s, the reaction between sodium and chlorine is an obvious choice to ensure students experience the formation of an ionic compound from its elements (rsc.li/3WniAVL). Students should be able to unpick this and devise a dot and cross diagram. At this point some classes may be ready for the introduction of OIL RIG. I’ll revisit this with my 14–16s in future retrieval questions before they go on to study reactions at electrodes during the electrolysis of molten ionic compounds.
Reaction between zinc and copper(II) oxide
Next, I get my 11–14 students to use their knowledge of sodium reacting with chlorine to explain the safer thermite reaction (rsc.li/3DXoQxe). This straightforward reaction between zinc and copper(II) oxide is simple, safe and visual, so guaranteed to engage younger students. If you can’t carry out the experiment, watch the Exhibition chemistry demonstration, Creating copper (rsc.li/4jbpNSt). I find this the perfect reaction to study definitions of oxidation and reduction, in terms of both oxygen and electrons. The latter becomes an essential retrieval question during my introduction to electrolysis.
Microscale conductivity meter
Following on, I ensure students have a concrete understanding of why some substances are conductors and others insulators. I then introduce the concept of electrolytes and how you can make ionic substances conduct electricity with my 14–16s. This microscale conductivity meter activity is an easy way to do this in the classroom (rsc.li/4g8CwTC). Create your own conductivity meters using these instructions (bit.ly/4h7Gf5a).
Electrolysis of aqueous copper(II) chromate
My experience has taught me that it is best to introduce electrolysis with examples where students can see the movement of ions. This helps to overcome the misconception that electrons move through electrolytes during electrolysis. Options include purple MnO4-, blue Cu2+ and yellow CrO42- ions. This experiment combines the latter in a very simple practical activity for my 14–16s (rsc.li/3WmZXBs). Reinforcing the polarity of the power pack/battery terminals helps learners’ understanding of the movement of anions and cations at this point.
Electrolysis of lead bromide
Logically, the electrolysis of molten and aqueous solutions is what I cover next with my 14–16s. The electrolysis of lead bromide is the go-to practical for molten substances, mainly due to the accessible melting point of the compound in a school setting (rsc.li/4amH0V5). At this point I like to return to equations for the formation of substances covered during ionic bonding, for example sodium chloride and magnesium oxide. After revisiting this I’m always more confident pupils will be able to complete half-equations for reactions at electrodes.
Electrolysis of aqueous solutions
Still with my 14–16s, I then move on to the annual obstacle of aqueous solutions. It’s an essential required practical that many students struggle with. I prefer to stick to sodium chloride to begin with as it avoids messy electrodes, before progressing to copper(II) chloride and sulfate. You can do it easily as a purposeful class practical after learners watch the practical video as part of flipped learning (rsc.li/42gvbhf). Alternatively, you can demonstrate it using the electrolysis of brine.
My preferred method involves the electrolyte in the middle of a Petri dish with an anode and a cathode inserted through opposite sides of the dish. In the dry areas of the dish you can place a piece of damp blue litmus and a drop of potassium iodide solution. I check whether my students are able to explain the bubbling at both electrodes, the bleaching of the litmus paper and the change in colour of the potassium iodide solution.
There’s lots to unpick here in terms of what is happening at the electrodes and identifying the products formed. You can even get a squeaky pop at the cathode. At this point, I like to ensure that my 14–16 students have a firm grasp of the ionic equations for both electrodes and use this activity by Adam Boxer for sequencing and segmenting the concept (rsc.li/4fUrMec).
Oxidation states of vanadium ions
Moving on to post-16, my experience has taught me that a firm understanding of both oxidation numbers and redox equations is vital before pupils even approach the concept of the electrochemical series. Everything that’s come before this has been preparation, from OIL RIG up to writing (and perhaps even combining) half-equations at electrodes. This excellent resource is a great way of introducing and reinforcing the concept of oxidation numbers (rsc.li/4jiNq8o).
Finally, one of my favourite post-16 practicals covers the very visual oxidation states of vanadium ions (rsc.li/4gWhRj4). This is the perfect medium for studying the colours attributed to each oxidation state and building redox equations to explain the colour changes. Use this Exhibition chemistry video and technician notes to prepare a one-lesson approach to demonstrate vanadium’s colourful oxidation states (rsc.li/3WnjYHX).
More resources
- Review dot and cross diagrams with your 14–16 learners with this step-by-step infographic, fact sheet and resource for plenty of practice: rsc.li/40jjP9F
- Use these four teacher-tested approaches to help learners gain a deeper understanding of redox reactions: rsc.li/3CksfHN
- Discover a range of microscale chemistry practicals and tips: rsc.li/4gXZEFn
- Share how applications of electrochemistry impact our everyday lives and current research, such as Lizzie’s PhD, to improve electrode materials: rsc.li/3Cb4QGO


1 Reader's comment