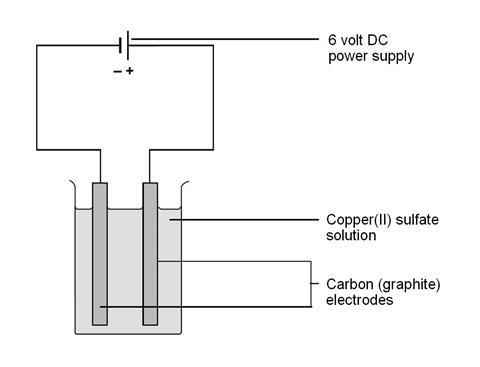
The outcomes of the experiment provide the opportunity to introduce a discussion about electroplating and the industrial electrolytic refining of copper
Video support and linked resources
Use our Electrolysis of aqueous solutions video to support you to deliver this practical lesson. With supporting resources, including illustrated technician notes, integrated instructions, pause-and-think questions, worksheets and more.
This class experiment can be done by students working either in pairs or threes.
Equipment
Apparatus
- Eye protection
- Beaker, 250 cm3
- Graphite electrodes, about 5 mm diameter, x2
- Retort stand and clamp to hold electrodes (note 1)
- DC power supply, 6 volt
- Light bulb, small, 6 volt, 5 watt (optional; note 2)
- Leads and crocodile clips
Apparatus notes
- There are several ways of securing the graphite electrodes. Using a retort stand and clamp is probably the most convenient. They can also be fixed using Blutac onto a small strip of wood resting on the top of the beaker.
- A bulb can be included in the circuit to indicate that there is a flow of current.
Chemicals
- Aqueous copper(II) sulfate, about 0.5 M, 200 cm3
- Copper strips x2 (optional; these can be used in place of the graphite rods as an extension to the basic experiment)
- Small pieces of emery paper
Health, safety and technical notes
- Read our standard health and safety guidance.
- Wear eye protection. Students must wash their hands at the end of all practical work.
- Copper(II) sulfate solution, CuSO4(aq) – see CLEAPSS Hazcard HC027c and CLEAPSS Recipe Book RB031. At the suggested concentrations, the copper(II) sulfate solution is LOW HAZARD. If the concentrations are increased, the solutions must be labelled with the correct hazard warnings. Copper(II) sulfate solution is HARMFUL if concentration is equal to or greater than 1 M.
Procedure
- Ask the students to set up the cell as shown. They should watch for any activity on each of the electrodes, and write down their observations.
The cathodes can be cleaned using emery paper.

Teaching notes
Students should see a deposit of copper forming on the cathode. This will often be powdery and uneven. You should explain that, if the current used is much lower, then the solid coating is shiny, impermeable and very difficult to rub off; this process forms the basis of electroplating.
Bubbles of gas (oxygen) are formed at the anode.
Cathode reaction: Cu2+(aq) + 2e- → Cu(s)
Anode reaction: 2H2O(l) → O2(g) + 4H+(aq) + 4e-
With carbon (graphite) electrodes, the oxygen usually reacts with the anode to form CO2. If copper is used for the electrodes, the copper anode dissolves. The reaction is the reverse of the cathode reaction.
The results of this experiment can lead to a discussion about electroplating and the electrolytic refining of copper.
It can be instructive to allow students to copperplate metal objects supplied by the school and previously tested for their suitability. Personal items should not be used. In many cases, an alternative redox reaction often takes place before any current is actually passed. This happens for instance in items made of metals above copper in the reactivity series. It is wise not to complicate electrolytic deposition with chemical displacement – valued articles can be effectively ruined.
Extension experiments for copper refining
- After doing the electrolysis as described above, the electrodes can be interchanged. Students can then see the copper disappearing from the surface of the copper-coated anode:
Cu(s) → Cu2+(aq) + 2e-
This leads to a discussion as to why, during electrolytic refining:- the anode consists of an unrefined sample of the metal;
- the cathode is made of pure copper or a support metal such as stainless steel.
- The electrolysis can be done using two weighed copper strips. This is to confirm that the mass gained at the cathode is equal to the mass loss at the anode.
More resources
Add context and inspire your learners with our short career videos showing how chemistry is making a difference.
Additional information
This is a resource from the Practical Chemistry project, developed by the Nuffield Foundation and the Royal Society of Chemistry. This collection of over 200 practical activities demonstrates a wide range of chemical concepts and processes. Each activity contains comprehensive information for teachers and technicians, including full technical notes and step-by-step procedures. Practical Chemistry activities accompany Practical Physics and Practical Biology.
© Nuffield Foundation and the Royal Society of Chemistry
Health and safety checked, 2016


No comments yet