Magnesium is a classroom favourite for students, and with these experiments you can illuminate students on this interesting element
Grab your sunglasses and be dazzled by chemistry! Below are two methods to create a magnesium steam reaction.
Equipment
Apparatus
- Eye protection
Method 1
- Bunsen burner
- Tripod
- Gauze
- Tongs
- Conical flask, 250 cm3
Method 2
- Bunsen burner
- Tripod
- Gauze
- Conical flask, 1 dm3 (with a one-holed rubber bung to fit)
- Glass trough or washing up bowl
- One boiling tube
- One short length of glass tube of approximately 1 cm diameter
- About half a metre of rubber tubing
- Wooden spills
Chemicals
- 45 cm of magnesium ribbon
- Universal indicator solution
Health, safety and technical notes
- Read our standard health and safety guidance.
- Always wear eye protection.
- Looking at burning magnesium is hazardous due to a significant amount of UV light emitted.
- Magnesium is flammable (see CLEAPSS Hazcard HC095a).
- Universal indicator is flammable (see CLEAPSS Hazcard HC032).
Procedure
Method 1
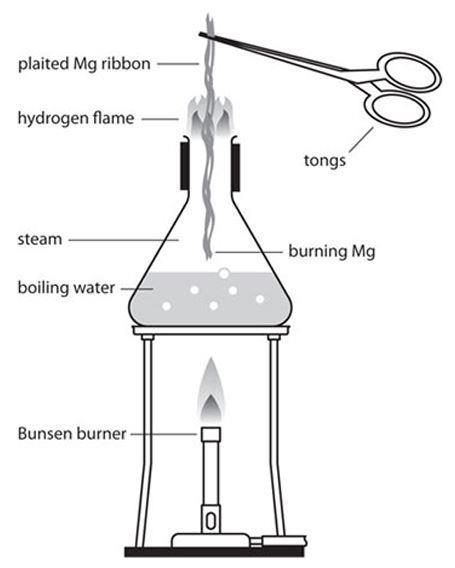
- Stand the 250 cm3 conical flask on the tripod and clamp its neck to steady it.
- Place about 50 cm3 of water in the flask. Bring this to the boil and allow it to boil for at least five minutes to displace all the air from the flask and replace it with steam.
- Take three 15 cm lengths of magnesium ribbon and twist them together to form a length of plaited ribbon of the same length. This is more rigid than a single strand and can therefore be manoeuvred more easily when held in a pair of tongs.
- Take care that the ribbon does not break during plaiting.
- Leave the Bunsen burner on, boiling the water.
- Holding the plaited magnesium ribbon in tongs by one end, light the other end in the Bunsen flame (a second Bunsen burner may be helpful) and hold the burning end in the steam inside the flask. Avoid looking directly at the burning ribbon.
- The ribbon will continue to glow brightly, forming hydrogen by reaction with steam. This ignites and burns at the mouth of the flask with a slightly yellowish flame.
- The magnesium oxide falls into the water and a little dissolves.
- Turn off the Bunsen burner and add a few drops of Universal indicator to the water. It will be significantly alkaline due to dissolved magnesium hydroxide.

Method 2
- Enlarge the hole in the rubber bung so that it will take a piece of glass tubing of diameter about 1 cm.
- Attach about half a metre of rubber delivery tube to this glass tube. This will be of similar bore to the tubing used for a Bunsen burner. (The reason for this unusually wide tubing is so that it can cope with the rapid evolution of hydrogen that occurs in this demonstration.)
- Stand the 1 dm3 conical flask on the tripod and clamp its neck to steady it.
- Place about 200 cm3 of water in the flask. Bring this to the boil and allow it to boil for at least five minutes to displace all the air from the flask and replace it with steam.
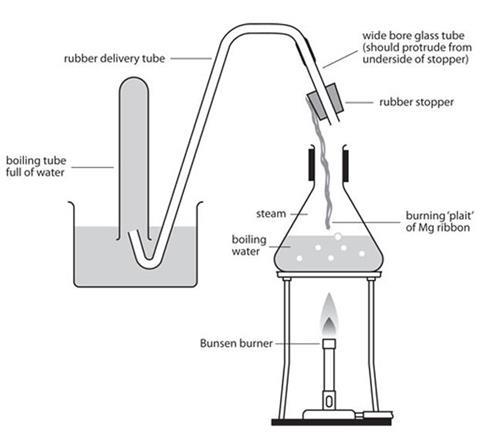
- Plait the magnesium as described above and attach it to the underside of the bung on the wide bore delivery tube. The easiest way to do this is to cut a small slit in the rubber with a scalpel and insert one end of the plaited ribbon into the slit.
- Fill a trough with water and clamp a boiling tube full of water in an inverted position with its mouth underwater.
- Place the free end of the rubber delivery tube in the mouth of the boiling tube. Clamp the delivery tube if necessary to prevent it coming out of the mouth of the boiling tube as the other end, attached to the bung, is moved (see diagram below).
- Leave the Bunsen burner on, boiling the water.
- Light the end of the plaited magnesium ribbon and lower it into the steam in the flask until the bung is fitted into the mouth of the flask. The magnesium will continue to glow brightly in the steam, forming hydrogen. This will be forced along the delivery tube and some will be collected in the boiling tube, although much will overflow.
- Remove the bung and delivery tube from the flask to prevent suck-back, and test the gas in the boiling tube with a lighted spill. It will ‘pop’ showing it to be hydrogen.
- The magnesium oxide will have fallen into the water and a little will have dissolved.
- Turn off the Bunsen burner and add a few drops of Universal indicator to the water. It will be significantly alkaline due to dissolved magnesium hydroxide.

Notes
- The reaction is:
- Mg(s) + H2O(g) → MgO(s) + H2(g)
- Followed by MgO(s) + H2O(l) → Mg(OH)2(aq)
- The hydrogen flame in method 1 would be more easily seen in a slightly darkened room.
- Do not allow the burning magnesium to touch the side of the flask. This can be a difficult task if you are dazzled by its flame. Wearing sunglasses might help.
Downloads
The reaction of magnesium with steam - teacher notes
PDF, Size 0.2 mb
Additional information
This practical is part of our Chemistry for non-specialists and Classic chemistry demonstrations collections. This experiment has been adapted from Classic Chemistry Demonstrations, Royal Society of Chemistry, London, p.199-203.


No comments yet