


Watch a video explaining the types of carbon, making graphite, the properties and uses of graphite
PhD student Dale Brownson speaks to Postdoctoral scientist Dimitrios Kampouris about his research investigating the electrochemistry of graphene.
Chapters
- 00:13 – Types of carbon
- 02:42 – Making graphite
- 03:37 – Properties of graphite
- 03:56 – Uses of graphite
- 06:16 – Making a solar cell
Transcript
00:00 Introduction
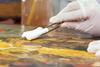
Dimitrios: Why have you brought a burnt sausage into the lab?
Dale: Well, Dimitrios, we’ve all been there, getting carried away at the barbecue and burnt our sausages. Although you may be a bad cook, you may actually be a great chemist.
Dimitrios: Great chemist? How can I be a great chemist by burning my sausages?
Dale: Well, the thing is, you might have created a new carbon material. The carbon material is a material comprised exclusively of carbon atoms. Interestingly though, depending on how the carbon atoms are bonded, this gives rise to various different structures which have various different properties.
Dimitrios: So, can you give me some examples of these carbon materials?
Dale: One of the most well-known carbon materials is diamond, okay, and another example is that from the barbecue earlier, is charcoal. Some more interesting carbon materials are graphitic materials. So, if we take this graphite block, this book here, imagine this is graphite, consists of multiple layers of stacked graphene sheets.
Dimitrios: So, what is graphene?
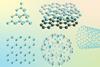
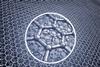
Dale: Well graphene, being a single layer of the graphite structure, consists of carbon atoms that are interconnected in a hexagonal lattice structure.
Interestingly though these two materials, graphene and graphite, have significantly different properties. Whereas graphene is strong in every direction, graphite may be strong in this direction but because it consists of the stacked layers as you can see it can be broken apart, it’s quite brittle in this direction.
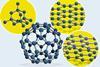
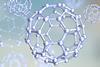
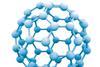
Interestingly though, graphene is known as the mother of all graphitic materials and from this one graphene sheet you can for example wrap it or roll it up to form a carbon nanotube, which again has different properties, or, if you roll it into a sphere, you get a C60 or fullerene which is known as a bucky ball.
If you imagine these intersections are carbon atoms and it consists of 60 carbon atoms, this structure, this ball, is identical to that of a fullerene.
02:29 Scotch tape method
Dale: So, the 2010 Nobel Prize in Physics was awarded to Andre Geim and Konstantin Novoselov for the isolation of a single layer of graphene using the Scotch tape method.
Dimitrios: And what does this method involve?
Dale: So, we take this graphite and gently press it against the Scotch tape. You can see that as we remove the graphite from the Scotch tape some of the graphite has been isolated and transferred onto the Scotch tape. Now if we repeatedly fold over the Scotch tape, pressing a clean part of the Scotch tape each time onto the graphite that’s been isolated and if you gently prise them apart you can see that each time the graphite flakes get transferred and effectively we’re splitting these up into smaller sizes of graphite flakes.
Eventually you’ll end up with a single layer of graphene which you can then transfer to a silicon wafer and locate using a microscope.
03:37 Graphene properties
Dale: Did you know that graphene has some fascinating properties?
Graphene is a two-dimensional, one-atom-thin crystal, it’s the thinnest and lightest material known to man. It’s also one of the strongest and most flexible, yet it’s non-flammable, transparent and highly conductive.
Dimitrios: So what are all these properties useful for?
Dale: One of the most promising properties of graphene is its use in circuits using its conductivity. So, for example here, if I take an ordinary pen, you can see that this is not conductive, there’s no current flow between the two parts.
However, if I do exactly the same using a graphite pencil, so we’re depositing graphene layers as we write, and we go from one point here to another point here you can see that in this case it’s conductive and a current flows between the two.
04:41 Solar cells
Dimitrios: Can you give me some more examples?
Dale: One great example is a combination of graphene’s transparency and great conductivity in the creation of a solar cell.
Dimitrios: So what is a solar cell?
Dale: Well a solar cell is basically a converter. It converts light energy into electrons or electricity. Smaller solar cells produce tiny amounts of electricity, just enough to power a small light or a calculator, whereas larger arrays of solar cells are used in earth-orbiting satellites, or in the home to generate electricity.
Dimitrios: What does graphene have to do with solar cells?
Dale: Well currently solar cells use titanium dioxide to convert light into the electricity. Unfortunately though, titanium dioxide can only be coated onto glass, and glass is both inflexible and heavy. If we use graphene, which is light and flexible, in place of titanium dioxide, then solar cells can then be applied onto a wider variety of surfaces.
05:42 How solar cells work
Dimitrios: So how does a solar cell work?
Dale: Well in a solar cell you have two glass plates acting as electrodes, and these are conductive. In the case of a graphene solar cell the graphene coated on top of the glass plate has a dye on top of it which when light passes through the glass this excites the dye molecules and then electrons travel from this to the graphene through an external circuit to a cathode and the circuit is completed by the use of an iodide electrolyte.
06:17 DIY solar cell
Dale: So I’ll now show you how to make your own solar cell. Unfortunately we have to use titanium dioxide rather than graphene because at the present time it’s not possible to coat a single layer of graphene covering the whole surface of this glass plate. Here we have two conductive glass plates. The first step is to coat the anode material with titanium dioxide and a platinum paste for the cathode.
Once I’ve covered the glass plate in its entirety, I will then leave this to dry before removing the Sellotape.
Here’s a plate that I made earlier. This has been fired to dry it and remove any contaminants. So now it’s time to dye the titanium dioxide. Here we’re using a squash containing concentrated fruit juices. And we’ll then add the anode into the juice. We’ll leave it there now for two hours to make sure that it gets stained efficiently. We can now remove the stained anode from the dye solution.
After leaving the anode for five minutes to dry it’s now time to construct our solar cell. The first stage is to place a spacer which is going to be between the two electrodes, and this is to stop short circuiting. Once that’s in place we place the two electrodes on top of each other with the coated sides together so that we can effectively clamp these together and have room for connection.
In the final stage we now fill the solar cell with our electrolyte through a hole in one of the plates. So, having covered the holes with Sellotape, there you have it, your homemade solar cell.
To test this out we’ve now connected it up to a multimeter and as you can see when I apply a light to the cell the output of the solar cell increases and then again when I turn the light off the output drops.
So, as you can see, using just a couple of pieces of glass and some fruit juice you can take a plentiful energy source like light and convert it into electricity using this. So when large areas of graphene can be produced and used in applications like this, its true potential can be realised.
Additional information
Made in conjunction with The Banks Group at Manchester Metropolitan University.
- Prepare(1)
 CPD article
How to teach structure and bonding of carbon at 14–16
Secure your learners’ understanding of this core topic with these teaching ideas
- Deliver(4)
 Resource
Carbon allotropes | Developing understanding | 14–16
Encourage learners to think about how different structures of carbon are represented and what this means at the sub-microscopic level
 Resource
Different allotropes of carbon | Johnstone’s triangle worksheets | 14–16 years
Use these worksheets to get learners thinking about carbon allotropes at different levels, from sub-microscopic structures to macroscopic properties
 Resource
Allotropes of carbon | Structure strip | 14–16 years
Support learners to retrieve information on the structure and bonding in different forms of carbon, with this scaffolded writing activity
 Poster
Allotropes of carbon
Use this infographic with your 14–16 classes to boost their knowledge of diamond, graphite, graphene and fullerenes
- Literacy(3)
 Resource
Structure and bonding | Key terms support | 14–16
Language support pack for structure and bonding, with key terms list, accessible glossary, Frayer models and unscrambling definitions
 Resource
Structure and bonding | Reading comprehension | 14–16 years
Use this reading comprehension based on a real science research news story to develop literacy skills and confidence
 Resource
Structure and bonding | Structured talk | 14–16 years
In this speaking and listening task learners work together to build word bridges by applying, building and sharing understanding of bonding
- Assess(3)
 Quiz
QuizGiant structures with covalent bonding | Bridging the knowledge gap | 14–16 years
Support your students with the transition to post-16 study with this quiz on giant structures with covalent bonding
 Resource
Structure and bonding of carbon | Knowledge check | 14–16
Assess learning on atomic structure with a higher and foundation worksheet
 Resource
Structure and bonding of carbon | In context | 14–16
Put carbon structure and bonding into context and practise maths in science with questions about graphene, Buckminsterfullerene, diamond
- Enrich(9)
 Games and puzzles
Allotropes of carbon | Gridlocks puzzle | 14–16 years
Reinforce your students’ understanding of allotropes of carbon using these sudoku-style puzzles, with printable worksheets and answers
 News
NewsBreakthrough method produces flexible diamond films
New method shows promise for mass producing ultrathin diamond films for use in the electronic industry

 News
NewsA carbon allotrope that can scratch diamond
The amorphous carbon material created from buckminsterfullerene
 News
NewsGraphene veil prevents fading
Atomically-thin graphene lattices are being used as a barrier against ageing
 Job profile
Science communicator
Fernando uses his scientific knowledge to explain complex science to the public so they can understand and appreciate the value of these discoveries that are important to their everyday lives
 Resource
The discovery of buckminsterfullerene | Anecdotes for chemistry teachers
Listen to a 7-minute podcast telling the story of the discovery of the ’soccer ball’ carbon allotrope
currently reading
 Resource
Graphene: future applications
Watch a video explaining the types of carbon, making graphite, the properties and uses of graphite


No comments yet