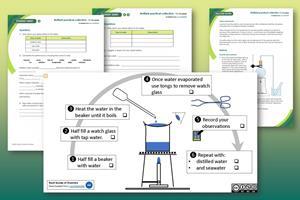
Compare the solids and gases dissolved in tap water and seawater in this class practical and demonstration
-

Download this
Download the scaffolded and unscaffolded student worksheets and teacher guidance (including answers) as MS Word and pdf.
Download the classroom presentation as MS Powerpoint and pdf.
Discover more resources from the Nuffield practical collection
In this experiment, learners evaporate tap water, distilled water and seawater to reveal solid residues. They then observe as the teacher boils the three types of water to release their dissolved gases, which will be collected in a test tube and tested using a glowing splint.
This is a class practical and teacher demonstration. If there is enough apparatus, learners could do the three evaporations in parallel. Alternatively, the three types of water could be distributed round the class and the results compared at the end. It takes quite a long time for the water in a beaker to boil, so this should be built into the planning.
The teacher demonstration could be set up while the leaners are waiting for their water to evaporate. If several of the shortcuts suggested are used, these experiments could be done in 45 minutes.
Learning objectives
- Set up and carry out an evaporation practical.
- Compare the dissolved substances in tap water and seawater.
- Describe what happens to the particles of a substance when it dissolves.
- Explain why it’s important for water to contain dissolved substances.
Scaffolding
There are two versions of the student worksheet: scaffolded (✪) and unscaffolded (✪✪). The scaffolded sheet offers more support for learners to access the questions.
Integrated instructions are available in the PowerPoint presentation.
Try these related experiments
Introduce younger learners to key ideas and practical skills by separating salts from seawater, or try analysing the dissolved solids in seawater to illustrate tests for positive and negative ions.
Technician notes
Read our standard health and safety guidance and carry out a risk assessment before running any live practical.
Apparatus
- Eye protection: safety glasses to EN166F
For the teacher demonstration
- Round bottomed flask (250 cm3), x 2
- Bung and delivery tube, x 2
- Bunsen burner, tripod and gauze, x 2
- Heat resistant mat, x 2
- Stand and clamp, x 2
- Beaker (250 cm3) or a small trough, x 2
- Test tube, x 2
For the class practical
- Glass watch glass (approximately 7.5 cm diameter), x 3
- Beaker (100 cm3)
- Bunsen burner
- Tripod and gauze
- Heat resistant mat
- Tongs
Chemicals
For the teacher demonstration
- Seawater, 400 cm3 (see note 3 below)
For the class practical
- Seawater (5 cm3)
- Distilled (or deionised) water (5 cm3)
Preparation
If the real thing isn’t available, ‘seawater’ can be made up by dissolving about 35 g of sodium chloride in 1000 cm3 of tap water. This will provide enough for both parts of the experiment. (Note: seawater contains a complex mixture of salts, but this gives a suitable solution for this experiment, resembling seawater in having 3.5% salinity.)
Safety and hazards
Learners should be able to use a Bunsen burner with confidence. Remind them how to handle hot liquids in beakers.
Allow enough time for the equipment to cool down before asking the students to put away their equipment. In case of a burn, cool the burn by immediately irrigating with gently running water for at least 20 minutes and until pain is relieved and heat is no longer felt.
The solid residue on the watch glass can be disposed of in the general waste bin. Remind learners never to eat or drink anything in the lab as they may be tempted to taste the salt.
Method
Students’ experiment
- Set up a Bunsen burner on a heat resistant mat. Over it, place a tripod and gauze.
- Half-fill a beaker with water and place it on the gauze.
- Take a watch glass and place enough tap water on it to cover half its area. Place the watch glass on the beaker.
- Heat the water in the beaker until it boils and then let it boil briskly.
- When all the water on the watch glass has evaporated, turn off the Bunsen and use tongs to remove the watch glass (Do not touch the watch glass it will be hot. It can safely be placed on the bench though.)
- Examine the watch glass for traces of solid residue.
- Repeat the steps 3 to 6 with:
- Distilled water
- Seawater
Teacher demonstration
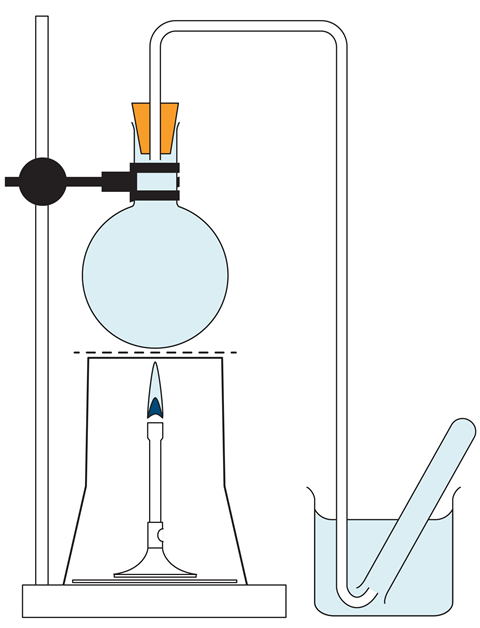
- Fill a round bottomed flask right up to the top with tap water. Insert a bung carrying a delivery tube so that the tube itself becomes completely filled with water (see diagram). If this cannot easily be done, place the bung in the flask while the whole apparatus is immersed in a sink of water.
- Fill a collection test tube with water and place inverted into a beaker of water. Position the other end of the delivery tube under the test tube (see diagram).
- Repeat step 1 and 2 with a flask of seawater.
- Position each flask over a Bunsen burner using a clamp and stand. Heat each flask until bubbles of gas are released from the water and travel into the test tube. Continue until the contents of the flask are boiling. About half a test tube full of gas will be collected in each case, all of which has been displaced from solution by heating.
- Conduct a splint test to demonstrate the presence of oxygen.

Teaching notes
Distilled water should contain no dissolved solids, tap water some dissolved solids (those causing ‘hardness’ for example) and seawater more dissolved solids (sodium chloride and other salts). A related experiment describes how to analyse the salts obtained from seawater.
The gas that comes out of both seawater and tap water is air (with a higher percentage of oxygen than normal air, as oxygen is more soluble than nitrogen). The best test available is to show that a glowing splint continues to glow and does not immediately go out when placed in the gas.
The presence of dissolved oxygen in water is vital for fish to survive.
Downloads
Dissolved substances student sheet scaffolded
Handout | PDF, Size 0.14 mbDissolved substances student sheet unscaffolded
Handout | PDF, Size 0.14 mbDissolved substances presentation slides
Handout | PDF, Size 1.41 mbDissolved substances teacher notes
Handout | PDF, Size 0.28 mbDissolved substances student scaffolded
Editable handout | Word, Size 0.51 mbDissolved substances student unscaffolded
Editable handout | Word, Size 0.53 mbDissolved substances presentation slides
Editable handout | PowerPoint, Size 3.35 mbDissolved substances teacher notes
Editable handout | Word, Size 0.49 mb
Additional information
This is a resource from the Practical Chemistry project, developed by the Nuffield Foundation and the Royal Society of Chemistry. This collection of over 200 practical activities demonstrates a wide range of chemical concepts and processes. The supporting resources were updated in 2025 by Dorothy Warren.
Practical Chemistry activities accompany Practical Physics and Practical Biology.
© Nuffield Foundation and the Royal Society of Chemistry


No comments yet