


Try this practical or demonstration to explore the importance of water for acidity using hydrogen chloride and methylbenzene
In this experiment, students compare the properties of a solution of hydrogen chloride in water – ie hydrochloric acid – with the properties of a solution of hydrogen chloride in a non-aqueous solvent such as methylbenzene (toluene). They measure the pH of each solution and observe what happens when they add different substances to them, including magnesium ribbon and marble chips.
By observing the lack of standard acid behaviour in the solution of hydrogen chloride in methylbenzene, students can identify and discuss the essential part played by water in the characteristic properties of acids.
This lesson needs careful and thorough preparation, planning and organisation, especially with regard to preparing and handling the solution of hydrogen chloride in methylbenzene. However, the reward is a clear insight into the nature of acids and the role water plays.
Preparation of the solution of hydrogen chloride in methylbenzene must begin two days in advance of the experiment by the teacher or an experienced technician (see the health, safety and technical notes below). Once prepared it has a limited life, and needs to be kept very well-stoppered in a fume cupboard, from where small volumes can be dispensed to students in stoppered test tubes. For this reason, the lesson must take place in a laboratory with an adequate fume cupboard – preferably two fume cupboards if available.
The solution in methylbenzene gives off choking corrosive and toxic fumes. For that reason the experiment is suitable as a class experiment only for reliable classes of students age 14 and over, in a well ventilated lab. For other classes the experiment can be done as a demonstration. It may help to organise the practical work on a class-cooperative basis, with different working groups being allocated different tests to perform. This limits exposure to the fumes.
If all groups do all tests, the experiment is likely to take about 40–50 minutes. It can be done quicker on a class-cooperative basis.
Take care to collect the methylbenzene solvent residues in a suitable container in a fume cupboard for disposal. Draw the class’s attention to this procedure.
Equipment
Apparatus
- Eye protection
- Oven-dried beakers, 100 cm3, x2
- Teat pipettes (well dried), x2
- 6 V DC power pack (see note 11 below)
- Connecting wires
- Switch
- 6 V lamp
- Steel electrodes, x2 (four pairs should serve up to a total of 16 working groups)
- Paper tissues/towels
- Universal indicator paper, dried, kept in dessicator or distributed in dry stoppered sample tubes (see note 12)
- Forceps
- Oven-dried test tubes, 100 x 16 mm, x9 with stoppers to fit, x3
- Oven-dried test tubes, 150 x 25 mm, x3 with stoppers to fit, x3
- Conical flask, 100 cm3, to collect solution and stopper to fit
For making hydrogen chloride in methylbenzene
- Conical flask, 500 cm3, x2
- Beaker, 500 cm3
- Dropping funnel (ideally a pressure equalising - Quickfit), 250cm3
- Filter funnel (Quickfit), 1 dm3
- Drechsler bottle (or other glass container)
- Rubber tubing
- Stoppers or cork (for conical flask), x2
Chemicals
- Marble chips (calcium carbonate), x2
- Magnesium ribbon, cut into 1 cm lengths, x2
- Dilute hydrochloric acid, 1 M, in a bottle labelled ‘Solution of hydrogen chloride in water’, 100 cm3
- Purified water
- Methylbenzene (toluene) (HIGHLY FLAMMABLE, HARMFUL), 300 cm3
- Anhydrous calcium chloride, 10–20 g
- Concentrated sulfuric acid, CORROSIVE), 125 cm3
- Sodium chloride (or rock salt), 50 g
Health, safety and technical notes
- Read our standard health and safety guidance.
- Wear eye protection throughout. Avoid breathing fumes from the solution of hydrogen chloride in methylbenzene when the corks are removed from containers.
- Calcium carbonate, CaCO3(s) – see CLEAPSS Hazcard HC019B.
- Magnesium ribbon, Mg(s) – see CLEAPSS Hazcard HC059A.
- Hydrochloric acid, HCl(aq) – see CLEAPSS Hazcard HC047a and CLEAPSS Recipe Book RB043.
- Concentrated sulfuric acid, H2SO4(aq), (CORROSIVE) – see CLEAPSS Hazcard HC098a.
- Anhydrous calcium chloride, CaCl2(s), (IRRITANT) – see CLEAPSS Hazcard HC019A.
- Sodium chloride, NaCl(s) – see CLEAPSS Hazcard HC047b.
- Hydrogen chloride, HCl(g), (CORROSIVE, TOXIC) – see CLEAPSS Hazcard HC049.
- Methylbenzene, C6H5CH3(l), (HIGHLY FLAMMABLE, HARMFUL) – see CLEAPSS Hazcard HC046a.
- Four conductivity test circuits should be set up around the laboratory. Each consists of a low-voltage DC power pack set at an appropriate voltage connected to a bulb of similar operating voltage. They should have a press switch and two steel electrodes clamped so that they can be easily lowered into a 100 cm3 beaker containing the test solution. Beside each test station, provide a supply of paper towels for cleaning the electrodes after each use.
- Place small strips of universal indicator paper in a warm (about 60 ˚C) oven for a few hours. Transfer into a series of oven-dried screw-top sample tubes (enough for one tube between two working groups, each tube containing about 10 small strips) and store in a dessicator until the start of the lesson. Provide a pair of forceps per tube for picking out the strips.
Preparing the solution in methylbenzene
You need to start preparing the saturated solution of hydrogen chloride in methylbenzene two days before the class experiment. If the technician is not sufficiently experienced the preparation needs to be supervised. It must be done in an efficient fume cupboard.
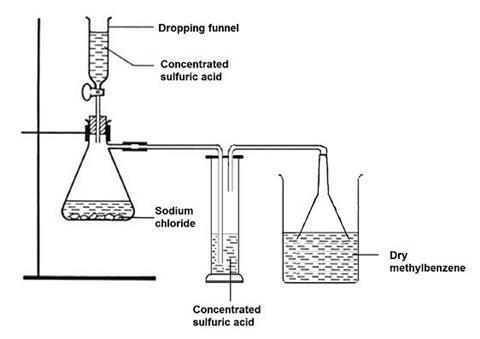
For one class of 12–16 working groups, place 300 cm3 of methylbenzene in a corked 500 cm3 conical flask, add 10–20 g of good quality anhydrous calcium chloride and leave overnight. Next day, decant into a dry 500 cm3 beaker just before passing dried hydrogen chloride gas into the solvent. The hydrogen chloride generator consists of a large (1 dm3 Quickfit) filter flask fitted with a dropping funnel and side-arm leading to a drechsler bottle containing concentrated sulfuric acid (approx 25 cm3) to dry the gas, and then to an inverted filter funnel just dipping into the dry methylbenzene. The filter flask contains about 50 g of sodium chloride, and concentrated sulfuric acid is added slowly dropwise from the dropping funnel to generate hydrogen chloride gas. A total addition of about 100 cm3 of concentrated sulfuric acid over about 1 hour should ensure that enough hydrogen chloride is passed to saturate the solvent. Transfer the hydrogen chloride in methylbenzene solution to a 500 cm3 conical flask and seal it securely with a cork or stopper.
Access to the solution of hydrogen chloride in methylbenzene can be managed either by students coming to the fume cupboard and using a teat pipette to transfer small volumes to a dry test tube, or by a technician preparing for each group 3 stoppered test tubes (100 x 16 mm) each containing 2 cm3 of the solution, two stoppered test tubes (150 x 25 mm) each containing 10 cm3 of the solution, and one stoppered test tube (150 x 25 mm) containing about 6 cm3 of the solution.
Procedure
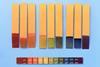
- Take one test tube each of the solutions of hydrogen chloride in water and of hydrogen chloride in methylbenzene, each containing about 2 cm3. Using forceps (do NOT touch the papers with your hands), drop a small strip of dry universal indicator paper into each test tube, and compare the changes in colour of the indicator against the pH colour chart for that indicator.
- Take another test tube each of the solutions of hydrogen chloride in water and of hydrogen chloride in methylbenzene, each containing about 2 cm3. Drop a small marble chip into each test tube. Compare the effects of each solution on the marble chip.
- Take another test tube each of the solutions of hydrogen chloride in water and of hydrogen chloride in methylbenzene, each containing about 2 cm3. Drop a small strip of magnesium ribbon into each test tube. Compare the effects of each solution on the magnesium.
- In a fume cupboard, pour about 10 cm3 of each of the solutions into two separate beakers. Take the two beakers carefully to a testing station where a conductivity test circuit is provided. Make sure the two steel electrodes are completely dry using a clean paper towel. Test the methylbenzene solution first. Dip the two electrodes into the solution and press the switch. Does the lamp light? Dry the electrodes and repeat with the solution in water. Dry the electrodes again before removing your beakers to the fume cupboard.
- Take a larger test tube containing about 6 cm3 of the solution in methylbenzene, remove the cork and add about the same volume of purified water. Replace the cork firmly and shake vigorously for about 30 seconds. Pour off the upper layer of methylbenzene.
- Repeat tests in steps 1–4 on the remaining solution. Begin by repeating the test in step 4, then use samples of the solution in smaller test tubes to repeat steps 1–3.
Teaching notes
Be aware of the safety issues associated with students inhaling fumes from the solution of hydrogen chloride in methylbenzene, and of the precautions needed, especially for those with asthma and similar problems. Ensure good ventilation of the lab.
This is an important experiment to develop an understanding of the nature of acid behaviour, and well worth the extra effort involved in planning, preparing and delivering this complex practical session. However, you can also try a related, more straightforward practical, featuring a series of short experiments exploring what makes a substance acidic (including the role of water).
In step 1 the indicator paper should show the standard colour change for pH = 1 in aqueous solution. In methylbenzene solution there may well be a colour change (especially if the indicator paper has not been dried thoroughly) but the comparison with the aqueous solution should be marked.
In step 2 there should be the usual fizzing in aqueous acid as carbon dioxide is given off from the calcium carbonate, but no sign of reaction with the methylbenzene solution.
In step 3 there should be the usual evolution of hydrogen (this can be ‘pop’ tested) from aqueous acid, but no reaction with the methylbenzene solution.
In step 4 the aqueous acid should conduct sufficiently for the lamp to light, and gas should be evolved at each electrode; the smell of chlorine may be detected. In contrast the methylbenzene solution does not conduct or show signs of electrolysis.
In step 5 the water layer suddenly acquires all the properties of the aqueous solution, and observant students may note that the pungent fumes of hydrogen chloride have disappeared from the methylbenzene layer.
The lack of standard acid behaviour of the solution of hydrogen chloride in methylbenzene is in stark contrast to the familiar properties of hydrochloric acid. This is emphasised when on shaking the former with water, the hydrogen chloride clearly transfers to the water and the standard acid properties now appear in the aqueous layer. If students have already been taught ionic theory, the conductivity experiments reveal the presence of ions in the aqueous solution but not in the methylbenzene solution. If the cathode product on electrolysis is identified as hydrogen, then the presence of hydrogen cations can be related to standard acid behaviour.
In the follow-up to the practical work, these conclusions can be drawn and lead to a deeper theory of acid behaviour than that so far taught to students. The latter is the descriptive view of acids being substances that have certain characteristic reactions. Now we have a theory of acid behaviour: it is the presence of hydrogen cations that cause the familiar properties.
Students could be asked to write symbol equations for the reactions with the aqueous solution:
CaCO3(s) + 2HCl(aq) → CaCl2(aq) + CO2(g) + H2O(l)
and
Mg(s) + 2HCl(aq) → MgCl2(aq) + H2(g)
If electrode reactions have been studied, these can also be added:
Cathode: 2H+(aq) + 2e– → H2(g)
and
Anode: 2Cl–(aq) → Cl2(g) + 2e–
Additional information
This is a resource from the Practical Chemistry project, developed by the Nuffield Foundation and the Royal Society of Chemistry.
Practical Chemistry activities accompany Practical Physics and Practical Biology.
© Nuffield Foundation and the Royal Society of Chemistry


No comments yet