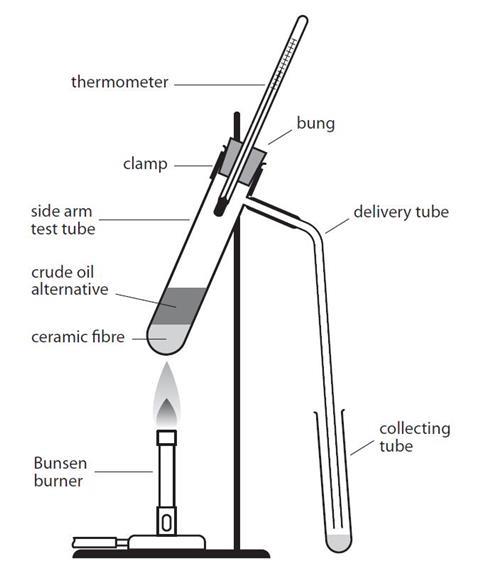
Try this class practical or demonstration to simulate the industrial fractional distillation of crude oil in the laboratory
In this experiment, students use a crude oil substitute to model the fractional distillation of crude oil. After collecting four fractions at different temperatures, students test each one for viscosity, colour, smell and flammablility.
Teachers will need to assess whether this activity can be done as a class experiment or as a demonstration.
The time required depends on the age and experience of the students. A year 7 (or equivalent) group needs about 50 minutes, while a year 12 (or equivalent) group about 30 minutes.
Equipment
Apparatus
- Eye protection
- Bunsen burner
- Heat resistant mat
- Side-arm hard glass test tube (see note 4 below)
- Bent delivery tube and rubber connection tubing
- Small sample tubes, at least 20 mm x 5 mm (small test tubes can also be used), x4
- Thermometer, 0–360 °C, with cork to fit side-arm test tube
- Teat pipette
- Beaker, 100 cm3
- Hard glass (borosilicate) watch glass
- Mineral or ceramic fibre
- Wooden splints
Chemicals
- Crude oil substitute (HIGHLY FLAMMABLE and HARMFUL), about 2 cm3 (see notes 3 and 5 below)
Health, safety and technical notes
- Read our standard health and safety guidance.
- Wear eye protection throughout.
- Crude oil substitute (HIGHLY FLAMMABLE and HARMFUL) – see CLEAPSS Hazcards HC045a and HC045b, plus CLEAPSS Recipe Book RB032. Real crude oil contains more than 0.1% benzene, which is carcinogenic, which makes it unsuitable for use in schools.
- Side-arm boiling tubes produce more consistent results than boiling tubes fitted with bungs with two holes, one for a thermometer and one for a delivery tube.
- It is important to try the experiment beforehand. It may be necessary to add an additional low boiling point fraction to the ‘crude oil’ mixture – eg cyclohexane – to obtain something below 70 °C.
- This is quite a messy experiment. If it is done regularly, it is probably best to keep sets of apparatus – apart from the thermometer and watch glasses – dedicated to the experiment. This is because it is difficult to get clean, and it still works if oil residues are present.
Procedure
- Place about a 2 cm3 depth of ceramic fibre in the bottom of the side-arm test tube. Add about 2 cm3 of crude oil alternative to this, using the teat pipette.

- Set up the apparatus as shown in the diagram, with one addition for the first fraction: ensure you place a beaker of cold water around the collecting tube. The bulb of the thermometer should be level with, or just below the side-arm. Heat the bottom of the side-arm test tube gently, with the lowest Bunsen flame. Watch the thermometer.
- When the temperature reaches 100 °C, replace the collection tube with another empty one. The beaker of water is no longer necessary.
- Collect three further fractions, to give the fractions as follows:
- Room temperature to 100°C
- 100–150 °C
- 150–200 °C
- 200–250 °C
- A black residue remains in the side-arm test tube. Test the four fractions for viscosity (how easily do they pour?), colour, smell and flammablility.
- To test the smell, gently waft the smell towards you with your hand.
- To test for flammablility, pour onto a hard glass watch glass and light the fraction with a burning splint.
- Keep one set of fractions and see that they combine to form a mixture very like the original sample.
Teaching notes
The fractions increase in viscosity with boiling temperature and should become more coloured as the temperature increases. With some artificial mixtures, the difference in colour can be difficult to observe.
The descriptions of smells vary from student to student, but students can be encouraged to liken them to familiar smells – eg ‘like lubricating oil’.
The samples become increasingly difficult to burn and burn with increasingly smokey flames.
This experiment forms an important part of understanding how we obtain chemicals from oil.
Additional information
This is a resource from the Practical Chemistry project, developed by the Nuffield Foundation and the Royal Society of Chemistry.
Practical Chemistry activities accompany Practical Physics and Practical Biology.
The experiment is also part of the Royal Society of Chemistry’s Continuing Professional Development course: Chemistry for non-specialists.
© Nuffield Foundation and the Royal Society of Chemistry


No comments yet