


Use this colourful practical to introduce learners to the electrolysis of brine, or sodium chloride solution
-

Download this
Download the scaffolded and unscaffolded student worksheets and teacher guidance (including answers) as MS Word and pdf and the presentation slides as MS Powerpoint and pdf.
Discover more resources from the Nuffield practical collection
In this experiment, learners observe what happens during the electrolysis of brine (sodium chloride solution), using universal indicator to help them follow the reaction that takes place.
The experiment works well if you direct learners to make detailed observations and then attempt to explain what they think is happening.
Learning objectives
- Safely investigate the electrolysis of brine.
- State and describe your observations for the electrolysis of brine.
- Apply your understanding of electrolysis to explain your observations and the products formed.
- Predict the products formed.
Scaffolding
There are two versions of the student worksheet: scaffolded (✪) and unscaffolded (✪✪). The scaffolded sheet offers more support to allow learners to access the questions. The practical requires a large cognitive load and some learners may struggle to link their observations with the theory.
This topic requires good prior understanding of electrolysis, and that requires good understanding of ions, ionic compounds, the properties of ionic compounds and indicators/pH.
Predicting the products during the electrolysis of aqueous solutions is a tough topic, so the rules are included to assist learners. If necessary, model these rules with a few examples prior to learners making their predictions.
Equipment
Apparatus
- Safety glasses
- U-shaped test tube
- Clamp and clamp stand
- Carbon electrodes and electrode holders, x 2 (If electrode holders are not available, another suitable means of securing the electrodes could be used. Do not use bungs because the products are gases.)
- Electrical leads, x 2
- Power pack (low voltage, DC)
- Beaker, 100 cm3
- Spatula
- Stirring rod
Chemicals
- Sodium chloride (table salt)
- Universal indicator solution (FLAMMABLE)
- Distilled water (If distilled water is a problem, then tap water could be used. But it may affect the colours produced, especially in areas with hard water.)
Health, safety and technical notes
- Read our standard health and safety guidance and carry out a risk assessment before running any live practical.
- Wear safety glasses throughout, especially when clearing up the experiment. The products of the electrolysis of the salt solution are all more hazardous than the starting materials.
- Hydrogen, H2 (g), is EXTREMELY FLAMMABLE. See CLEAPSS Hazcard HC048 or refer to your local safety advisory body.
- Chlorine, Cl2 (g), is TOXIC and DANGEROUS FOR THE ENVIRONMENT. See CLEAPSS Hazcard HC022a or refer to your local safety advisory body.
- Sodium hydroxide, NaOH(aq), is CORROSIVE. See CLEAPSS Hazcard HC091a or refer to your local safety advisory body.
Ensure that the current is turned off as soon as a trace of chlorine is detected. Chlorine can be a problem for asthmatic pupils. If the directions in the procedure notes are followed, then very little chlorine is produced.
Procedure
- Put about 75 cm3 distilled water into the beaker. Add about two heaped spatulas of sodium chloride.
- Stir until the salt dissolves. Then add several drops of universal indicator solution. Stir to mix thoroughly. You need enough indicator to give the water a reasonable depth of green colour.
- Pour the coloured salt solution into the U-shaped test tube and clamp it as shown in the diagram.
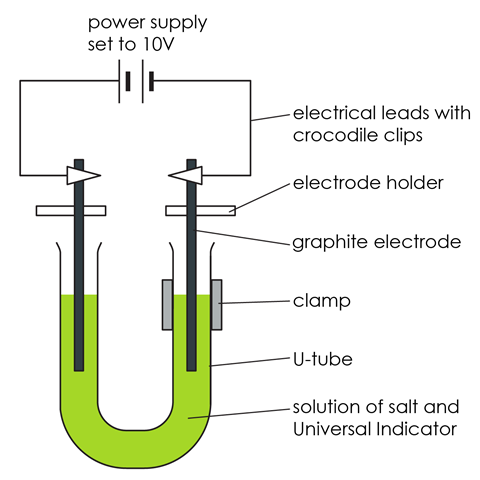
- Wash the carbon electrodes carefully in distilled water and then fix them so that there is about 3 cm of electrode in each side of the U-tube – see diagram. This is most easily done using electrode holders.
- Attach leads to the electrodes and connect them to a power pack set to 10 V (DC).
- Turn on the power pack and observe closely what happens. A piece of white paper held behind the U-tube can help. Make sure the U-tube is kept very still during the experiment.
- Turn off the power as soon as you notice any change at the positive electrode, or when you smell a ‘bleachy, swimming pool’ smell. This will probably take less than five minutes.
Teaching notes
This experiment is an interesting introduction to the electrolysis of brine. Do not use it as the first electrolysis that learners encounter. They would struggle to explain for themselves what is going on. You can follow it up with the electrolysis of salt solution in industry.
Bubbles of gas will be visible at each electrode. At the positive electrode, the indicator turns red initially and then is bleached to colourless. This indicates the presence of chlorine. At the negative electrode the indicator turns purple. The remainder of the solution stays green.
The product at the negative electrode is hydrogen. This can be difficult for learners to understand.
Some of the water will ionise, that is, turn to hydrogen (H+) and hydroxide (OH–) ions.
When the sodium chloride is dissolved in water, the ions forming the ionic solid separate out. This means that there are four ions present in the solution: H+, OH–, Na+ and Cl–.
The negative ions are attracted to the positive electrode. The chloride ions are discharged (giving chlorine) in preference to the hydroxide ions. These are left behind in solution.
At the negative electrode, the hydrogen ions are discharged (producing hydrogen gas) in preference to the sodium ions. These are also left behind in solution. Thus sodium hydroxide solution remains. This is the cause of the purple colour of the indicator at the negative electrode.
In time, the green colour of the indicator in the middle would change too, as the ions diffuse through the resulting solution.
Equations
2H+ + 2e–→ H2 [negative electrode, cathode]
2Cl–→ Cl2 + 2e– [positive electrode, anode]
H2 O → H+ + OH–
Answers
Answers to the questions in both the student sheets and on the lesson slides can be found in the teacher notes.
Downloads
Electrolysis of brine student sheet
Handout | PDF, Size 0.24 mbElectrolysis of brine scaffolded student sheet
Handout | PDF, Size 0.3 mbElectrolysis of brine teacher notes
Handout | PDF, Size 0.34 mbElectrolysis of brine lesson slides
Presentation | PDF, Size 0.38 mbElectrolysis of brine student sheet
Editable handout | Word, Size 0.52 mbElectrolysis of brine scaffolded student sheet
Editable handout | Word, Size 0.51 mbElectrolysis of brine teacher notes
Editable handout | Word, Size 0.52 mbElectrolysis of brine lesson slides
Presentation | PowerPoint, Size 0.31 mb
References
Additional information
This is a resource from the Practical Chemistry project, developed by the Nuffield Foundation and the Royal Society of Chemistry. This collection of over 200 practical activities demonstrates a wide range of chemical concepts and processes. Each activity contains comprehensive information for teachers and technicians, including full technical notes and step-by-step procedures. Practical Chemistry activities accompany Practical Physics and Practical Biology.The supporting resources were updated in 2025 by Harry Lord.
The experiment is also part of the Royal Society of Chemistry’s Continuing Professional Development course: Chemistry for non-specialists.
© Nuffield Foundation and the Royal Society of Chemistry


No comments yet