Use microscale titration to complete an acid–base neutralisation with sodium hydroxide in this class practical
-

Download this
Download the scaffolded and unscaffolded student worksheets and teacher guidance (including answers) as MS Word and pdf and the presentation slides as MS Powerpoint and pdf.
Discover more resources from the Nuffield practical collection
In this experiment, learners use a microscale titration apparatus – prepared from pipettes, a syringe and some rubber or plastic tubing – to carry out a titration, filling the microscale burette with hydrochloric acid and placing sodium hydroxide solution in a beaker. They then calculate the exact concentration of the sodium hydroxide solution.
For this microscale technique, learners need to be capable of careful manipulation to carry the experiment out successfully. They also need to be familiar with the concept of the mole and capable of performing the calculations from the results of the experiment.
On such a small scale, safety issues are minimal and the time taken to carry out a titration is reduced as the volumes being reacted are so small. It is possible for a class to carry out the practical work and calculations in a one-hour session.
Learning objectives
- Safely carry out a microscale titration of sodium hydroxide and hydrochloric acid.
- Use practical results to calculate an unknown concentration.
Success criteria
Learners will carry out the microscale titration, aiming to achieve concordant results. They will use their results to carry out either a structured or unstructured calculation to find the unknown concentration of sodium hydroxide solution.
Scaffolding
A scaffolded (✪) sheet is available, which guides learners through the calculation stepwise. The unscaffolded (✪✪) version offers less guidance on the steps. If appropriate, you can alter the scaffolded version to remove some steps, for example prompts to convert volumes, or remove the provided equations.
The scaffolded sheet provides learners with a results table and units. The unscaffolded sheet requires learners to produce their own. You can alter this to provide a table without units, for example.
For a simpler introduction to microscale titration which focuses on observing the end-point of the reaction, try this Microscale titration experiment with integrated instructions.
Equipment
Apparatus
- Graduated glass pipette, 2 cm3
- Pipette, 1 cm3, and pipette filler to fit (or a 1 cm3 plastic syringe)
- Plastic syringe, 10 cm3
- Fine-tip poly(ethene) dropping pipette
- Small lengths of rubber, plastic or silicone tubing
- Beakers, 10 cm3, x 2
- Clamp stand with two bosses and clamps
- Safety glasses
Chemicals
- Dilute hydrochloric acid, 0.10 M, about 10 cm3
- Sodium hydroxide solution, approx. 0.1 M (IRRITANT), about 10 cm3
- Phenolphthalein indicator solution (HIGHLY FLAMMABLE), a few drops

Health, safety and technical notes
- Read our standard health and safety guidance.
- Wear safety glasses throughout.
- Dilute hydrochloric acid, HCl(aq) – see CLEAPSS Hazcard HC047a and CLEAPSS Recipe Book RB043 or refer to your local safety advisory body.
- Sodium hydroxide solution, NaOH(aq), (IRRITANT at concentration used) – see CLEAPSS Hazcard HC091a and CLEAPSS Recipe Book RB085 or refer to your local safety advisory body. Learners are to calculate the concentration of the sodium hydroxide solution so the bottle should not be labelled with the exact concentration.
- Phenolphthalein indicator solution (HIGHLY FLAMMABLE) – see CLEAPSS Hazcard HC032 and CLEAPSS Recipe Book RB000 or refer to your local safety advisory body.
Preparing the microscale titration apparatus
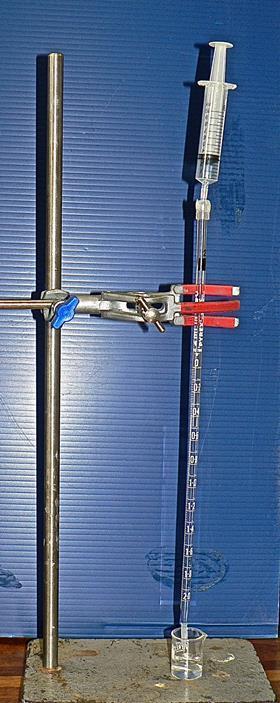
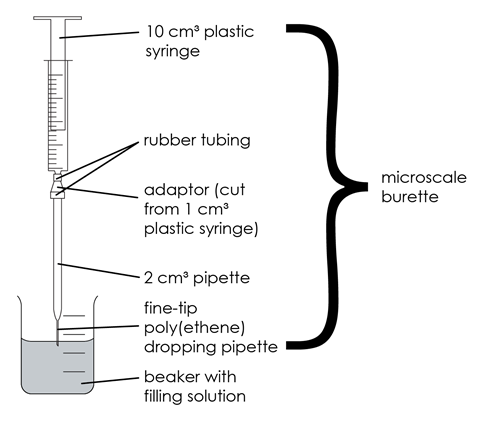
The microscale titration apparatus, or microscale burette, replaces the normal burette. To make the microscale titration apparatus, cut off the tip end of a fine-tip poly(ethene) dropping pipette and push the tip carefully onto the end of a 2 cm3 graduated glass pipette. Clamp a plastic syringe, 10 cm3 capacity, above the adapted pipette as shown in the picture, and connect the two with rubber, plastic or silicone tubing. Because the diameters of the syringe nozzle and of the top of the pipette may be quite different, two pieces of tubing, one to fit each end, will probably be needed; these can then be joined by an adaptor. A suitable adaptor can be made by cutting off the lower end of a 1 cm3 plastic syringe, such that the syringe body diameter fits the wider tubing, and the syringe tip fits the narrower tubing.
Learners can build their own microscale titration apparatus from supplied components, but this is likely to take the learners more time than the titration itself! For that reason, it is preferable to prepare a class set of these in advance (or ready-made microscale titration kits can be purchased online).
A suitable poly(ethene) dropping pipette would be fine-tip standard, non-sterile, 3.3 cm3 capacity.
Procedure

- Clamp the microscale burette as shown in the diagram. To fill the microscale burette, first push the syringe plunger completely down to ensure there is no air present inside. Place the tip of the microscale burette into the 0.10 M hydrochloric acid and slowly raise the plunger, making sure no air bubbles are drawn in. Fill all the way to the zero mark.
- Use the 1 cm3 microscale pipette and pipette filler to transfer exactly 1.0 cm3 of the sodium hydroxide solution into a clean 10 cm3 beaker.
- Add one small drop (no more!) of phenolphthalein indicator solution to the sodium hydroxide solution.
- Adjust the position of the microscale burette so that the tip is just below the surface of the sodium hydroxide and indicator solution in the beaker.
- Titrate the acid solution into the alkali by pressing down on the syringe plunger very gently, swirling to allow each tiny addition to mix and react before adding more.
- Continue until the colour of the indicator just turns from pink to permanently colourless.
- Record the volume of hydrochloric acid added at that point.
- Repeat the titration until you get reproducible measurements – concordant results within 0.1 cm3 of each other.
Teaching notes
This microscale technique minimises apparatus and chemical requirements and takes less time to perform than titration on the usual scale. Although the solutions used do present minor hazards, the use of such small quantities reduces risks from those hazards to very low levels. Nevertheless, make sure that learners take all the usual precautions in handling these solutions. The main risk is from misuse of the syringe or pipettes, especially if containing hazardous solutions.
The technique also makes the point that quantitative chemical experimentation does not always have to be performed on the traditional ‘bucket’ scale at school level.
An example of the results can be found in the student PowerPoint.
Questions
Questions linking the practical experiment to quantitative chemistry topics can be found in the student worksheets. There are two versions of the student worksheet: scaffolded (✪) and unscaffolded (✪✪). The scaffolded sheet offers more support to allow learners to access the questions. Hints are provided after some of the questions to support learners and guide their answers.
Answers
Answers to the questions in both levels of student sheets and on the lesson slides can be found in the teaching notes.
Downloads
Microscale titration scaffolded student sheet
Handout | PDF, Size 0.29 mbMicroscale titration unscaffolded student sheets
Handout | PDF, Size 0.19 mbMicroscale titration teacher notes
Handout | PDF, Size 0.26 mbMicroscale titration slides
Presentation | PDF, Size 0.46 mbMicroscale titration scaffolded student sheets
Editable handout | Word, Size 0.51 mbMicroscale titration unscaffolded student sheets
Editable handout | Word, Size 0.48 mbMicroscale titration teacher notes
Editable handout | Word, Size 0.44 mbMicroscale titration slides
Presentation | PowerPoint, Size 0.49 mb
Additional information
This is a resource from the Practical Chemistry project, developed by the Nuffield Foundation and the Royal Society of Chemistry. This collection of over 200 practical activities demonstrates a wide range of chemical concepts and processes. Each activity contains comprehensive information for teachers and technicians, including full technical notes and step-by-step procedures. Practical Chemistry activities accompany Practical Physics and Practical Biology.
© Nuffield Foundation and the Royal Society of Chemist


1 Reader's comment