


This class experiment is often used in the introductory study of acids to establish that this behaviour is a characteristic property
The experiment is done first on a smaller scale using test tubes (lesson 1 below), with no attempt to recover the salts formed. This establishes that hydrogen production is a characteristic property of the reaction of metals and acids. It can then be done on a larger scale (lesson 2 below), and the salts formed can be recovered by crystallisation.
Lesson 1 is a series of test tube experiments in which each working group establishes as a common feature that hydrogen is given off as metals react with an acid – if the metal reacts at all. This should take around 40 minutes, and most classes should be able to do this version. Each working group needs a small selection of metals and acids to test.
The range of metals and acids tested can be extended to a teacher demonstration in the concluding part of this lesson.
Lesson 2, in which the salt formed is recovered by crystallisation, takes longer, and the class needs to be reliable enough in behaviour and manipulative skills to cope with the hazards involved in heating acidic solutions in beakers on tripods.
The time taken for the reaction depends on the particle size of the metal used. Using small granules helps to reduce the time taken.
Equipment
Apparatus
Lesson 1
- Eye protection
- Test tubes, 100 mm x 16 mm or similar, x8
- Test tube rack
- Corks or bungs to fit test tubes loosely, x2
- Bunsen burner
- Wood splint
Lesson 2
- Conical flask, 100 cm3
- Beaker, 100 cm3
- Measuring cylinder, 100 cm3
- Glass stirring rod
- Spatula
- Filter funnel, approximately 65 mm diameter
- Filter paper
- Bunsen burner
- Tripod
- Pipeclay triangle or ceramic gauze (see note 1)
- Heat resistant mat
- Evaporating basin, at least 50 cm3 capacity
- Crystallising dish (see note 2)
Apparatus notes
- Ceramic gauzes can be used instead of pipeclay triangles to support the evaporating basin, but the evaporation will then take longer.
- The evaporation and crystallisation stages may well be incomplete in the time available for Lesson 2. In this case, the crystallisation dishes need to be set aside for crystallisation to take place slowly. However, the dishes should not be allowed to dry out completely, as this spoils the quality of the crystals. With occasional checks, it should be possible to decide when to decant surplus solution from each dish to leave good crystals for the students to inspect in the following lesson.
Chemicals
Lesson 1
- Dilute hydrochloric acid, 1 M, 25 cm3
- Dilute sulfuric acid, 0.5 M (IRRITANT), 25 cm3
- Small granules, coarse filings, or foil pieces of these metals in small labelled containers: copper, iron, magnesium, zinc
Lesson 2
- Small zinc granules, approximately 5 g in a labelled container
- Dilute sulfuric acid, 0.5 M (IRRITANT), 50 cm3
Health, safety and technical notes
- Read our standard health and safety guidance.
- Wear eye protection throughout.
- The selection of metals can vary according to what is available as small granules (up to 5 mm), coarse filings or foil. What matters is that each group has at least two metals that react readily and one that does not.
- Copper, Cu(s) – see CLEAPSS Hazcard HC026.
- Iron filings, Fe(s) – see CLEAPSS Hazcard HC055a.
- Magnesium ribbon, Mg(s) – see CLEAPSS Hazcard HC059a. Magnesium turnings are HIGHLY FLAMMABLE. Distribution of pieces of magnesium ribbon should be supervised to avoid students taking several pieces and experimenting later with igniting them.
- Zinc granules, Zn(s) – see CLEAPSS Hazcard HC107. While other metal/acid combinations react in the same way, recovering the salt by crystallisation (in Lesson 2) may not be as successful as it is using zinc and sulfuric acid.
- Dilute hydrochloric acid, HCl(aq) – see CLEAPSS Hazcard HC047a and CLEAPSS Recipe Book RB043.
- Dilute sulfuric acid, H2SO4(aq), (IRRITANT at concentration used) – see CLEAPSS Hazcard HC098a and CLEAPSS Recipe Book RB098.
Procedure
Lesson 1
- Place six test tubes in the test tube rack.
- Add a 2–3 cm depth of dilute hydrochloric acid to the first three tubes, and a 2–3 cm depth of dilute sulfuric acid to the remaining three tubes.
- Add a small piece of a different metal to each of the tubes with hydrochloric acid in them. Record which metal you add to each tube.
- Add a small piece of the same metals to each of the tubes with sulfuric acid in them. Record which metal you add to each tube.
- Your teacher will show you how to test the gas being produced in these reactions.
- Choose one of the metals that reacts rapidly with the acids, and in a clean test tube add a piece of this metal to a 2–3 cm depth of one of the acids. This time place a cork loosely in the top of the test tube so that any gas produced escapes slowly. Light a wood splint, remove the cork and immediately hold the flame to the mouth of the tube. If nothing happens, you may need to try again.
Lesson 2
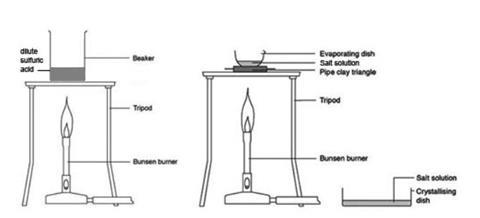
- Measure 50 cm3 of dilute sulfuric acid using a measuring cylinder and pour it into the beaker. Warm this acid gently over a low, non-smokey, Bunsen flame. Turn off the Bunsen burner before the solution boils. Carefully remove the beaker of acid from the tripod as instructed by your teacher, and stand it on the heat resistant mat. Be very careful not to knock the tripod while the beaker is on it.
- To this hot acid, add about half the zinc pieces provided. Avoid inhaling the acidic fumes that may rise from the beaker as a result of the vigorous bubbling.
- If all the zinc reacts, add two more pieces and stir with the glass rod. Add more zinc until no more bubbles form. The acid is now used up.
- Filter the warm solution into the conical flask to remove the excess zinc. Transfer the filtrate into an evaporating basin.
- Place the evaporating basin on a pipeclay triangle or gauze on a tripod and gently boil the solution over a low Bunsen flame. Be very careful not to knock the tripod supporting the basin. When the volume has been reduced by about half, dip a glass rod in the solution and then hold it up to cool. If small crystals form on the glass rod, stop heating, otherwise continue until that point is reached. Do not continue to heat beyond the point when crystals start to appear on the top edge of the solution.
- Pour the remaining hot solution into a crystallising dish as instructed by your teacher. Label the dish and leave until the next lesson to crystallise. The crystals can then be examined using a hand lens or microscope.
Teaching notes
Use the student handout available with this resource and get the students to answer each question after observing the reaction.
Safety is particularly relevant to younger students. Be aware of the problems associated with heating beakers or evaporating dishes on tripods, and with lifting such hot containers off a tripod after heating. Students should not be seated on laboratory stools while carrying out these operations.
Using tongs of suitable size is a good way of lifting hot containers but some schools may not have these. If there is any doubt about the safety of this step, the teacher should first lift each beaker down onto the heatproof mat, using a thick cloth or wearing suitable thermal protection gloves, before the students add the zinc pieces. The same applies to moving the evaporating basin before pouring its contents into the crystallising dish.
The procedure for safely testing the evolved hydrogen gas in the test tube reactions needs to be demonstrated at a suitable point in lesson 1. A loosely inserted cork allows sufficient build-up of gas in a slow reaction to enable a successful test. Nevertheless many students find it difficult to achieve a successful ‘pop’ test for hydrogen, so you may need to do follow-up demonstrations as well.
This pair of experiments forms an important stage for younger students in developing an understanding of what an acid is. They need to understand how to generalise from sufficient examples, and to see the limits to that generalisation in metals that do not react. It may help to develop this discussion in the concluding stages of lesson 1 by additional demonstrations of other metals and acids. In particular dilute nitric acid (< 0.5 M) does produce hydrogen with moderately reactive metals such as magnesium and zinc, even though reactions are different at higher concentrations, and with other metals. By the end of the lesson, students should be able readily to draw the conclusion:
Metal + acid → salt + hydrogen
This experiment is also a good opportunity for students to learn how to draw up suitable tables for recording experimental observations.
In lesson 2, selecting zinc and sulfuric acid as the example to follow through to producing crystals of the salt is governed by the need to have a salt that crystallises easily. Unfortunately the chlorides of magnesium and zinc are not easy to crystallise, while magnesium sulfate is so soluble that it takes longer to evaporate sufficiently. Iron(II) compounds may suffer from oxidation problems when the solution is evaporated, giving a visibly impure product.
There is potential for producing hazardous fumes if classes are allowed to over-evaporate salt solutions, either from evaporation of any excess sulfuric acid or from decomposition of the salt. There is also a danger of hot material spitting out of the container. If crystals begin to appear, eg at the top edge of the solution, the Bunsen burner should be turned off immediately and the solution left to cool. Refer to CLEAPSS Laboratory Handbook Section 13.2.6 for a discussion.
If older students perform these experiments, they can be asked to write symbol equations:
Mg(s) + 2HCl(aq) → MgCl2(aq) + H2(g)
and
Mg(s) + H2SO4(aq) → MgSO4(aq) + H2(g)
For reactions of these acids with iron or zinc, the students simply substitute Fe or Zn for Mg in these equations.
Questions for students
Download these questions as a worksheet from the bottom of this article.
- Which metals react with hydrochloric acid? How do you know a reaction is taking place? Draw a table in your notebook to record all these observations.
- Which metals react with sulfuric acid? How do you know a reaction is taking place? Extend your table of observations in your notebook to include these.
- Record which metal and which acid you use, and what happens when the lighted splint is applied to the gas produced. What is the name of this gas?
- Which other metals and acids produce the same gas? Write a list of those tested by other groups.
- Your teacher may show you more examples of metals reacting with acids. Add these to your table. Do most metals react with acids in the same way? Explain your answer by referring to your table of results.
- Complete this general word equation in your notebook: Metal + acid → +
- Write a word equation for the reaction between zinc and sulfuric acid.
- Write word equations for the reactions of i) zinc and hydrochloric acid ii) magnesium and sulfuric acid
Downloads
Reactions of metals with acids experiment - student handout
Handout | PDF, Size 95.85 kbReactions of metals with acids experiment - student handout
Editable handout | Word, Size 63.08 kb
Additional information
This is a resource from the Practical Chemistry project, developed by the Nuffield Foundation and the Royal Society of Chemistry.
Practical Chemistry activities accompany Practical Physics and Practical Biology.
© Nuffield Foundation and the Royal Society of Chemistry

No comments yet