


Get started
Watch a demonstration of this experiment and download the technician notes from the Education in Chemistry website: rsc.li/4k3jXCb
Learners come to our classrooms with a variety of pre-existing beliefs about evaporation, boiling and condensation that can inhibit further learning. Indeed, even teachers can have confused ideas. In a study on student teachers in Turkey, many had incorrect mental models of vapour pressure and more than half provided answers that revealed they were using a static model for a liquid–gas system, which did not reflect the dynamic equilibrium at play. The following demonstration is an excellent tool for probing the faulty models our students (and even we teachers) might be using.
Learners come to our classrooms with a variety of pre-existing beliefs about evaporation, boiling and condensation that can inhibit further learning. Indeed, even teachers can have confused ideas. In a study on student teachers in Turkey, many had incorrect mental models of vapour pressure and more than half provided answers that revealed they were using a static model for a liquid–gas system, which did not reflect the dynamic equilibrium at play (rsc.li/3TPjykk). The following pair of demonstrations are excellent tools for probing the faulty models our students (and even we teachers) might be using.
Use this demonstration when teaching changes of state at 11–14 and vaporisation at 16–18.
Kit
- 60 cm3 plastic syringe
- Syringe cap (or short piece of silicone tubing with a Hoffman clip)
- Anti-bumping granules
- Thermometer
- Kettle full of water
Health and safety
- Read our standard health and safety guidance and carry out a risk assessment before running a live demonstration.
- Take care when pouring hot water to avoid spilling it on yourself.
Health and safety
- Read our standard health and safety guidance and carry out a risk assessment before running a live demonstration (rsc.li/45YUM4h)
- Take care when pouring hot water to avoid spilling it on yourself.
Preparation
Remove the plunger from the syringe. Add a few anti-bumping granules and replace the plunger. Heat water in the kettle to 70–80°C. Water closer to boiling point can weaken the tip of the syringe and presents an unnecessary scalding risk, plus the purpose of the demonstration is to show water boiling far from 100°C. Below 70°C, the effect is too subtle to be obvious.
In front of the class
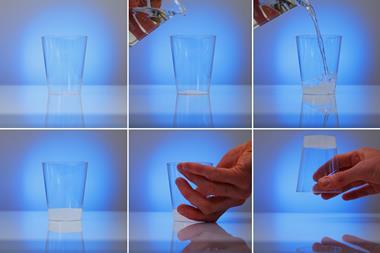
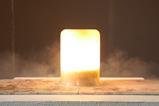
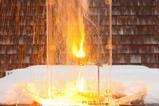
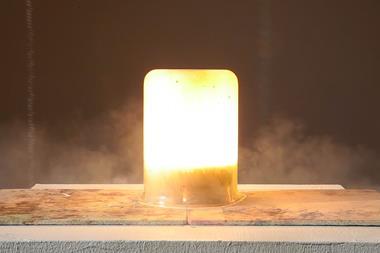
Pour some hot water into a beaker and show the temperature to the class. Ask them if the water is boiling and then if it is evaporating. Most 11–14 year-olds will agree it is not boiling and if you ask them to elaborate, they will say that there are no bubbles. Ask them what you could do to the water to make it boil. Most will suggest (perhaps pointing towards the kettle) that you will need to heat the water. Few will suggest an alternative method.
Turn the kettle on and ask the students to listen. Ask them what they hear. When they can hear bubbling, ask them to consider what is in those bubbles. Many students will claim that the bubbles are full of air. Explain there is another way of making water boil that doesn’t require heating.
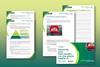
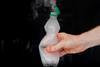
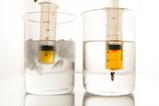
Carefully draw liquid into the syringe until it is about one third full. Invert it and carefully depress the plunger until you have expelled all the air and seal with a syringe cap. Ask the students if there is any air left in the syringe to draw their attention to its absence and finally, holding the syringe vertically, pull back the plunger. Bubbles will stream from the anti-bumping granules.
Remind the class that there is no air in the syringe and ask them what must be in the bubbles. More students will now suggest the correct answer: gaseous water. Ask them again: was the liquid evaporating, was it boiling and did we heat it? Finally, help them to establish that boiling is evaporation with bubbles.
Teaching goal for 11–14
I was inspired to make the sequence above by work demonstrating how functional examples can help students move past misconceptions about evaporating and boiling. A Korean study asked children aged 9–12 about situations associated with boiling and evaporation; 68% (of 11–12 year-olds) misidentified situations where a liquid was heated as boiling and 71% misclassified boiling scenarios where no heating took place as evaporation.
I was inspired to make the sequence above by work demonstrating how functional examples can help students move past misconceptions about evaporating and boiling. A Korean study asked children aged 9–12 about situations associated with boiling and evaporation; 68% (of 11–12 year-olds) misidentified situations where a liquid was heated as boiling and 71% misclassified boiling scenarios where no heating took place as evaporation (rsc.li/3P5szeg).
Even without a submicroscopic model of boiling, learners could understand the difference after the researchers showed water boiling under reduced pressure. 11–14 year-olds need to understand that the vapour in the bubbles needs to push back against the pressure from the atmosphere above, otherwise the bubbles will collapse. Point out to them that the louder, higher-pitched sound of the bubbles when the kettle was heating was the sound of these tiny bubbles collapsing. Only when the vapour pressure approaches atmospheric pressure is the bubble able to maintain its size then grow. This causes the drop in pitch as the kettle approaches the boil.
Teaching goal for 16–18
Vapour pressure comes and goes from 16–18 curriculums – it’s not in the most recent International baccalaureate diploma programme specification and does not currently appear in A-level specifications. However, some A-level specifications require students to solve problems involving partial pressure. For this reason, you can use the above demonstration to reinforce the role of vapour pressure in boiling before you test learners’ understanding of vapour pressure in a syringe with air.
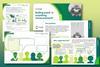
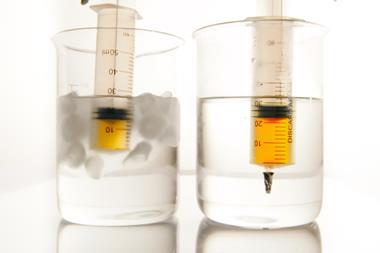
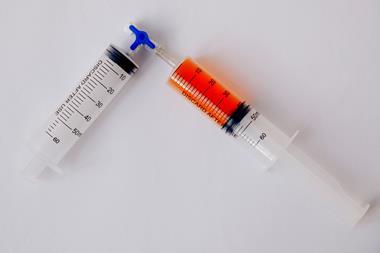
As shown in the Turkish investigation, faulty mental models about vaporisation can persist into adulthood. When researchers asked student teachers to consider the situation in figure 1, 59% gave responses which indicated that they had fixed mental models of vapour pressure (or for A-level teachers, the partial pressure of the water).
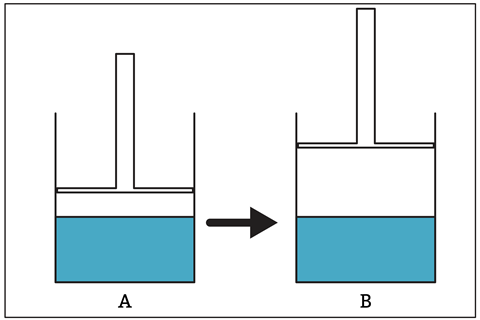
The researchers identified the most common (and incorrect) response as the vapour pressure in A being greater than in B because the vapour volume increases in container B and (by the ideal gas law) pressure and volume are inversely proportional.
As shown in the Turkish investigation, faulty mental models about vaporisation can persist into adulthood. When researchers asked student teachers to compare the vapour pressure in two piston-cylinder devices, 59% gave responses which indicated that they had fixed mental models of vapour pressure (or for A-level teachers, the partial pressure of the water).
The study summarised the most common (and incorrect) response as the vapour pressure with the piston pushed down being greater than in the cylinder with piston pulled up, because the vapour volume increases in the latter container and (by the ideal gas law) pressure and volume are inversely proportional.
The student teachers’ answers suggested they did not consider that the number of vapour particles could and would change as the dynamic equilibrium between the liquid and the vapour shifted. The vapour pressure of a particular liquid depends only on temperature.
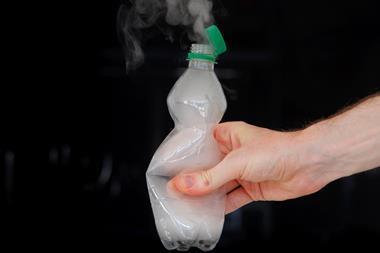
You can test this faulty model further with the Cloud in a bottle demonstration, which impresses all ages.
You can test this faulty model further with the ‘Cloud in a bottle’ demonstration on page 40, which impresses all ages.
Declan Fleming
Downloads
Boiling without heating technician notes
Handout | PDF, Size 0.18 mbBoiling without heating technician notes
Editable handout | Word, Size 0.49 mb
Additional information
Thank you to Pavel (Pasha) Mikhalkov for co-presenting this Exhibition chemistry video.
- Prepare(3)
 Resource
Students’ ideas about changes of state | Beyond appearances
Changes in state need changes in thinking to be understood, explore how to support learners to develop a new way of seeing state changes
 Resource
Improve graph skills for chemistry
A diagnostic exercise, practical and worksheet to assess and boost students’ grasp of graphing
 Course
Particle and atomic models | Self-led course
Strengthen your subject knowledge and discover teaching strategies to develop your learners’ understanding of the particle model and atomic structure
- Deliver(8)
 Class experiment
Supercooling and the energetics of freezing
Explore what happens when a liquid is supercooled and develop learners’ observation skills in this class practical
 Lesson plan
What happens when a substance changes state? | Lesson plan | 11–14 years
Use this lesson plan, complete with scaffolded and unscaffolded student sheets, to secure learners’ understanding of changes of state
 Class experiment
Melting and freezing stearic acid
In this class practical students take the temperature of stearic acid at regular intervals as they heat and cool it. Includes kit list and safety instructions.
 Resource
Melting and boiling | Johnstone’s triangle worksheets | 11–14 years
Develop learners’ understanding of melting and boiling with this worksheet, including a teacher demonstration for learners to observe
 Resource
Melting and boiling points | Developing understanding | 11–14 years
Deepen understanding of melting and boiling points and how these are represented at different conceptual levels of thinking
 Resource
Changes of state | Structure strip | 11–14 years
Use scaffolded prompts to support learners to write about changes of state
 Poster
Evaporation in action
Boost your 11–14 students’ knowledge and understanding of separation techniques with this poster, fact sheet and practical activity
 Poster
The science of melting chocolate
Use this infographic with your 11–14 students to develop their knowledge of changes of state and their graphing skills
- Literacy(3)
 Resource
Particle model | Key terms support | 11–14
Language support pack for particle model, with key terms list, accessible glossary, Frayer models and unscrambling definitions
 Resource
Particle model | Reading comprehension | 11–14 years
Use this reading comprehension based on a real science research news story to develop literacy skills and confidence
 Resource
Particle model | Structured talk | 11–14 years
In this speaking and listening task learners work together to build word bridges, building and sharing understanding by applying the particle model
- Enrich(6)
 Extension
Boiling point: a surprising measurement | Stretch and challenge | 11–14 years
Develop critical thinking skills by guiding learners to evaluate possible explanations for an unexpected experimental result
 Exhibition chemistry
Forming a cloud in a bottle
Explore evaporation, condensation and equilibrium with this quick and easy demonstration
 Class experiment
Rate of evaporation
Use this class practical to measure and compare the rate of evaporation of propanone under different conditions
currently reading
 Exhibition chemistry
Boiling without heating
Overcome common misconceptions about changes of state and vaporisation with water, a syringe and reduced pressure
 Resource
Salt (for cooking) activities | 11–14 years
Uncover the properties and health implications of salt in our diets
 Resource
Making ice | In Search of More Solutions | 11–14 years
Explore the properties of water and ice in this planning activity


No comments yet